You need a license to use CockroachDB; obtain a private offer link on the AWS Marketplace or see CockroachDB Pricing to learn about custom pricing.
Before you begin
Requirements
- You must have locally. This is necessary for generating and managing your deployment’s certificates.
- You must have SSH access to each machine. This is necessary for distributing and starting CockroachDB binaries.
-
Your network configuration must allow TCP communication on the following ports:
26257for intra-cluster and client-cluster communication8080to expose your DB Console
- Carefully review the , including supported hardware and software, and the recommended .
- Do not run multiple node processes on the same VM or machine. This defeats CockroachDB’s replication and causes the system to be a single point of failure. Instead, start each node on a separate VM or machine.
-
To start a node with multiple disks or SSDs, you can use either of these approaches:
-
Configure the disks or SSDs as a single RAID volume, then pass the RAID volume to the
--storeflag when starting thecockroachprocess on the node. -
Provide a separate
--storeflag for each disk when starting thecockroachprocess on the node. For more details about stores, see . If you start a node with multiple--storeflags, it is not possible to scale back down to only using a single store on the node. Instead, you must decommission the node and start a new node with the updated--store.
-
Configure the disks or SSDs as a single RAID volume, then pass the RAID volume to the
-
When starting each node, use the flag to describe the node’s location, for example,
--locality=region=west,zone=us-west-1. The key-value pairs should be ordered from most to least inclusive, and the keys and order of key-value pairs must be the same on all nodes. -
When deploying in a single availability zone:
- To be able to tolerate the failure of any 1 node, use at least 3 nodes with the . In this case, if 1 node fails, each range retains 2 of its 3 replicas, a majority.
- To be able to tolerate 2 simultaneous node failures, use at least 5 nodes and to 5. The replication factor for is 5 by default, so no adjustments are needed for internal data. In this case, if 2 nodes fail at the same time, each range retains 3 of its 5 replicas, a majority.
-
When deploying across multiple availability zones:
-
To be able to tolerate the failure of 1 entire AZ in a region, use at least 3 AZs per region and set
--localityon each node to spread data evenly across regions and AZs. In this case, if 1 AZ goes offline, the 2 remaining AZs retain a majority of replicas. - To ensure that ranges are split evenly across nodes, use the same number of nodes in each AZ. This is to avoid overloading any nodes with excessive resource consumption.
-
To be able to tolerate the failure of 1 entire AZ in a region, use at least 3 AZs per region and set
-
When deploying across multiple regions:
- To be able to tolerate the failure of 1 entire region, use at least 3 regions.
CockroachDB is supported in all AWS regions.
Recommendations
-
Decide how you want to access your DB Console:
- You should have familiarity with configuring the following AWS components:
- All Amazon EC2 instances running CockroachDB should be members of the same security group. For an example, see AWS architecture.
- Follow the AWS IAM best practices to harden the AWS environment. Use to grant access to the deployment, following a policy of least privilege.
- The AWS root user is not necessary.
- Review the AWS Config service limits and contact AWS support to request a quota increase, if necessary.
AWS architecture
In this basic deployment, 3 CockroachDB nodes are each deployed on an Amazon EC2 instance across 3 availability zones. These are grouped within a single VPC and security group. Users are routed to the cluster via Amazon Route 53 (which is not used in this tutorial) and a load balancer.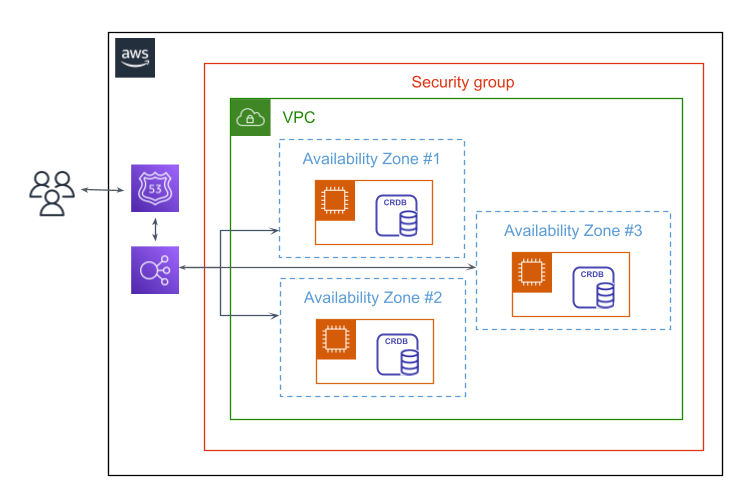
Step 1. Create instances
Open the Amazon EC2 console and launch an instance for each node you plan to have in your cluster. If you plan to run our sample workload against the cluster, create a separate instance for that workload.- Run at least 3 nodes to ensure survivability.
- Your instances will rely on Amazon Time Sync Service for clock synchronization. When choosing an AMI, note that some machines are preconfigured to use Amazon Time Sync Service (e.g., Amazon Linux AMIs) and others are not.
-
Use general-purpose
m6iorm6aVMs with SSD-backed EBS volumes. For example, Cockroach Labs has usedm6i.2xlargefor performance benchmarking. If your workload requires high throughput, use network-optimizedm5ninstances. To simulate bare-metal deployments, usem5dwith SSD Instance Store volumes.m5andm5ainstances, and compute-optimizedc5,c5a, andc5ninstances, are also acceptable.
Do not use burstable performance instances, which limit the load on a single core.
- Note the ID of the VPC you select. You will need to look up its IP range when setting inbound rules for your security group.
-
Make sure all your instances are in the same security group.
- If you are creating a new security group, add the inbound rules from the next step. Otherwise note the ID of the security group.
-
When creating the instance, you will be prompted to specify an EC2 key pair. For more information on key pairs, see the AWS documentation. These are used to securely connect to your instances and should be encrypted (e.g.,
ssh-keygen -p -f $keypairfilein Linux).
Step 2. Configure your network
Add Custom TCP inbound rules to your security group to allow TCP communication on two ports:26257for inter-node and client-node communication. This enables the nodes to work as a cluster, the load balancer to route traffic to the nodes, and applications to connect to the load balancer.8080for exposing the DB Console to the user, and for routing the load balancer to the health check endpoint.
Inter-node and load balancer-node communication
Application data
DB Console
You can set your network IP by selecting “My IP” in the Source field.
Load balancer-health check communication
To get the IP range of a VPC, open the Amazon VPC console and find the VPC listed in the section called Your VPCs.
Load balancer-health check communication
To get the IP range of a VPC, open the Amazon VPC console and find the VPC listed in the section called Your VPCs.
Step 3. Synchronize clocks
CockroachDB requires moderate levels of to preserve data consistency. For this reason, when a node detects that its clock is out of sync with at least half of the other nodes in the cluster by 80% of the maximum offset allowed (500ms by default), it spontaneously shuts down. This avoids the risk of consistency anomalies, but it’s best to prevent clocks from drifting too far in the first place by running clock synchronization software on each node.ntpd should keep offsets in the single-digit milliseconds, so that software is featured here, but other methods of clock synchronization are suitable as well.
- SSH to the first machine.
-
Disable
timesyncd, which tends to be active by default on some Linux distributions:Verify thattimesyncdis off:Look forNetwork time on: noorNTP enabled: noin the output. -
Install the
ntppackage: -
Stop the NTP daemon:
-
Sync the machine’s clock with Google’s NTP service:
To make this change permanent, in the
/etc/ntp.conffile, remove or comment out any lines starting withserverorpooland add the following lines:Restart the NTP daemon:
We recommend Google’s NTP service because it handles “smearing” the leap second. If you use a different NTP service that doesn’t smear the leap second, be sure to configure client-side smearing in the same way on each machine. See the for details.
-
Verify that the machine is using a Google NTP server:
The active NTP server will be marked with an asterisk.
- Repeat these steps for each machine where a CockroachDB node will run.
pool.ntp.org, will handle the leap second. Therefore, you should:
- Configure each GCE instance to use Google’s internal NTP service.
- If you plan to run a hybrid cluster across GCE and other cloud providers or environments, note that all of the nodes must be synced to the same time source, or to different sources that implement leap second smearing in the same way. See the for details.
- Configure each AWS instance to use the internal Amazon Time Sync Service.
- Per the above instructions, ensure that
etc/chrony.confon the instance contains the lineserver 169.254.169.123 prefer iburst minpoll 4 maxpoll 4and that otherserverorpoollines are commented out. - To verify that Amazon Time Sync Service is being used, run
chronyc sources -vand check for a line containing* 169.254.169.123. The*denotes the preferred time server.
- Per the above instructions, ensure that
- If you plan to run a hybrid cluster across GCE and other cloud providers or environments, note that all of the nodes must be synced to the same time source, or to different sources that implement leap second smearing in the same way. See the for details.
ntpd should keep offsets in the single-digit milliseconds, so that software is featured here. However, to run ntpd properly on Azure VMs, it’s necessary to first unbind the Time Synchronization device used by the Hyper-V technology running Azure VMs; this device aims to synchronize time between the VM and its host operating system but has been known to cause problems.
- SSH to the first machine.
-
Find the ID of the Hyper-V Time Synchronization device:
-
Unbind the device, using the
Device_IDfrom the previous command’s output: -
Install the
ntppackage: -
Stop the NTP daemon:
-
Sync the machine’s clock with Google’s NTP service:
To make this change permanent, in the
/etc/ntp.conffile, remove or comment out any lines starting withserverorpooland add the following lines:Restart the NTP daemon:We recommend Google’s NTP service because it handles “smearing” the leap second. If you use a different NTP service that doesn’t smear the leap second, be sure to configure client-side smearing in the same way on each machine. See the for details. -
Verify that the machine is using a Google NTP server:
The active NTP server will be marked with an asterisk.
- Repeat these steps for each machine where a CockroachDB node will run.
Step 4. Set up load balancing
Each CockroachDB node is an equally suitable SQL gateway to your cluster, but to ensure client performance and reliability, it’s important to use load balancing:- Performance: Load balancers spread client traffic across nodes. This prevents any one node from being overwhelmed by requests and improves overall cluster performance (queries per second).
- Reliability: Load balancers decouple client health from the health of a single CockroachDB node. In cases where a node fails, the load balancer redirects client traffic to available nodes.
- Add AWS load balancing. Be sure to:
- Select a Network Load Balancer and use the ports we specify below.
- Select the VPC and all availability zones of your instances. This is important, as you cannot change the availability zones once the load balancer is created. The availability zone of an instance is determined by its subnet, found by inspecting the instance in the Amazon EC2 Console.
- Set the load balancer port to 26257.
- Create a new target group that uses TCP port 26257. Traffic from your load balancer is routed to this target group, which contains your instances.
- Configure health checks to use HTTP port 8080 and path
/health?ready=1. This ensures that load balancers do not direct traffic to nodes that are live but not ready to receive requests. - Register your instances with the target group you created, specifying port 26257. You can add and remove instances later.
- To test load balancing and connect your application to the cluster, you will need the provisioned internal (private) IP address for the load balancer. To find this, open the Network Interfaces section of the Amazon EC2 console and look up the load balancer by its name.
Step 5. Generate certificates
You can usecockroach cert commands or to generate security certificates. This section features the cockroach cert commands.
Locally, you’ll need to :
- A certificate authority (CA) key pair (
ca.crtandca.key). - A node key pair for each node, issued to its IP addresses and any common names the machine uses, as well as to the IP addresses and common names for machines running load balancers.
- A client key pair for the
rootuser. You’ll use this to run a sample workload against the cluster as well as somecockroachclient commands from your local machine.
- on your local machine, if you haven’t already.
-
Create two directories:
certs: You’ll generate your CA certificate and all node and client certificates and keys in this directory and then upload some of the files to your nodes.my-safe-directory: You’ll generate your CA key in this directory and then reference the key when generating node and client certificates. After that, you’ll keep the key safe and secret; you will not upload it to your nodes.
-
Create the CA certificate and key:
-
Create the certificate and key for the first node, issued to all common names you might use to refer to the node as well as to the load balancer instances:
-
Upload the CA certificate and node certificate and key to the first node:
gcloud compute ssh associates your public SSH key with the GCP project and is only needed when connecting to the first node. See the GCP docs for more details.-
Delete the local copy of the node certificate and key:
This is necessary because the certificates and keys for additional nodes will also be named
node.crt and node.key. As an alternative to deleting these files, you can run the next cockroach cert create-node commands with the --overwrite flag.-
Create the certificate and key for the second node, issued to all common names you might use to refer to the node as well as to the load balancer instances:
-
Upload the CA certificate and node certificate and key to the second node:
- Repeat steps 6 - 8 for each additional node.
-
Create a client certificate and key for the
rootuser: -
Upload the CA certificate and client certificate and key to the machine where you will run a sample workload:
In later steps, you’ll also use the
rootuser’s certificate to run client commands from your local machine. If you might also want to runcockroachclient commands directly on a node (e.g., for local debugging), you’ll need to copy therootuser’s certificate and key to that node as well.
On accessing the DB Console in a later step, your browser will consider the CockroachDB-created certificate invalid and you’ll need to click through a warning message to get to the UI. You can avoid this issue by .
Step 6. Start nodes
You can start the nodes manually or automate the process using systemd. For each initial node of your cluster, complete the following steps:After completing these steps, nodes will not yet be live. They will complete the startup process and join together to form a cluster as soon as the cluster is initialized in the next step.
- Visit and download the full binary of CockroachDB to the node.
- On the node, follow the instructions to .
-
Run the command:
This command primes the node to start, using the following flags:When deploying across multiple datacenters, or when there is otherwise high latency between nodes, it is recommended to set
--localityas well. For more details, see . For other flags not explicitly set, the command uses default values. For example, the node stores data in--store=cockroach-dataand binds DB Console HTTP requests to--http-addr=<node1 address:8080. To set these options manually, see . - Repeat these steps for each additional node that you want in your cluster.
-
SSH to the machine where you want the node to run. Ensure you are logged in as the
rootuser. -
Download the CockroachDB archive for Linux, and extract the binary:
-
Copy the binary into the
PATH:If you get a permissions error, prefix the command withsudo. -
CockroachDB uses custom-built versions of the libraries. Copy these libraries to the location where CockroachDB expects to find them:
If you get a permissions error, prefix the command with
sudo. -
Create the Cockroach directory:
-
Create a Unix user named
cockroach: -
Move the
certsdirectory to thecockroachdirectory. -
Change the ownership of the
cockroachdirectory to the usercockroach: -
Download the sample configuration template and save the file in the
/etc/systemd/system/directory:Alternatively, you can create the file yourself and copy the script into it: -
In the sample configuration template, specify values for the following flags:
When deploying across multiple datacenters, or when there is otherwise high latency between nodes, it is recommended to set
--localityas well. For more details, see . For other flags not explicitly set, the command uses default values. For example, the node stores data in--store=cockroach-dataand binds DB Console HTTP requests to--http-addr=localhost:8080. To set these options manually, see . -
Start the CockroachDB cluster:
-
Configure
systemdto start CockroachDB automatically after a reboot: - Repeat these steps for each additional node that you want in your cluster.
systemd handles node restarts in case of node failure. To stop a node without systemd restarting it, run systemctl stop securecockroachdbStep 7. Initialize the cluster
On your local machine, run the command to complete the node startup process and have them join together as a cluster:Step 8. Test your cluster
CockroachDB replicates and distributes data behind-the-scenes and uses a Gossip protocol to enable each node to locate data across the cluster. Once a cluster is live, any node can be used as a SQL gateway. When using a load balancer, you should issue commands directly to the load balancer, which then routes traffic to the nodes. Use the locally as follows:-
On your local machine, launch the built-in SQL client, with the
--hostflag set to the address of the load balancer: -
Create a
securenodetestdatabase: -
View the cluster’s databases, which will include
securenodetest: -
Use
\qto exit the SQL shell.
Step 9. Run a sample workload
CockroachDB comes with a number of for simulating client traffic. This step features CockroachDB’s version of the TPC-C workload.Be sure that you have configured your network to allow traffic from the application to the load balancer. In this case, you will run the sample workload on one of your machines. The traffic source should therefore be the internal (private) IP address of that machine.
-
SSH to the machine where you want to run the sample TPC-C workload.
This should be a machine that is not running a CockroachDB node, and it should already have a
certsdirectory containingca.crt,client.root.crt, andclient.root.keyfiles. -
Download the CockroachDB archive for Linux, and extract the binary:
-
Copy the binary into the
PATH:If you get a permissions error, prefix the command withsudo. -
Use the command to load the initial schema and data, pointing it at the IP address of the load balancer:
-
Use the
cockroach workloadcommand to run the workload for 10 minutes:You’ll see per-operation statistics print to standard output every second:After the specified duration (10 minutes in this case), the workload will stop and you’ll see totals printed to standard output:
-
To monitor the load generator’s progress, open the by pointing a browser to the address in the
adminfield in the standard output of any node on startup. Since the load generator is pointed at the load balancer, the connections will be evenly distributed across nodes. To verify this, click Metrics on the left, select the SQL dashboard, and then check the SQL Connections graph. You can use the Graph menu to filter the graph for specific nodes.
Step 10. Monitor the cluster
In the Target Groups section of the Amazon EC2 console, check the health of your instances by inspecting your target group and opening the Targets tab. Despite CockroachDB’s various , it is critical to actively monitor the overall health and performance of a cluster running in production and to create alerting rules that promptly send notifications when there are events that require investigation or intervention. For details about available monitoring options and the most important events and metrics to alert on, see .Step 11. Scale the cluster
Before adding a new node, create a new instance as you did earlier. Then generate and upload a certificate and key for the new node. You can start the nodes manually or automate the process using systemd. For each additional node you want to add to the cluster, complete the following steps:- SSH to the machine where you want the node to run.
-
Download the CockroachDB archive for Linux, and extract the binary:
-
Copy the binary into the
PATH:If you get a permissions error, prefix the command withsudo. -
Run the command, passing the new node’s address as the
--advertise-addrflag and pointing--jointo the three existing nodes (also include--localityif you set it earlier). - Update your load balancer to recognize the new node.
-
SSH to the machine where you want the node to run. Ensure you are logged in as the
rootuser. -
Download the CockroachDB archive for Linux, and extract the binary:
-
Copy the binary into the
PATH:If you get a permissions error, prefix the command withsudo. -
Create the Cockroach directory:
-
Create a Unix user named
cockroach: -
Move the
certsdirectory to thecockroachdirectory. -
Change the ownership of the
cockroachdirectory to the usercockroach: -
Download the sample configuration template:
Alternatively, you can create the file yourself and copy the script into it:Save the file in the
/etc/systemd/system/directory. -
Customize the sample configuration template for your deployment:
Specify values for the following flags in the sample configuration template:
- Repeat these steps for each additional node that you want in your cluster.
Step 12. Use the database
Now that your deployment is working, you can:- .
- and .
- . Be sure to connect your application to the load balancer, not to a CockroachDB node.
- of your data.
When running a cluster of 5 nodes or more, it’s safest to to 5, even if you do not do so for user data. For the cluster as a whole to remain available, the ranges for this internal data must always retain a majority of their replicas.