
This page walks you through a simple demonstration of how CockroachDB remains available during, and recovers after, failure. Starting with a 6-node local cluster with the default 3-way replication, you'll run a sample workload, stop a node to simulate failure, and see how the cluster continues uninterrupted. You'll then leave that node offline for long enough to watch the cluster repair itself by re-replicating missing data to other nodes. You'll then prepare the cluster for 2 simultaneous node failures by increasing to 5-way replication, then take two nodes offline at the same time, and again see how the cluster continues uninterrupted.
Before you begin
Make sure you have already installed CockroachDB.
Step 1. Start a 6-node cluster
Use the
cockroach startcommand to start 6 nodes:$ cockroach start \ --insecure \ --store=fault-node1 \ --listen-addr=localhost:26257 \ --http-addr=localhost:8080 \ --join=localhost:26257,localhost:26258,localhost:26259 \ --background$ cockroach start \ --insecure \ --store=fault-node2 \ --listen-addr=localhost:26258 \ --http-addr=localhost:8081 \ --join=localhost:26257,localhost:26258,localhost:26259 \ --background$ cockroach start \ --insecure \ --store=fault-node3 \ --listen-addr=localhost:26259 \ --http-addr=localhost:8082 \ --join=localhost:26257,localhost:26258,localhost:26259 \ --background$ cockroach start \ --insecure \ --store=fault-node4 \ --listen-addr=localhost:26260 \ --http-addr=localhost:8083 \ --join=localhost:26257,localhost:26258,localhost:26259 \ --background$ cockroach start \ --insecure \ --store=fault-node5 \ --listen-addr=localhost:26261 \ --http-addr=localhost:8084 \ --join=localhost:26257,localhost:26258,localhost:26259 \ --background$ cockroach start \ --insecure \ --store=fault-node6 \ --listen-addr=localhost:26262 \ --http-addr=localhost:8085 \ --join=localhost:26257,localhost:26258,localhost:26259 \ --backgroundUse the
cockroach initcommand to perform a one-time initialization of the cluster:$ cockroach init \ --insecure \ --host=localhost:26257
Step 2. Set up load balancing
In this module, you'll run a sample workload to simulate multiple client connections. Each node is an equally suitable SQL gateway for the load, but it's always recommended to spread requests evenly across nodes. You'll use the open-source HAProxy load balancer to do that here.
Install HAProxy.
If you're on a Mac and use Homebrew, run:
$ brew install haproxyIf you're using Linux and use apt-get, run:
$ sudo apt-get install haproxyRun the
cockroach gen haproxycommand, specifying the port of any node:$ cockroach gen haproxy \ --insecure \ --host=localhost \ --port=26257This command generates an
haproxy.cfgfile automatically configured to work with the nodes of your running cluster.In
haproxy.cfg, changebind :26257tobind :26000. This changes the port on which HAProxy accepts requests to a port that is not already in use by a node.sed -i.saved 's/^ bind :26257/ bind :26000/' haproxy.cfgStart HAProxy, with the
-fflag pointing to thehaproxy.cfgfile:$ haproxy -f haproxy.cfg &
Step 3. Run a sample workload
Now that you have a load balancer running in front of your cluster, use the cockroach workload command to run CockroachDB's built-in version of the YCSB benchmark, simulating multiple client connections, each performing mixed read/write operations.
Load the initial
ycsbschema and data, pointing it at HAProxy's port:$ cockroach workload init ycsb --splits=50 \ 'postgresql://root@localhost:26000?sslmode=disable'The
--splitsflag tells the workload to manually split ranges a number of times. This is not something you'd normally do, but for the purpose of this tutorial, it makes it easier to visualize the movement of data in the cluster.Run the
ycsbworkload, pointing it at HAProxy's port:$ cockroach workload run ycsb \ --duration=20m \ --concurrency=3 \ --max-rate=1000 \ --tolerate-errors \ 'postgresql://root@localhost:26000?sslmode=disable'This command initiates 3 concurrent client workloads for 20 minutes, but limits the total load to 1000 operations per second (since you're running everything on a single machine).
You'll see per-operation statistics print to standard output every second:
_elapsed___errors__ops/sec(inst)___ops/sec(cum)__p50(ms)__p95(ms)__p99(ms)_pMax(ms) 1.0s 0 902.8 930.9 1.1 2.1 4.1 62.9 read 1.0s 0 46.5 48.0 3.4 4.7 6.0 6.0 update 2.0s 0 923.3 926.9 1.0 2.9 5.5 8.9 read 2.0s 0 38.0 43.0 3.0 6.0 7.6 7.6 update 3.0s 0 901.1 918.3 1.1 2.5 5.0 6.6 read 3.0s 0 55.0 47.0 3.4 7.9 9.4 11.5 update 4.0s 0 948.9 926.0 1.0 1.6 2.6 5.0 read 4.0s 0 46.0 46.7 3.1 5.2 16.8 16.8 update 5.0s 0 932.0 927.2 1.1 1.8 2.9 13.6 read 5.0s 0 56.0 48.6 3.0 4.2 5.2 5.5 update ...After the specified duration (20 minutes in this case), the workload will stop and you'll see totals printed to standard output.
Step 4. Check the workload
Initially, the workload creates a new database called ycsb, creates a usertable table in that database, and inserts a bunch of rows into the table. Soon, the load generator starts executing approximately 95% reads and 5% writes.
Go to the Admin UI at http://localhost:8080.
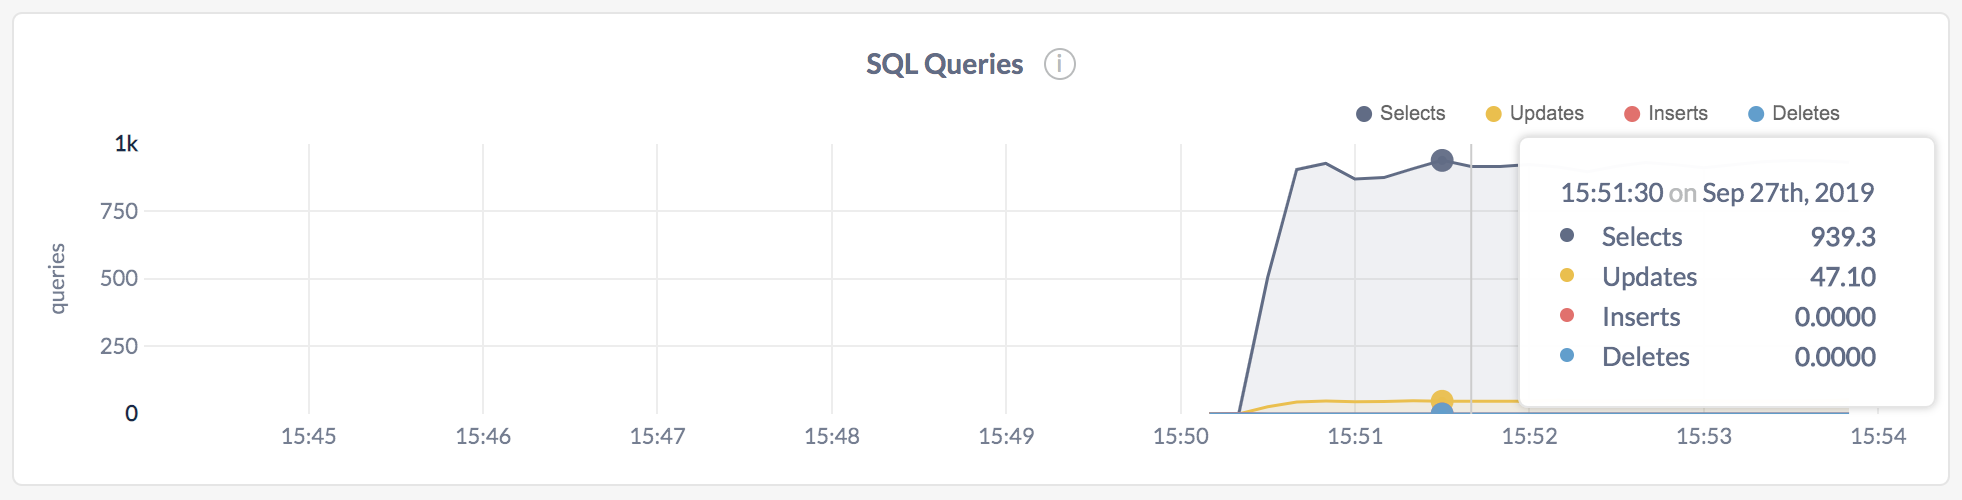
To check the SQL queries getting executed, click Metrics on the left, and hover over the SQL Queries graph at the top:
To check the client connections from the load generator, select the SQL dashboard and hover over the SQL Connections graph:
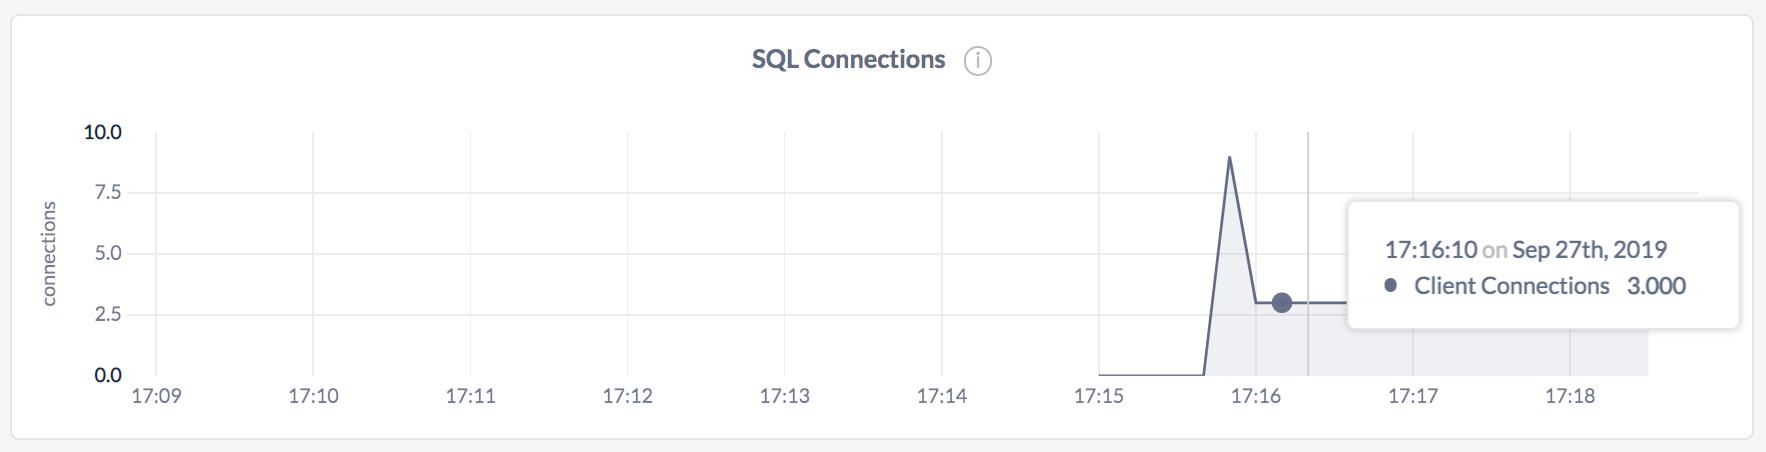
You'll notice 3 client connections from the load generator. If you want to check that HAProxy balanced each connection to a different node, you can change the Graph dropdown from Cluster to specific nodes.
To see more details about the
ycsbdatabase andusertabletable, click Databases in the upper left and then scroll down until you see ycsb: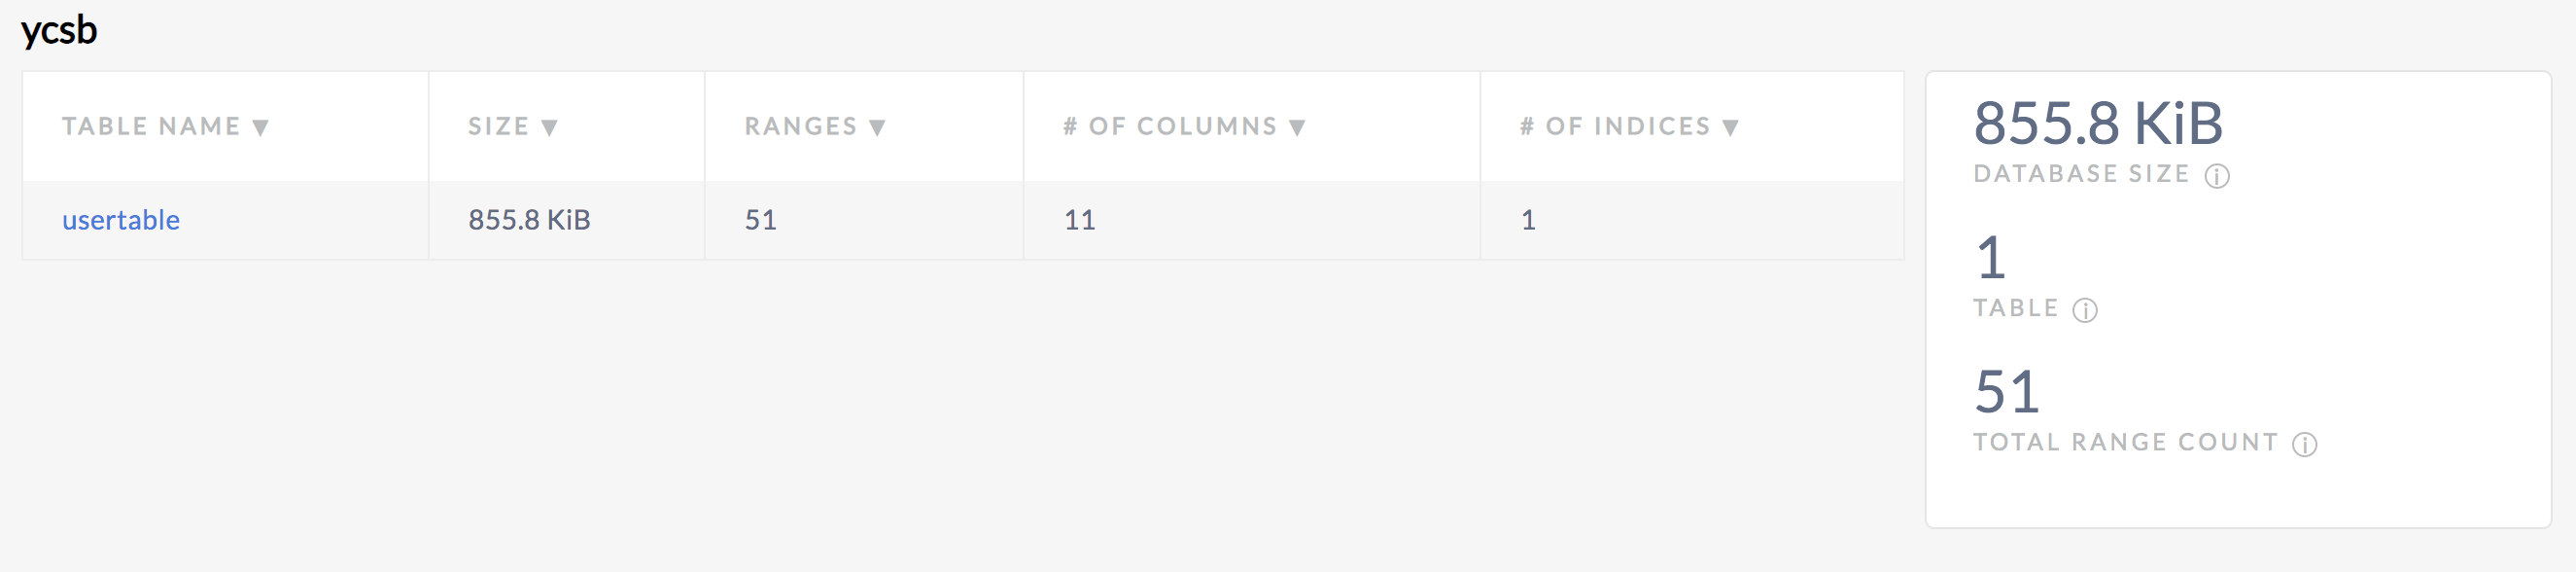
You can also view the schema of the
usertableby clicking the table name: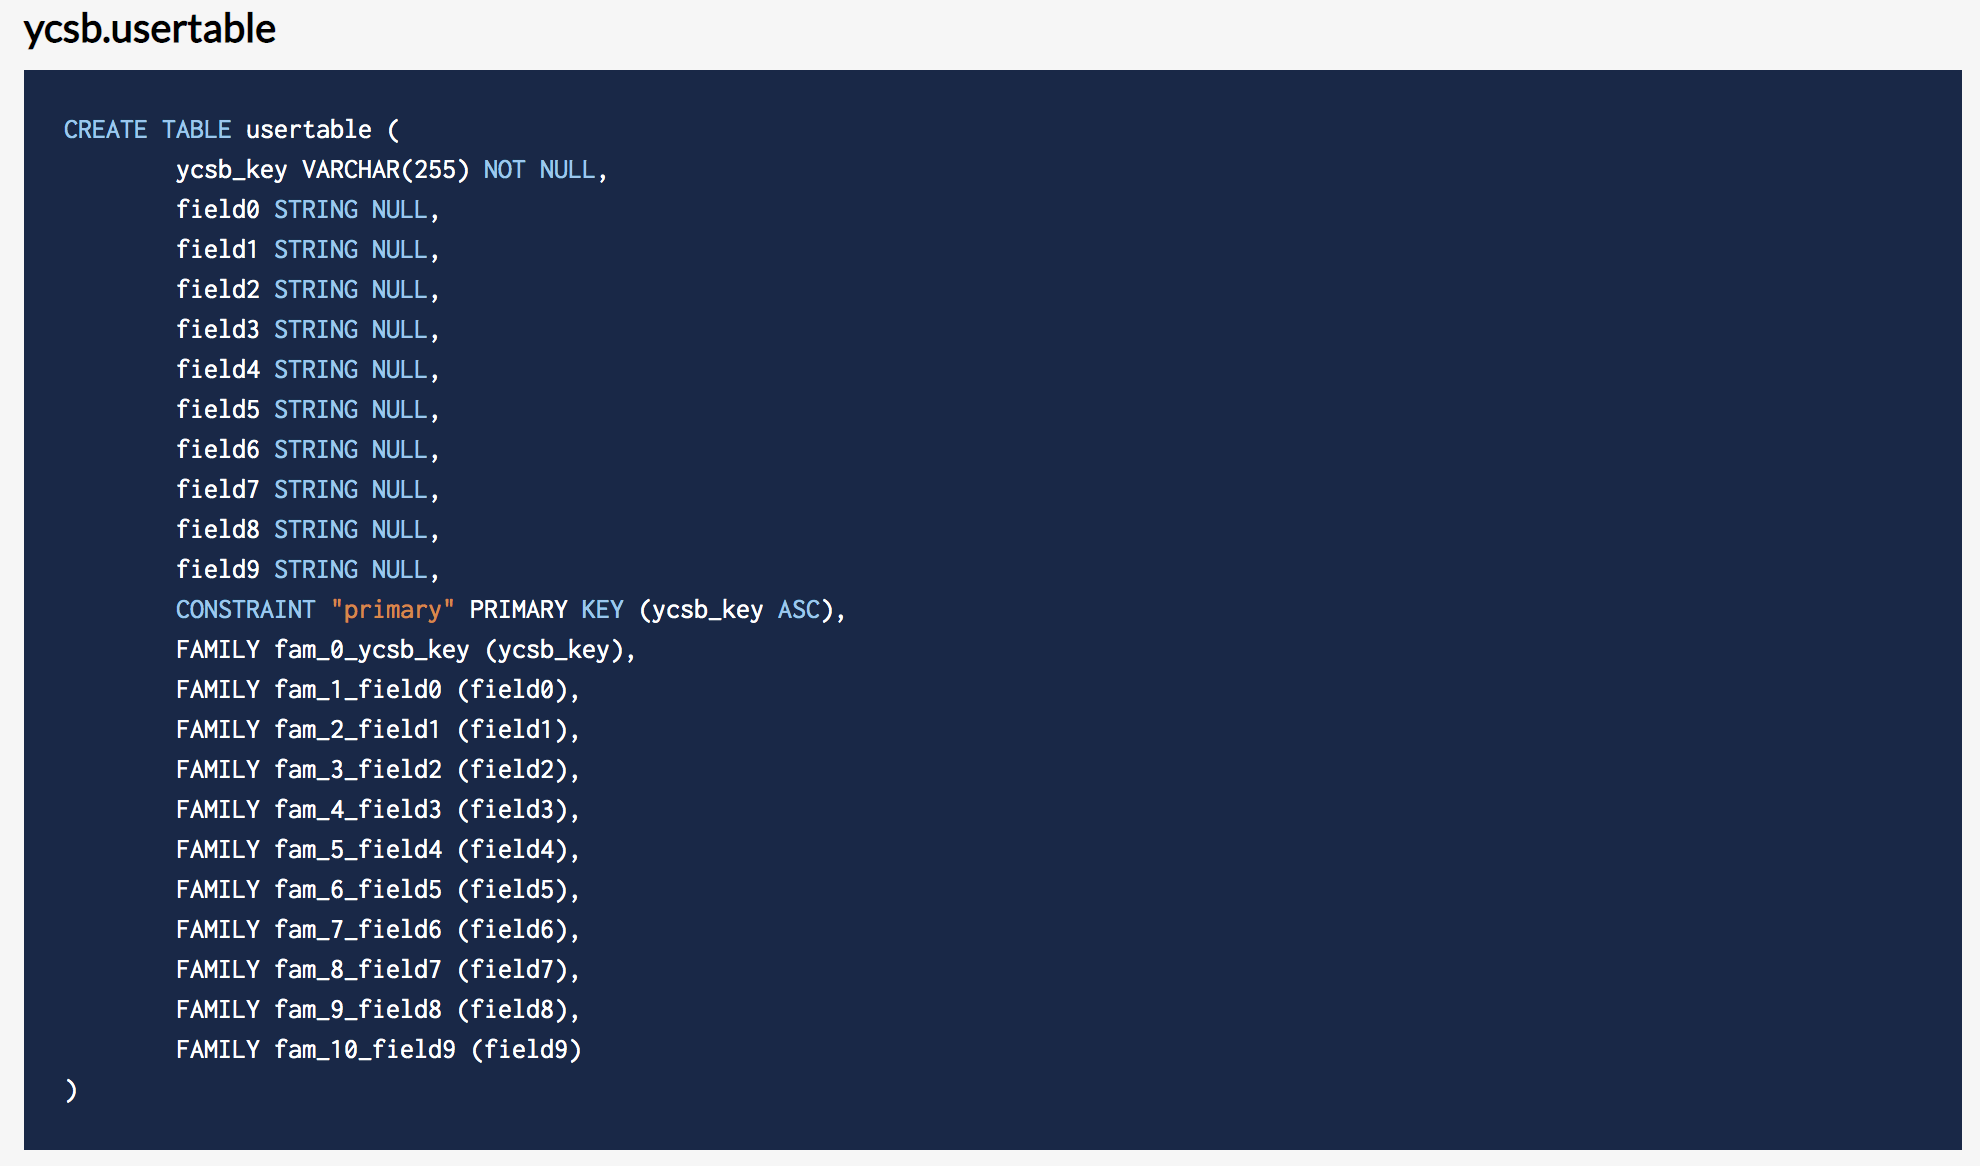
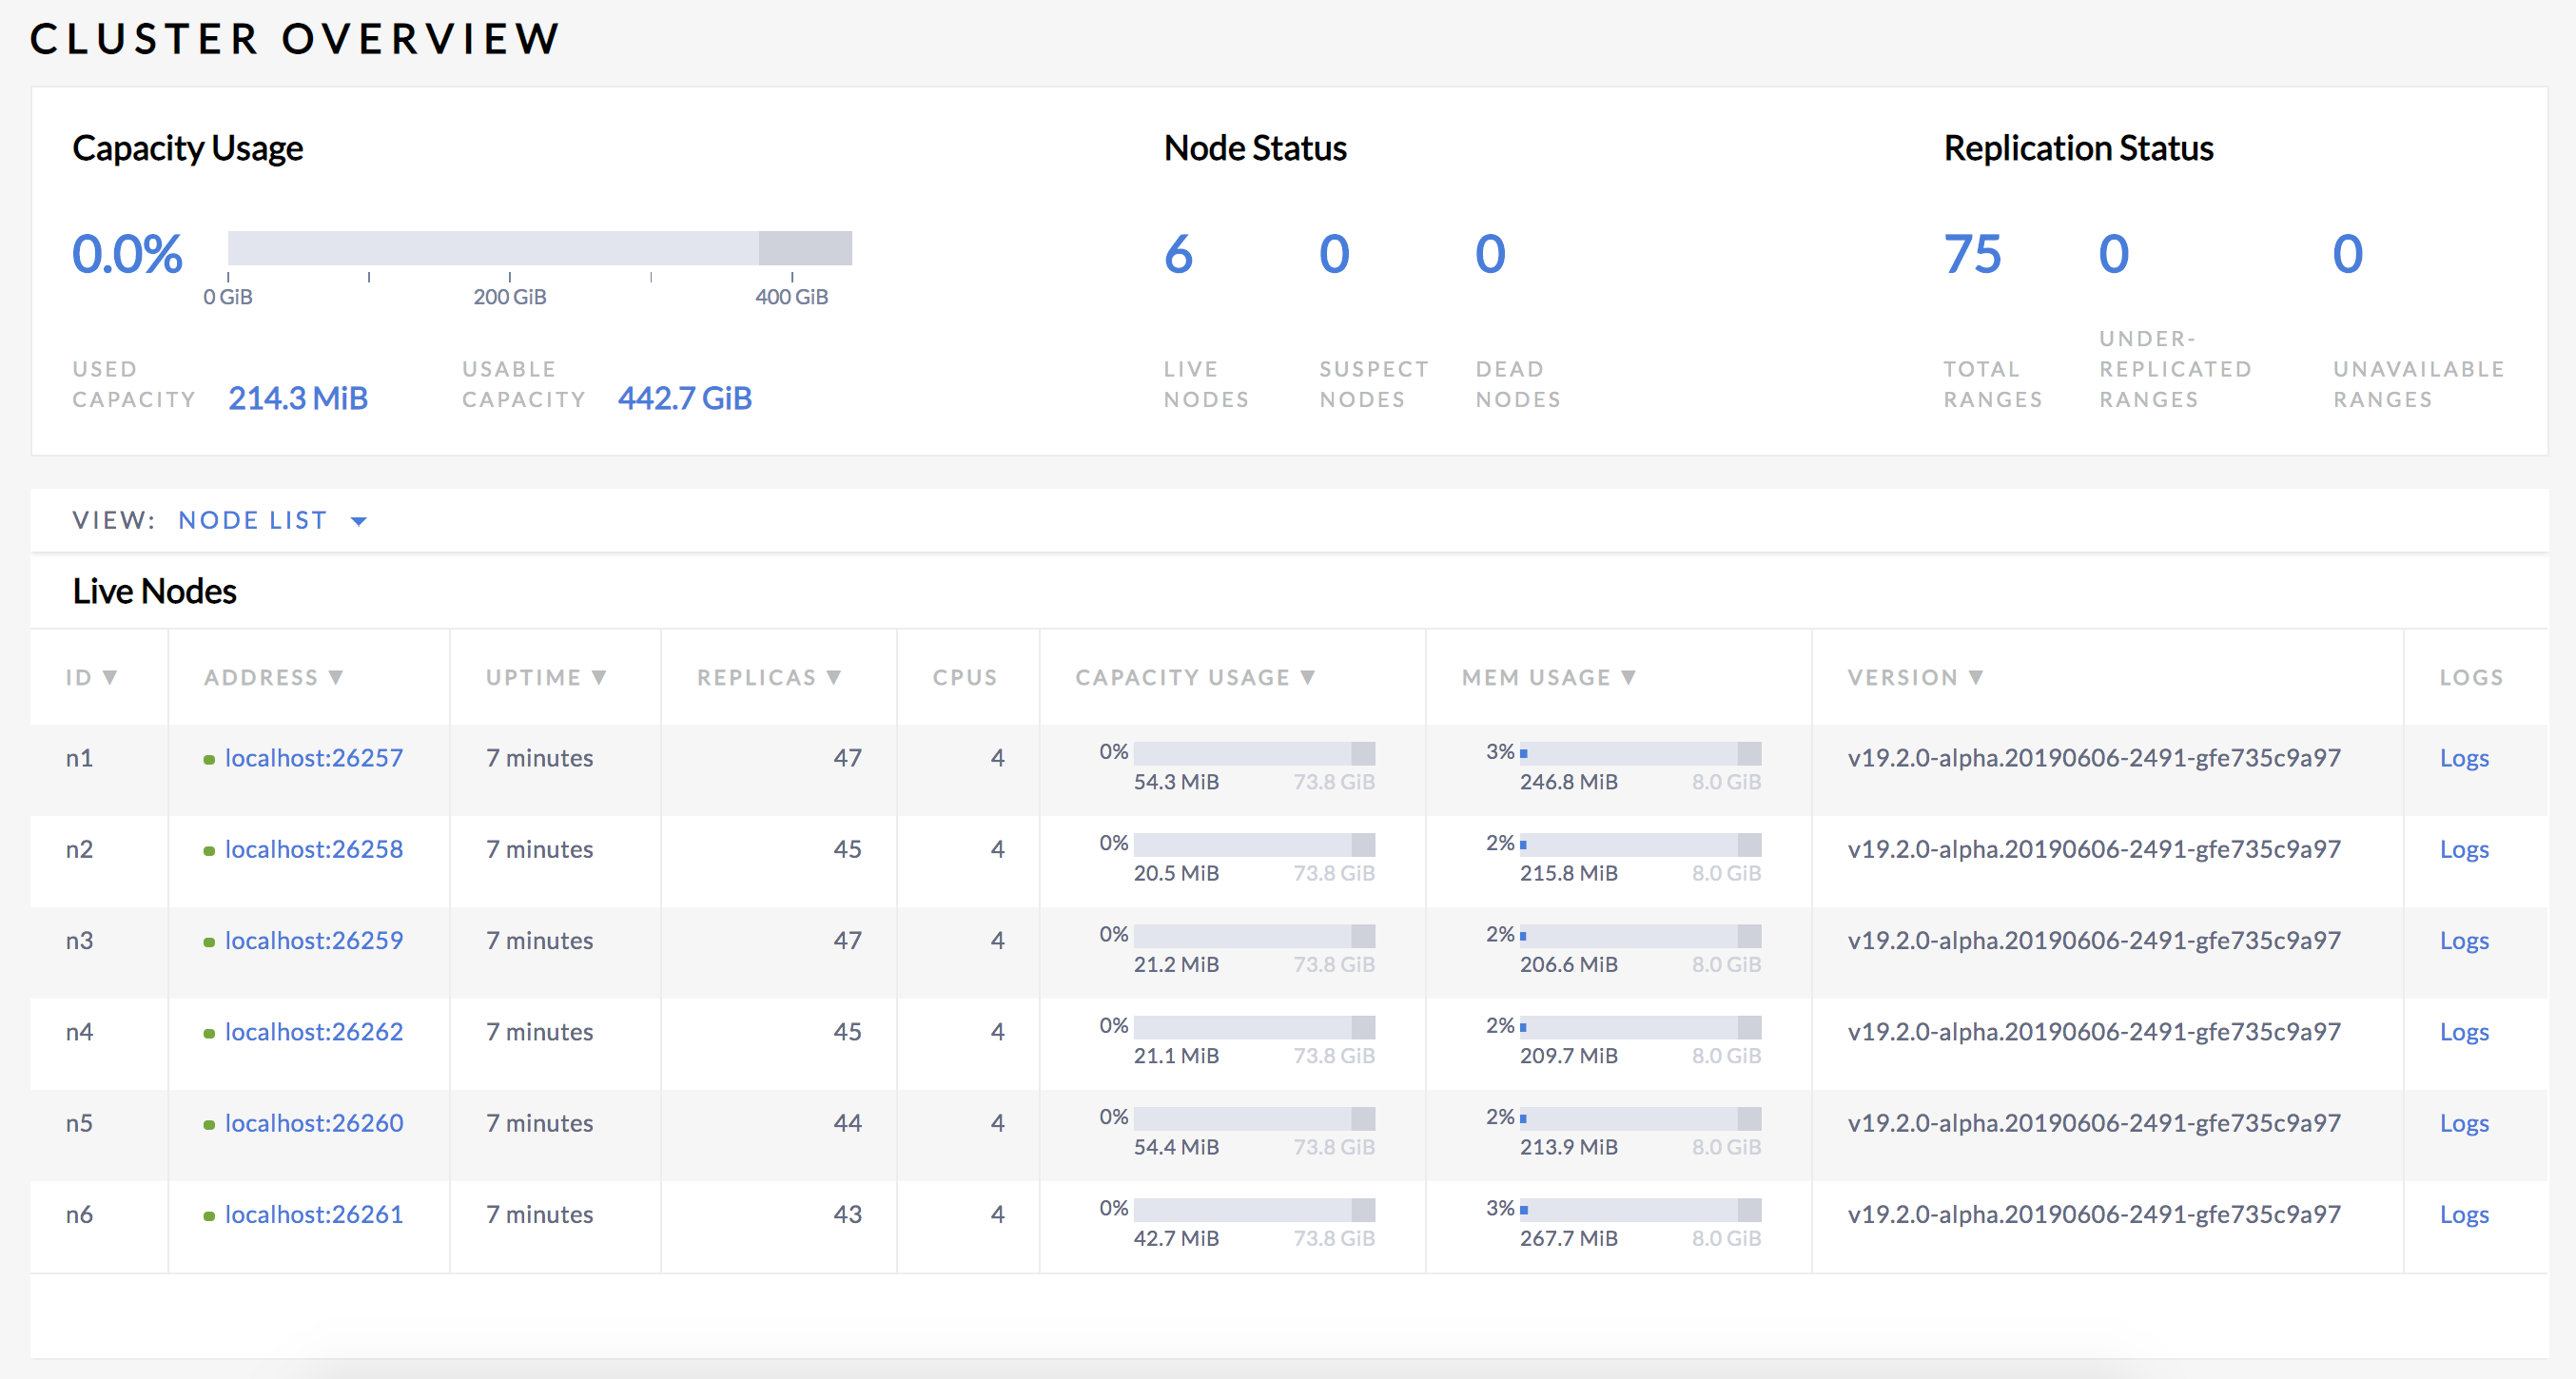
By default, CockroachDB replicates all data 3 times and balances it across all nodes. To see this balance, click Overview and check the replica count across all nodes:
Step 5. Simulate a single node failure
When a node fails, the cluster waits for the node to remain offline for 5 minutes by default before considering it dead, at which point the cluster automatically repairs itself by re-replicating any of the replicas on the down nodes to other available nodes.
In a new terminal, edit the default replication zone to reduce the amount of time the cluster waits before considering a node dead to the minimum allowed of 1 minute and 15 seconds:
$ cockroach sql \ --insecure \ --host=localhost:26000 \ --execute="SET CLUSTER SETTING server.time_until_store_dead = '1m15s';"Then use the
cockroach quitcommand to stop a node:$ cockroach quit \ --insecure \ --host=localhost:26261
Step 6. Check load continuity and cluster health
Go back to the Admin UI, click Metrics on the left, and verify that the cluster as a whole continues serving data, despite one of the nodes being unavailable and marked as Suspect:

This shows that when all ranges are replicated 3 times (the default), the cluster can tolerate a single node failure because the surviving nodes have a majority of each range's replicas (2/3).
Step 7. Watch the cluster repair itself
Click Overview on the left:
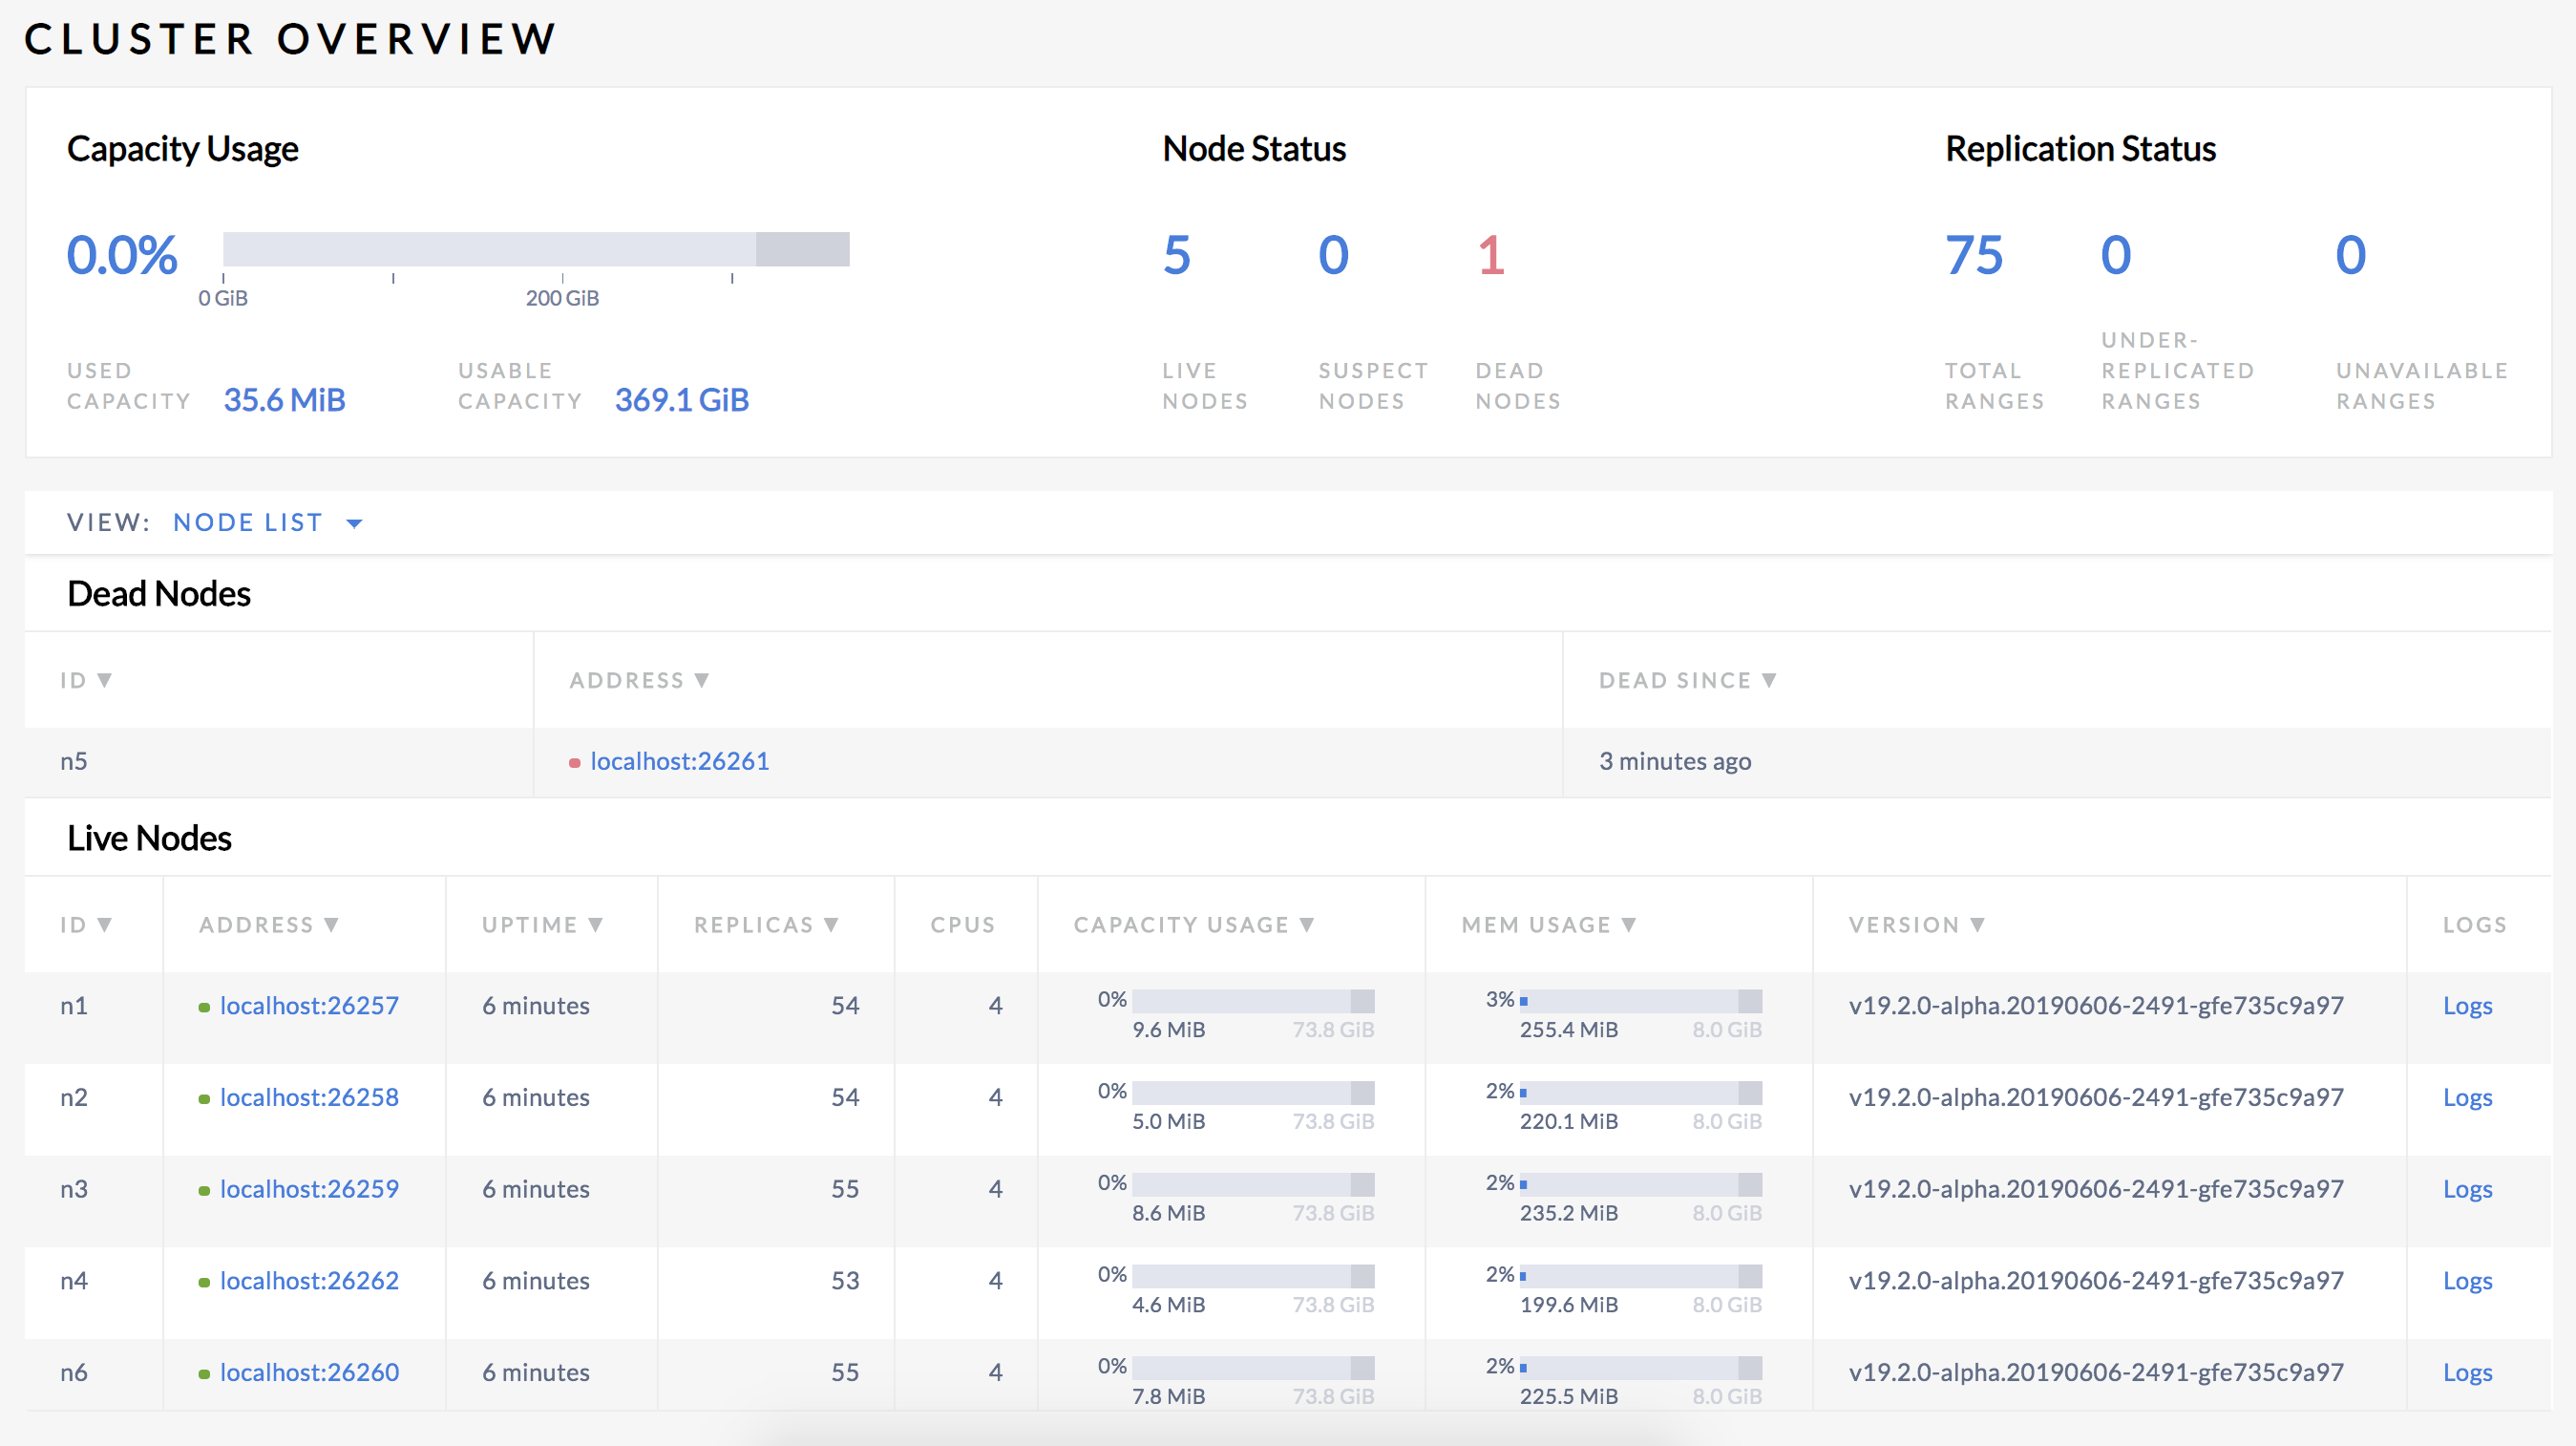
Because you reduced the time it takes for the cluster to consider the down node dead, after 1 minute or so, the cluster will consider the down node "dead", and you'll see the replica count on the remaining nodes increase and the number of under-replicated ranges decrease to 0. This shows the cluster repairing itself by re-replicating missing replicas.
Step 8. Prepare for two simultaneous node failures
At this point, the cluster has recovered and is ready to handle another failure. However, the cluster cannot handle two near-simultaneous failures in this configuration. Failures are "near-simultaneous" if they are closer together than the server.time_until_store_dead cluster setting plus the time taken for the number of replicas on the dead node to drop to zero. If two failures occurred in this configuration, some ranges would become unavailable until one of the nodes recovers.
To be able to tolerate 2 of 5 nodes failing simultaneously without any service interruption, ranges must be replicated 5 times.
Restart the dead node, using the same command you used to start the node initially:
$ cockroach start \ --insecure \ --store=fault-node5 \ --listen-addr=localhost:26261 \ --http-addr=localhost:8084 \ --join=localhost:26257,localhost:26258,localhost:26259 \ --backgroundUse the
ALTER RANGE ... CONFIGURE ZONEcommand to change the cluster'sdefaultreplication factor to 5:$ cockroach sql --execute="ALTER RANGE default CONFIGURE ZONE USING num_replicas=5;" --insecure --host=localhost:26000Back in the Admin UI Overview dashboard, watch the replica count increases and even out across all 6 nodes:
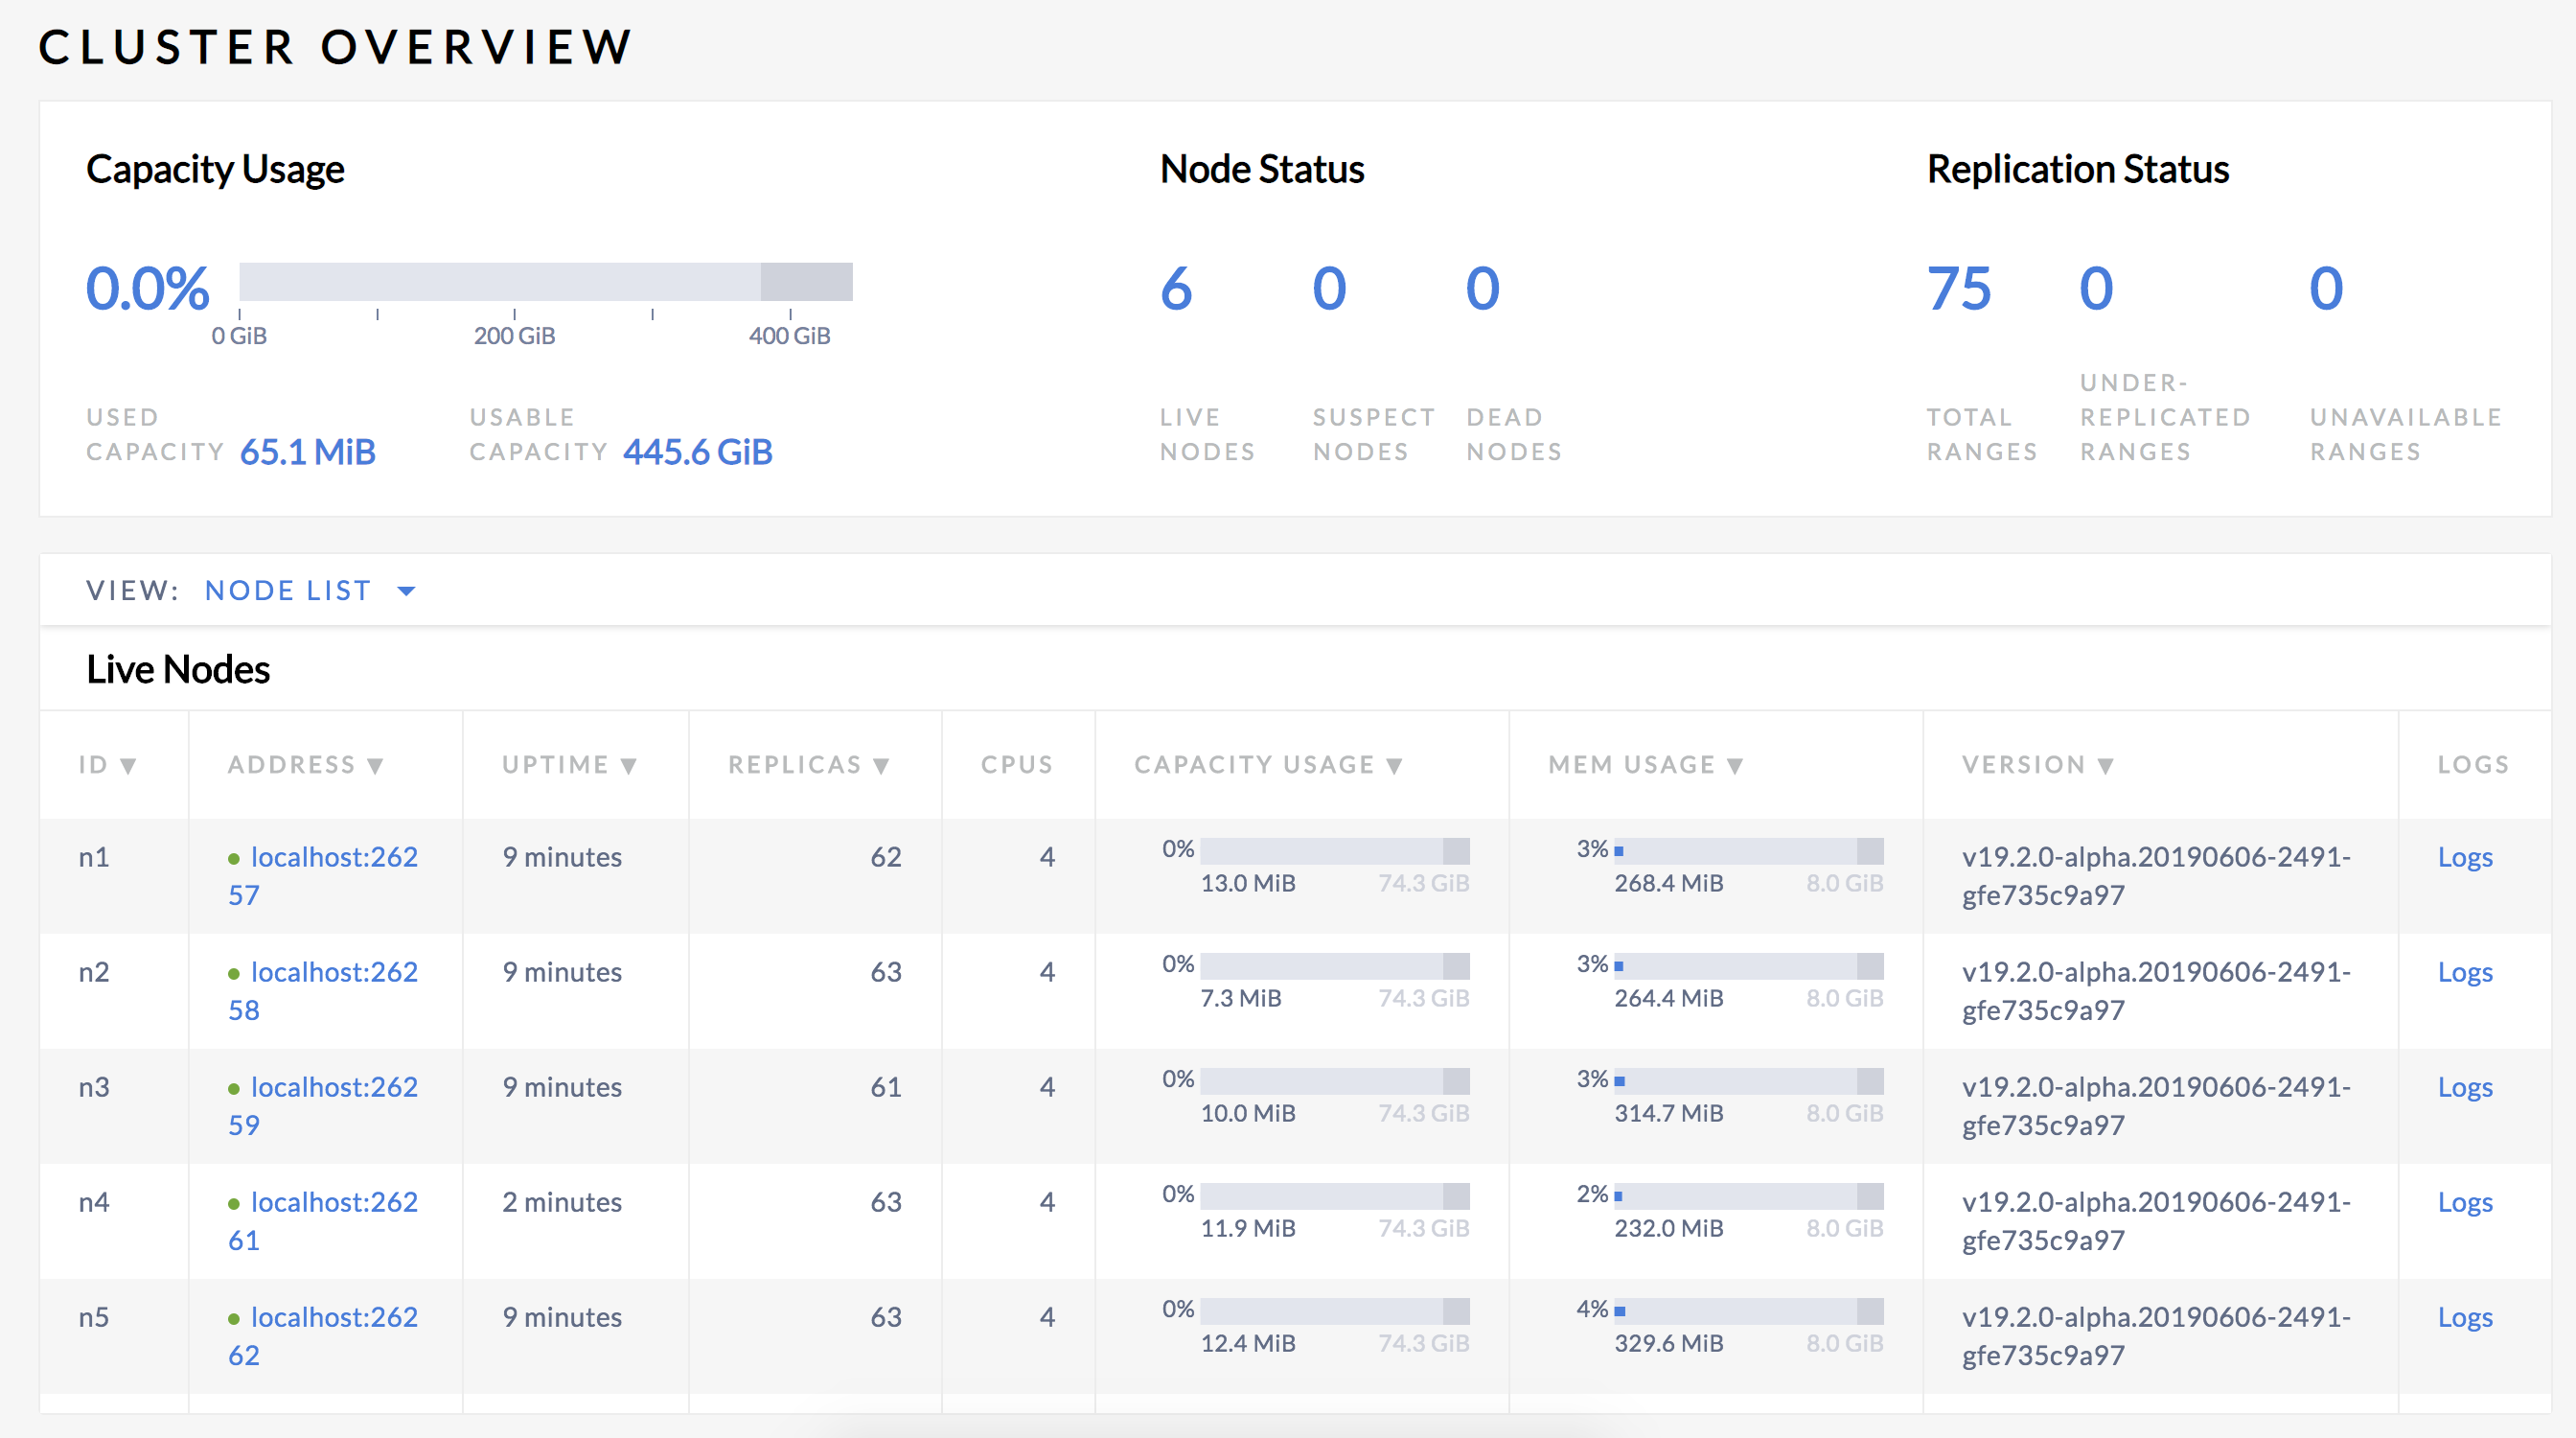
This shows the cluster up-replicating so that each range has 5 replicas, one on each node.
Step 9. Simulate two simultaneous node failures
Use the cockroach quit command to stop two nodes:
$ cockroach quit --insecure --host=localhost:26260
$ cockroach quit --insecure --host=localhost:26261
Step 10. Check load continuity and cluster health
Like before, go to the Admin UI, click Metrics on the left, and verify that the cluster as a whole continues serving data, despite 2 nodes being offline:

This shows that when all ranges are replicated 5 times, the cluster can tolerate 2 simultaneous node outages because the surviving nodes have a majority of each range's replicas (3/5).
To verify this further, use the
cockroach sqlcommand to count the number of rows in theycsb.usertabletable and verify that it is still serving reads:$ cockroach sql \ --insecure \ --host=localhost:26257 \ --execute="SELECT count(*) FROM ycsb.usertable;"count +-------+ 10000 (1 row)And writes:
$ cockroach sql \ --insecure \ --host=localhost:26257 \ --execute="INSERT INTO ycsb.usertable VALUES ('asdf', NULL, NULL, NULL, NULL, NULL, NULL, NULL, NULL, NULL, NULL);"$ cockroach sql \ --insecure \ --host=localhost:26257 \ --execute="SELECT count(*) FROM ycsb.usertable;"count +-------+ 10001 (1 row)
Step 11. Clean up
In the terminal where the YCSB workload is running, press CTRL + c.
Terminate HAProxy:
$ pkill haproxyUse the
cockroach quitcommand to shut down the remaining 4 nodes:$ cockroach quit --insecure --host=localhost:26257Note:For the final 2 nodes, the shutdown process will take longer (about a minute each) and will eventually force the nodes to stop. This is because, with only 2 of 5 nodes left, a majority of replicas are not available, and so the cluster is no longer operational.
$ cockroach quit --insecure --host=localhost:26258$ cockroach quit --insecure --host=localhost:26259To restart the cluster at a later time, run the same
cockroach startcommands as earlier from the directory containing the nodes' data stores.If you do not plan to restart the cluster, you may want to remove the nodes' data stores and the HAProxy config files:
$ rm -rf fault-node1 fault-node2 fault-node3 fault-node4 fault-node5 fault-node6 haproxy.cfg haproxy.cfg.saved
What's next?
Explore other core CockroachDB benefits and features:
