
This page shows you how to decommission one or more nodes. Decommissioning a node removes it from the CockroachDB cluster.
You might do this, for example, when downsizing a cluster or reacting to hardware failures.
Node decommissioning should not be performed when upgrading your cluster's version of CockroachDB or performing planned maintenance (e.g., upgrading system software). In these scenarios, you will want to temporarily stop the node and restart it later.
Overview
How it works
A node is considered to be decommissioned when it meets two criteria:
- The node has completed the decommissioning process.
- The node has been stopped and has not updated its liveness record for the duration configured via
server.time_until_store_dead, which defaults to 5 minutes.
The decommissioning process transfers all range replicas on the node to other nodes. During and after this process, the node is considered "decommissioning" and continues to accept new SQL connections. Even without replicas, the node can still function as a gateway to route connections to relevant data. However, note that the /health?ready=1 monitoring endpoint considers the node "unready" and returns a 503 Service Unavailable status response code so load balancers stop directing traffic to the node. In v20.1, the health endpoint correctly considers the node "ready".
After all range replicas have been transferred, the node can be drained of SQL clients, distributed SQL queries, and range leases, and then stopped. This can be done with a process manager or orchestration tool, or by sending SIGTERM manually. You can also use cockroach quit to drain and shut down the node. When stopped, the node stops updating its liveness record, and after the duration configured via server.time_until_store_dead is considered to be decommissioned.
You can check the status of node decommissioning with the CLI.
Considerations
Before decommissioning a node, make sure other nodes are available to take over the range replicas from the node. If no other nodes are available, the decommissioning process will hang indefinitely. See the Examples below for more details.
Examples
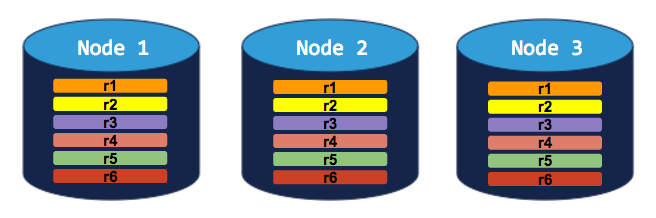
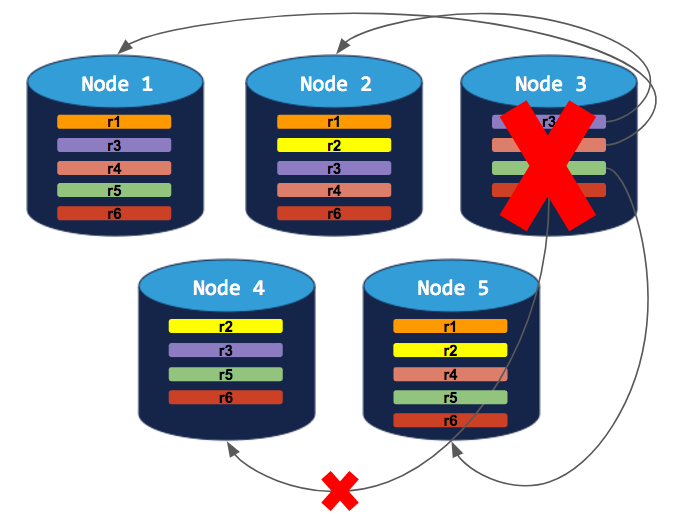
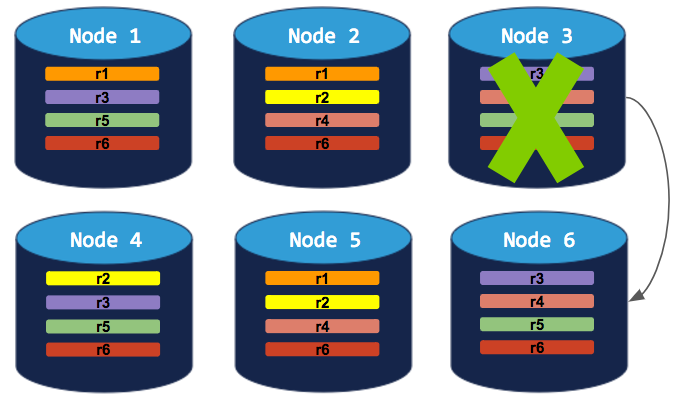
3-node cluster with 3-way replication
In this scenario, each range is replicated 3 times, with each replica on a different node:
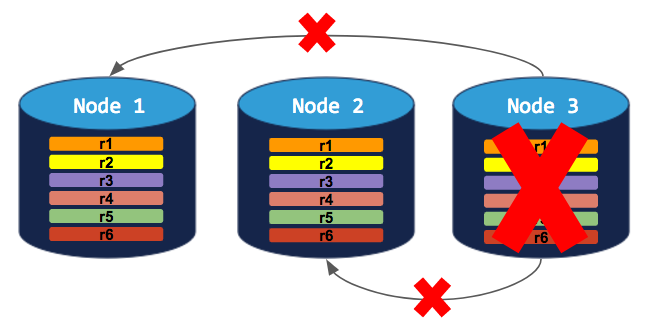
If you try to decommission a node, the process will hang indefinitely because the cluster cannot move the decommissioning node's replicas to the other 2 nodes, which already have a replica of each range:
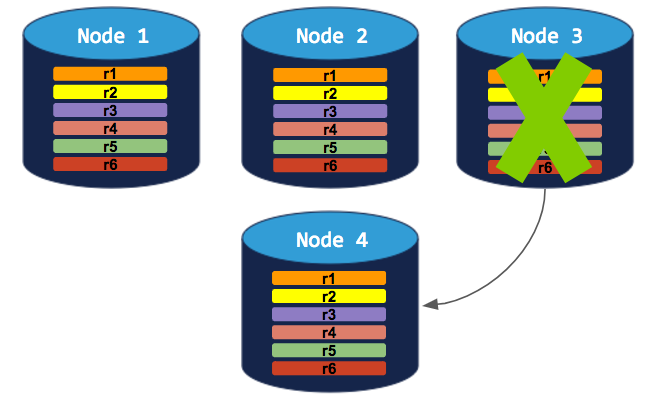
To successfully decommission a node in this cluster, you need to add a 4th node. The decommissioning process can then complete:
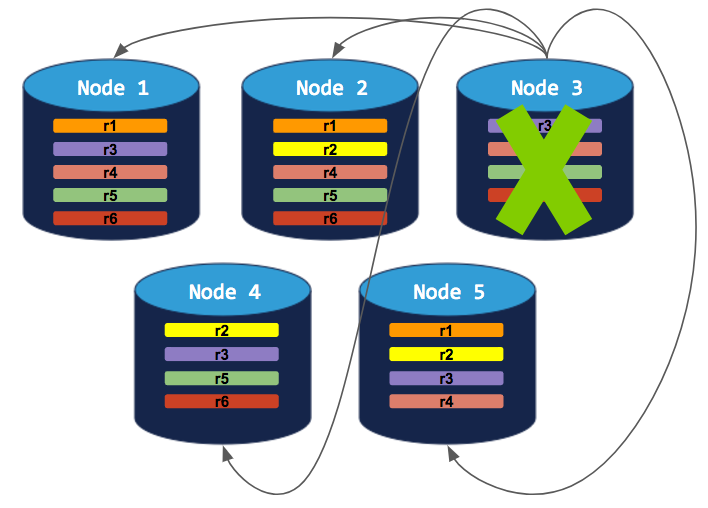
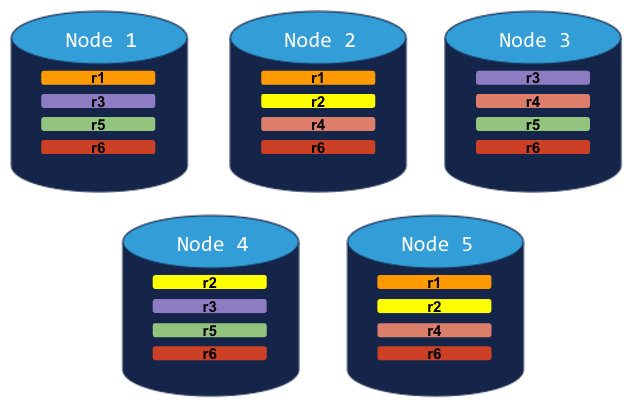
5-node cluster with 3-way replication
In this scenario, like in the scenario above, each range is replicated 3 times, with each replica on a different node:
If you decommission a node, the process will run successfully because the cluster will be able to move the node's replicas to other nodes without doubling up any range replicas:
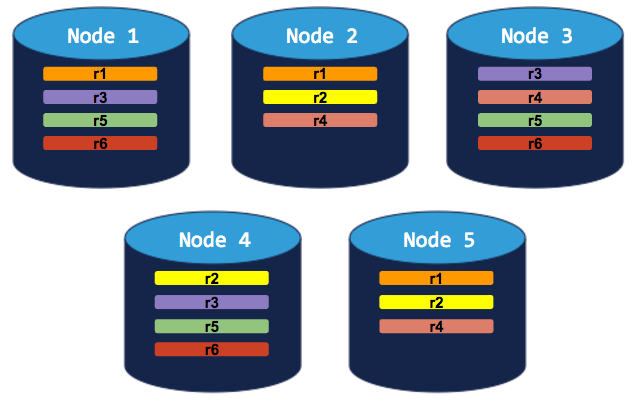
5-node cluster with 5-way replication for a specific table
In this scenario, a custom replication zone has been set to replicate a specific table 5 times (range 6), while all other data is replicated 3 times:
If you try to decommission a node, the cluster will successfully rebalance all ranges but range 6. Since range 6 requires 5 replicas (based on the table-specific replication zone), and since CockroachDB will not allow more than a single replica of any range on a single node, the decommissioning process will hang indefinitely:
To successfully decommission a node in this cluster, you need to add a 6th node. The decommissioning process can then complete:
Remove a single node (live)
Before decommissioning a node
To ensure your cluster can adequately handle decommissioning nodes:
- Before decommissioning each node verify that there are no underreplicated or unavailable ranges.
If you have a decommissioning node that appears to be hung, you can recommission the node. If you notice any issues persisting, contact our support team.
If possible, keep the node running instead of stopping it, because a hung decommissioning process might be a symptom of a problem that could result in data loss.
Confirm that there are enough nodes to take over the replicas from the node you want to remove. See some Example scenarios above.
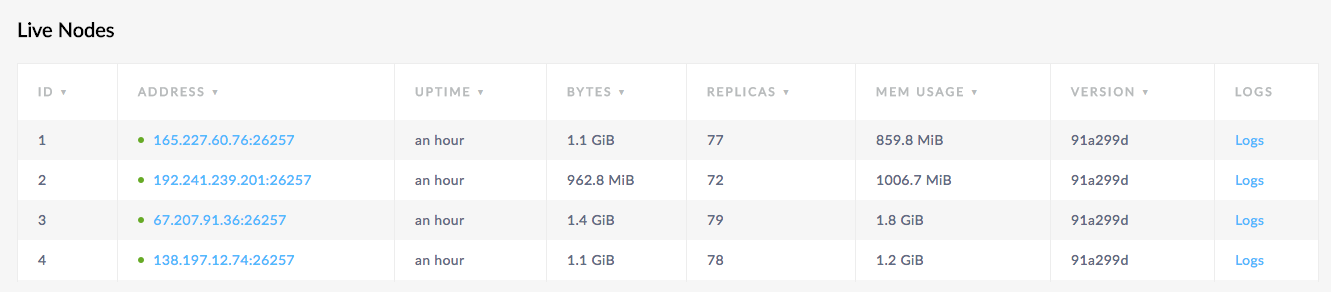
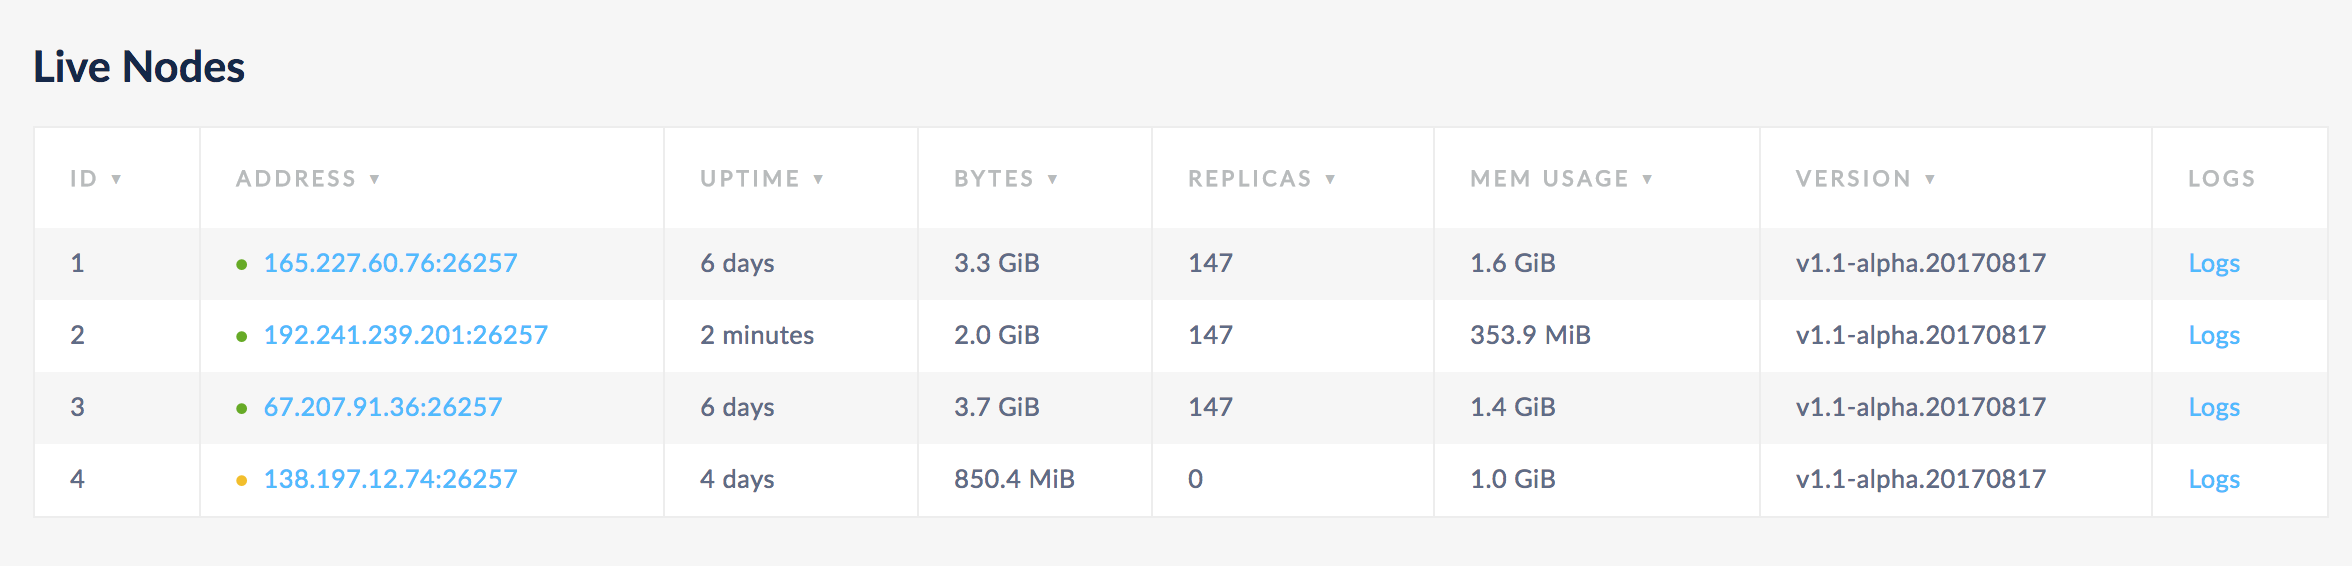
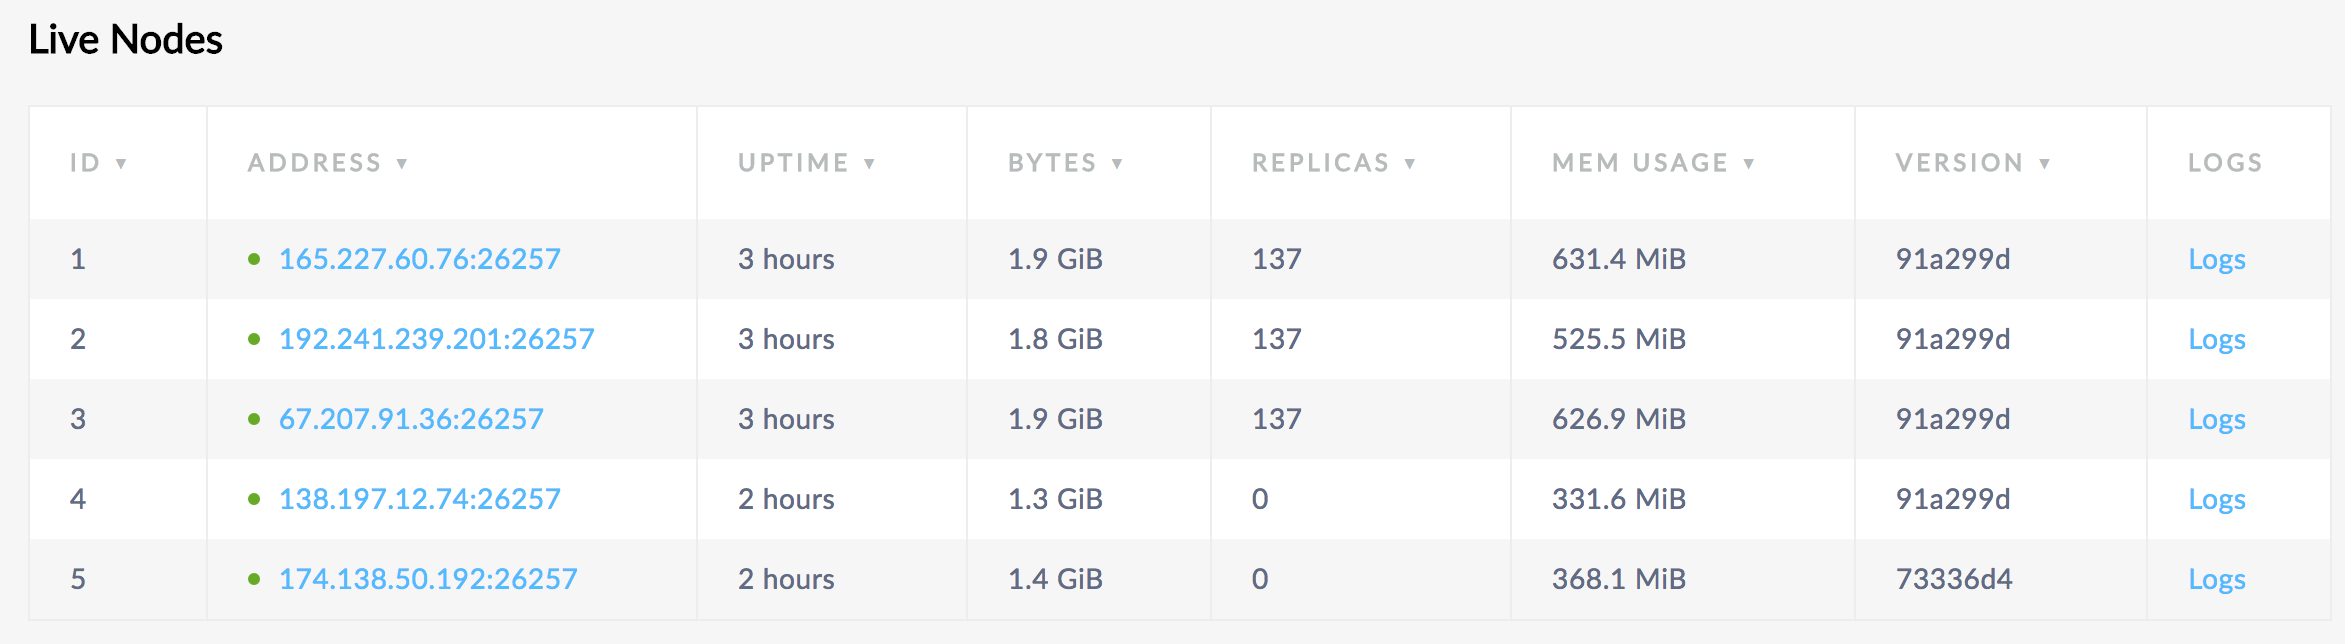
Step 1. Get the ID of the node to decommission
Open the Admin UI and select the Node List view, or go to Metrics on the left and click View nodes list in the Summary area. Note the ID of the node that you want to decommission:
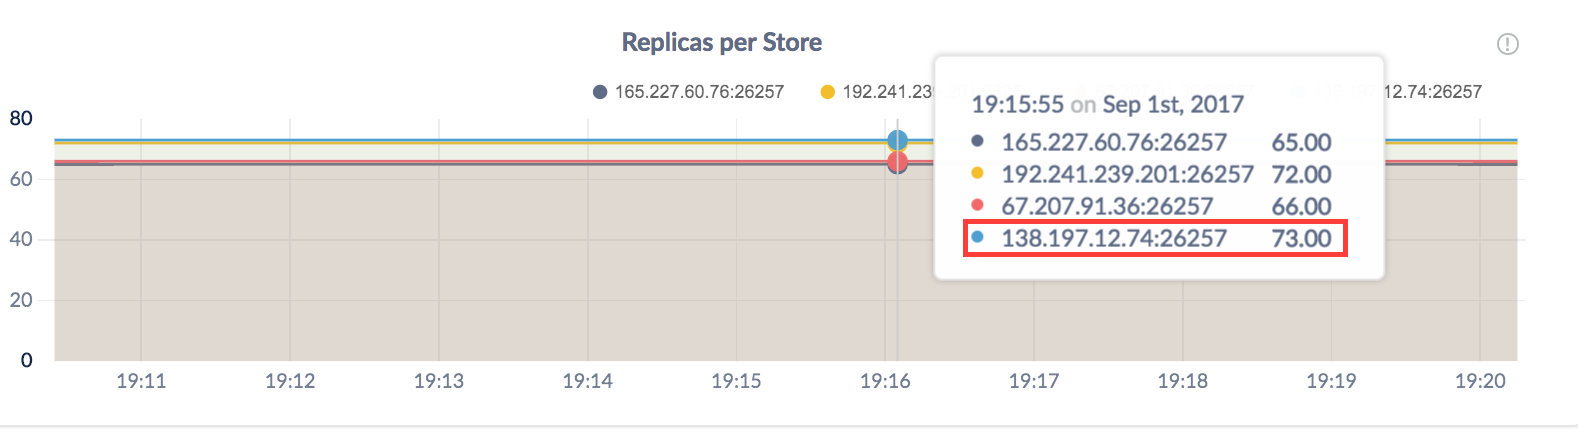
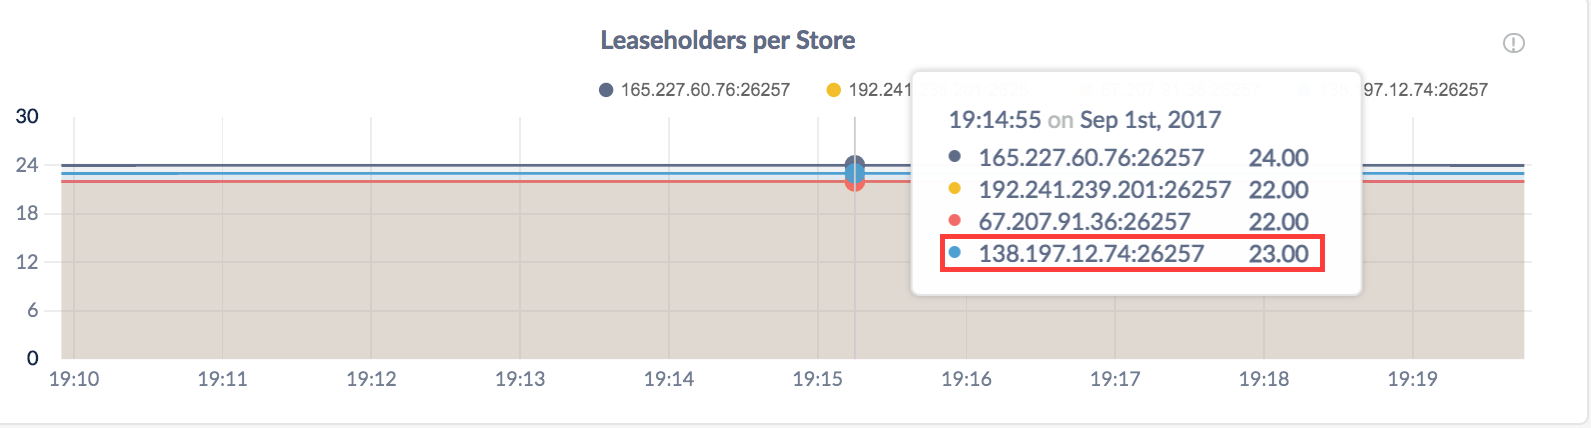
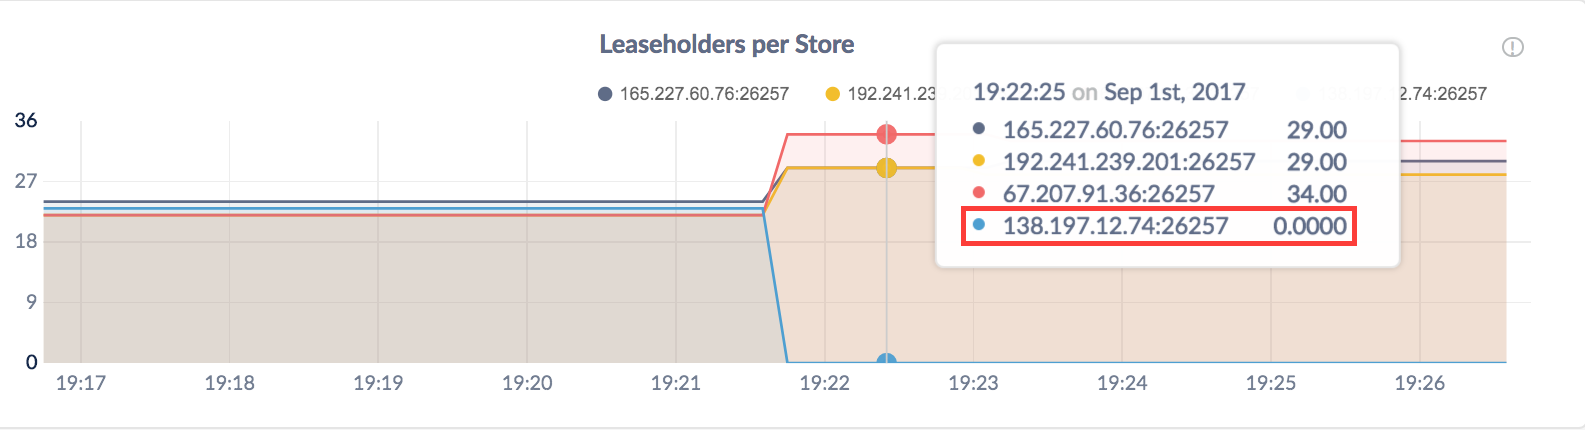
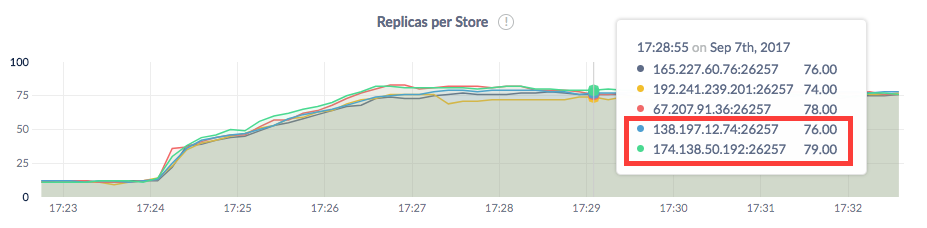
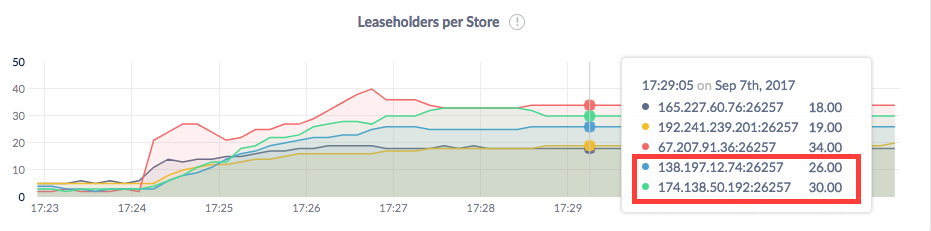
Step 2. Check the node before decommissioning
Open the Admin UI, click Metrics on the left, select the Replication dashboard, and hover over the Replicas per Store and Leaseholders per Store graphs:
Step 3. Start the decommissioning process on the node
Run the cockroach node decommission command with the ID of the node to decommission:
$ cockroach node decommission 4 --certs-dir=certs --host=<address of any live node>
$ cockroach node decommission 4 --insecure --host=<address of any live node>
You'll then see the decommissioning status print to stderr as it changes:
 id | is_live | replicas | is_decommissioning | is_draining
+---+---------+----------+--------------------+-------------+
  4 |  true   |       73 |        true        |    false
(1 row)
Once the node has been fully decommissioned and stopped, you'll see a confirmation:
 id | is_live | replicas | is_decommissioning | is_draining
+---+---------+----------+--------------------+-------------+
  4 |  true   |        0 |        true        |    false
(1 row)

No more data reported on target nodes. Please verify cluster health before removing the nodes.
ok
Note that is_decommissioning will remain true after all replicas have been transferred from the node.
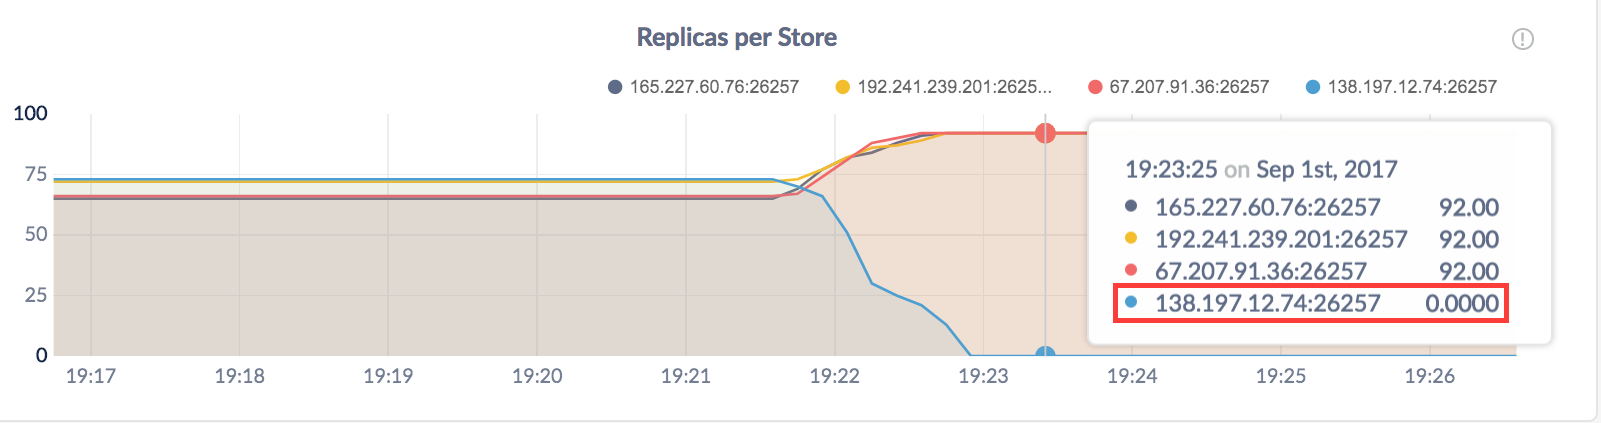
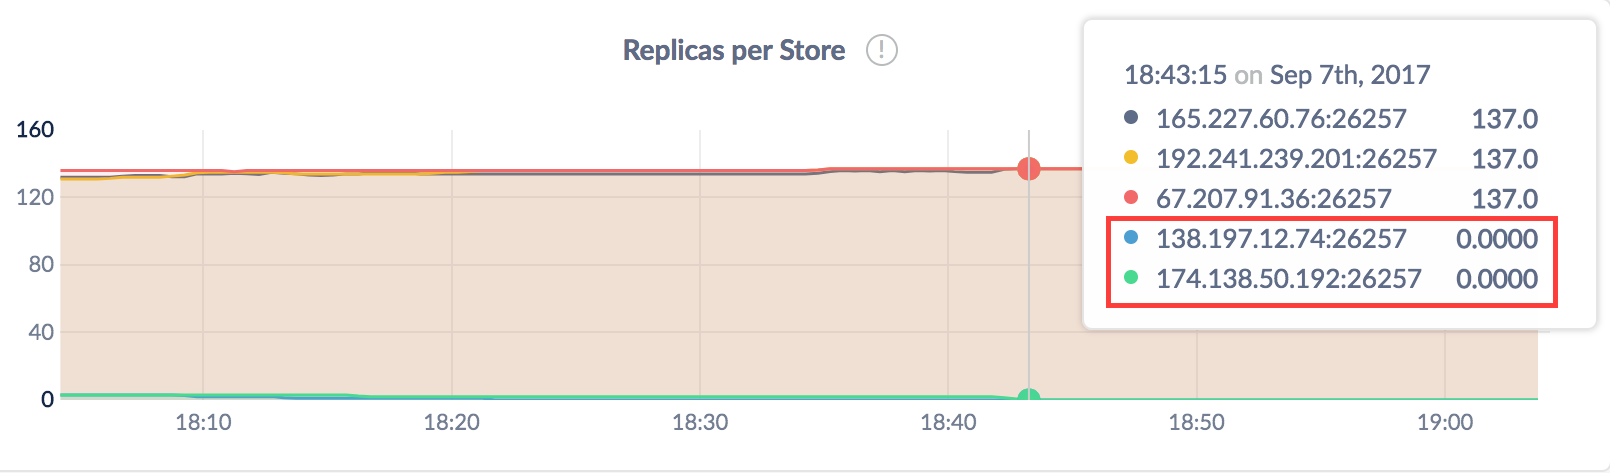
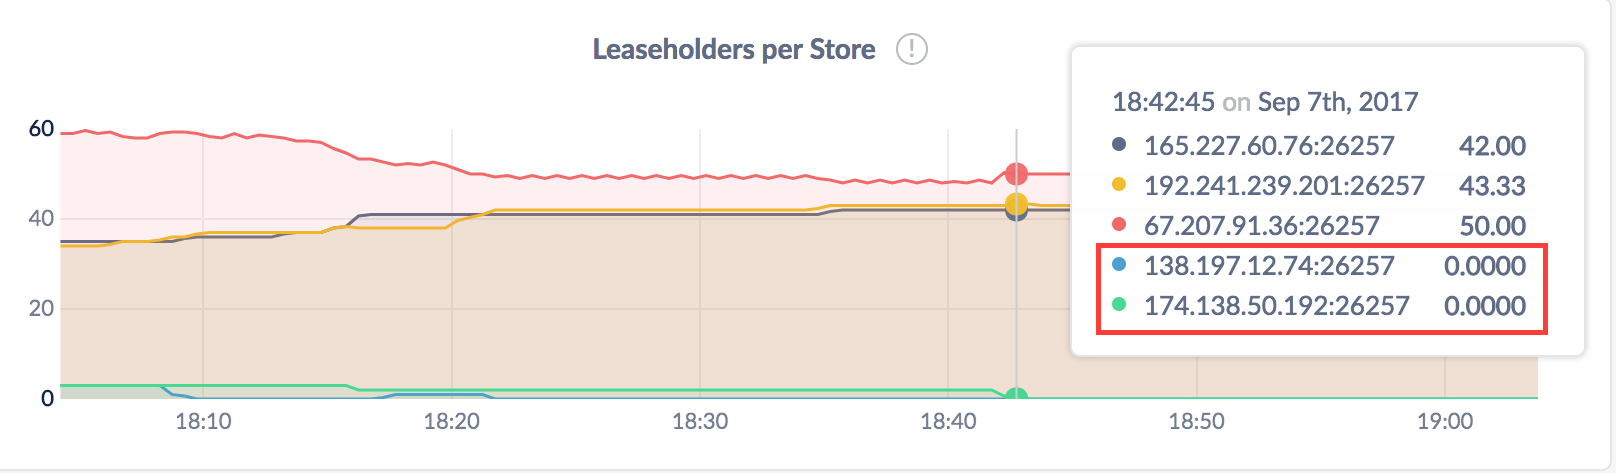
Step 4. Check the node and cluster after the decommissioning process
In the Admin UI Replication dashboard, again hover over the Replicas per Store and Leaseholders per Store graphs. For the decommissioning node, the counts should be 0:
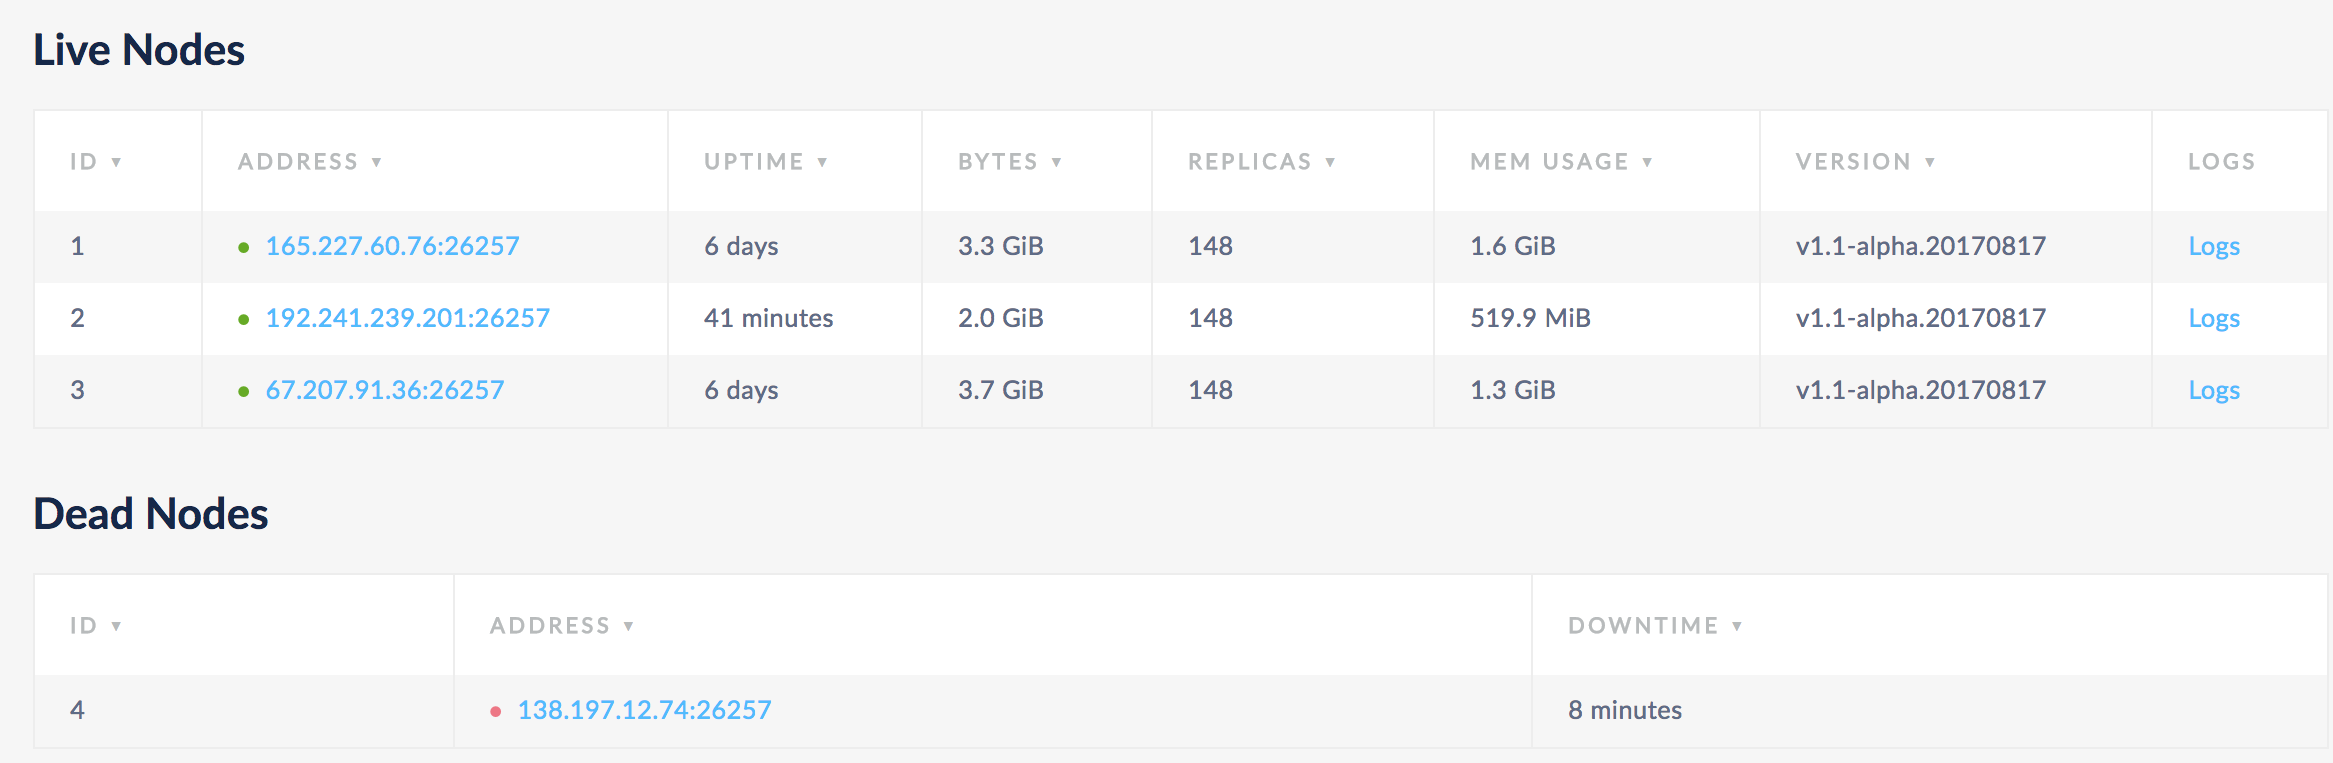
Then view Node List on the Overview page and make sure all nodes but the decommissioning node are healthy (green):
The node is counted as a "Suspect" node in the Admin UI Cluster Overview panel until it is shut down.
Step 5. Stop the decommissioning node
Execute the cockroach quit command:
$ cockroach quit --certs-dir=certs --host=<address of decommissioned node>
$ cockroach quit --insecure --host=<address of decommissioned node>
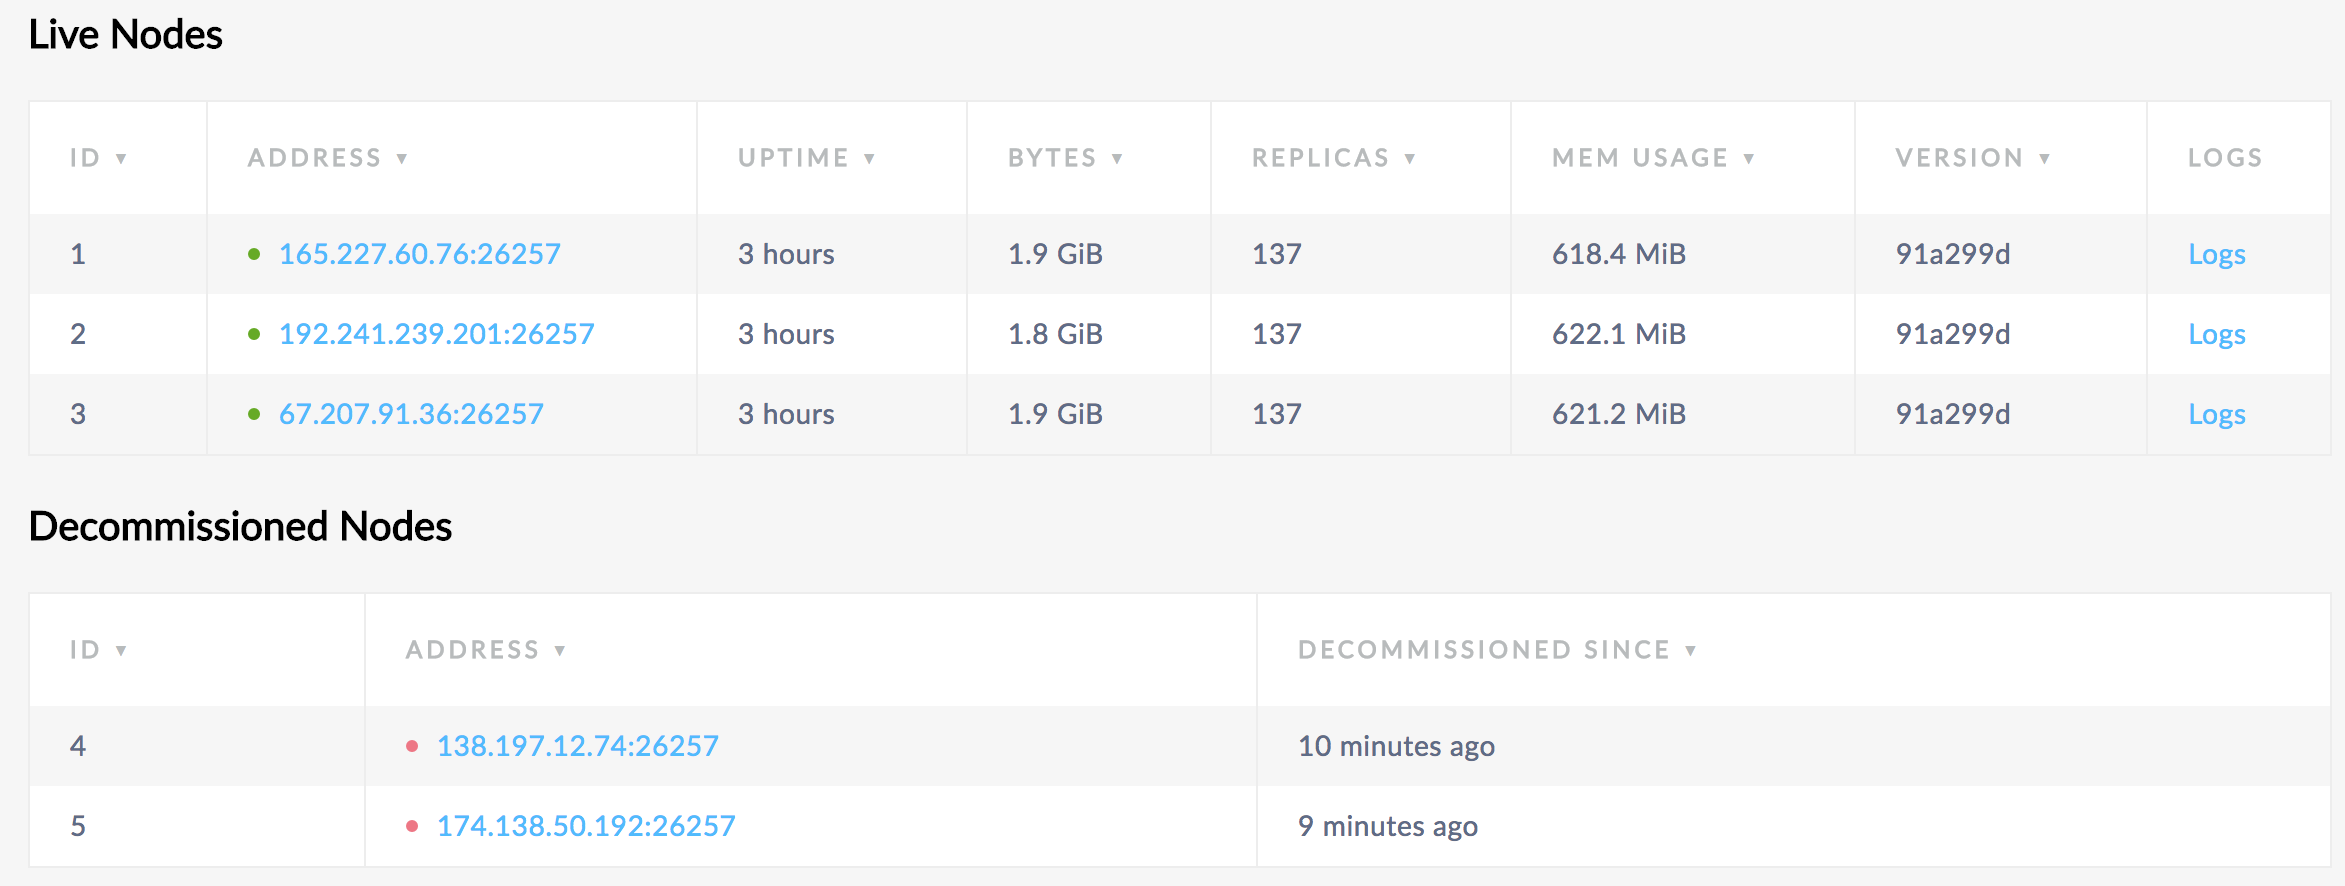
After the duration configured via server.time_until_store_dead, you'll see the removed node listed under Decommissioned Nodes:

At this point, the node is decommissioned and will no longer appear in timeseries graphs unless you are viewing a time range during which the node was live. However, it will never disappear from the Decommissioned Nodes list.
Remove a single node (dead)
After a node has been dead for 5 minutes, CockroachDB transfers the range replicas and range leases on the node to available live nodes. However, if the dead node is restarted, the cluster will rebalance replicas and leases to the node.
To prevent the cluster from rebalancing data to a dead node if it comes back online, do the following:
Step 1. Get the ID of the dead node
Open the Admin UI and select the Node List view. Note the ID of the node listed under Dead Nodes:
Step 2. Mark the dead node as decommissioned
Run the cockroach node decommission command with the ID of the node to decommission:
$ cockroach node decommission 4 --certs-dir=certs --host=<address of any live node>
$ cockroach node decommission 4 --insecure --host=<address of any live node>
 id | is_live | replicas | is_decommissioning | is_draining
+---+---------+----------+--------------------+-------------+
  4 |  false  |        0 |        true        |    true
(1 row)

No more data reported on target nodes. Please verify cluster health before removing the nodes.
If you go back to the Nodes List page, in about 5 minutes, you'll see the node move from the Dead Nodes to the Decommissioned Nodes list.
At this point, the node is decommissioned and will no longer appear in timeseries graphs unless you are viewing a time range during which the node was live. However, it will never disappear from the Decommissioned Nodes list.
If you want to utilize a decommissioned node again, first recommission the node to have the cluster rebalance data to the node. Then restart the node so that it accepts new SQL connections.
Remove multiple nodes
Before decommissioning nodes
- Before decommissioning each node verify that there are no underreplicated or unavailable ranges.
If you have a decommissioning node that appears to be hung, you can recommission the node. If you notice any issues persisting, contact our support team.
If possible, keep the node running instead of stopping it, because a hung decommissioning process might be a symptom of a problem that could result in data loss.
Confirm that there are enough nodes to take over the replicas from the node you want to remove. See some Example scenarios above.
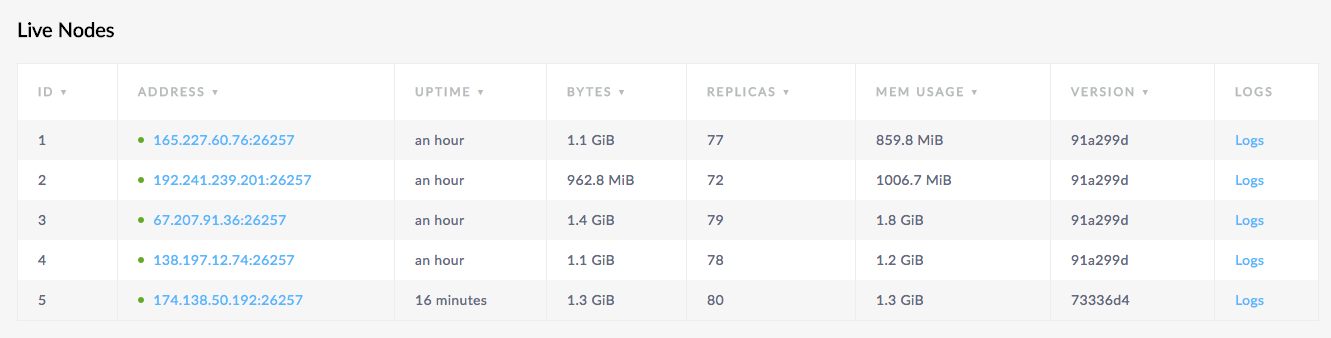
Step 1. Get the IDs of the nodes to decommission
Open the Admin UI and select the Node List view, or go to Metrics on the left and click View nodes list in the Summary area. Note the IDs of the nodes that you want to decommission:
Step 2. Check the nodes before decommissioning
Select the Replication dashboard, and hover over the Replicas per Store and Leaseholders per Store graphs:
Step 3. Decommission the nodes
Run the cockroach node decommission command with the IDs of the nodes to decommission:
$ cockroach node decommission 4 5 --certs-dir=certs --host=<address of any live node>
$ cockroach node decommission 4 5 --insecure --host=<address of any live node>
You'll then see the decommissioning status print to stderr as it changes:
 id | is_live | replicas | is_decommissioning | is_draining
+---+---------+----------+--------------------+-------------+
  4 |  true   |       18 |        true        |    false
  5 |  true   |       16 |        true        |    false
(2 rows)
Once the nodes have been fully decommissioned, you'll see a confirmation:
 id | is_live | replicas | is_decommissioning | is_draining
+---+---------+----------+--------------------+-------------+
  4 |  true   |        0 |        true        |    false
  5 |  true   |        0 |        true        |    false
(2 rows)

No more data reported on target nodes. Please verify cluster health before removing the nodes.
Note that is_decommissioning will remain true after all replicas have been transferred from each node.
Step 4. Check the nodes and cluster after the decommissioning process
In the Admin UI Replication dashboard, again hover over the Replicas per Store and Leaseholders per Store graphs. For the decommissioning nodes, the counts should be 0:
Then click View nodes list in the Summary area and make sure all nodes are healthy (green) and the decommissioning nodes have 0 replicas:
The nodes are counted as a "Suspect" node in the Admin UI Cluster Overview panel until they are shut down.
Step 5. Stop the decommissioning nodes
For each node, execute the cockroach quit command:
$ cockroach quit --certs-dir=certs --host=<address of decommissioned node>
$ cockroach quit --insecure --host=<address of decommissioned node>
After the duration configured via server.time_until_store_dead, you'll see the nodes move to the Decommissioned Nodes list.
At this point, the nodes are decommissioned and will no longer appear in timeseries graphs unless you are viewing a time range during which the nodes were live. However, they will never disappear from the Decommissioned Nodes list.
If you want to utilize a decommissioned node again, first recommission the node to have the cluster rebalance data to the node. Then restart the node so that it accepts new SQL connections.
Recommission nodes
If you accidentally started decommissioning a node, or have a node with a hung decommissioning process, you can recommission the node. This cancels the process of transferring replicas on the node to other nodes.
Recommissioning is intended to cancel an active decommissioning process. If all ranges have been removed from a node, start a new node instead of reusing the node.
Step 1. Cancel the decommissioning process
Press ctrl-c in each terminal with an ongoing decommissioning process that you want to cancel.
Step 2. Recommission the decommissioning nodes
Execute the cockroach node recommission command with the IDs of the nodes to recommission:
$ cockroach node recommission 4 --certs-dir=certs --host=<address of any live node>
$ cockroach node recommission 4 --insecure --host=<address of any live node>
The value of is_decommissioning will change back to false:
 id | is_live | replicas | is_decommissioning | is_draining
+---+---------+----------+--------------------+-------------+
  4 |  false  |        0 |       false        |    false
(1 row)
On the Node List, you should soon see the recommissioned nodes listed as LIVE. After a few minutes, you should see replicas rebalanced to the nodes.
Check the status of decommissioning nodes
To check the progress of decommissioning nodes, run the cockroach node status command with the --decommission flag:
$ cockroach node status --decommission --certs-dir=certs --host=<address of any live node>
$ cockroach node status --decommission --insecure --host=<address of any live node>
 id |        address         |  build  |            started_at            |            updated_at            | is_available | is_live | gossiped_replicas | is_decommissioning | is_draining
+---+------------------------+---------+----------------------------------+----------------------------------+--------------+---------+-------------------+--------------------+-------------+
  1 | 165.227.60.76:26257    | 91a299d | 2018-10-01 16:53:10.946245+00:00 | 2018-10-02 14:04:39.280249+00:00 |         true |  true   |                26 |       false        |    false
  2 | 192.241.239.201:26257  | 91a299d | 2018-10-01 16:53:24.22346+00:00  | 2018-10-02 14:04:39.415235+00:00 |         true |  true   |                26 |       false        |    false
  3 | 67.207.91.36:26257     | 91a299d | 2018-10-01 17:34:21.041926+00:00 | 2018-10-02 14:04:39.233882+00:00 |         true |  true   |                25 |       false        |    false
  4 | 138.197.12.74:26257    | 91a299d | 2018-10-01 17:09:11.734093+00:00 | 2018-10-02 14:04:37.558204+00:00 |         true |  true   |                25 |       false        |    false
  5 | 174.138.50.192:26257   | 91a299d | 2018-10-01 17:14:01.480725+00:00 | 2018-10-02 14:04:39.293121+00:00 |         true |  true   |                 0 |        true        |    false
(5 rows)
is_decommissioning == trueimplies that replicas are being or have been transferred to other nodes. The node is either undergoing or has completed the decommissioning process.is_draining == trueimplies that the node is no longer accepting SQL connections. The node is either in the process of shutting down or has already done so.
