
"Follow-the-workload" refers to CockroachDB's ability to dynamically optimize read latency for the location from which most of the workload is originating. This page explains how "follow-the-workload" works and walks you through a simple demonstration using a local cluster.
Overview
Basic Terms
To understand how "follow-the-workload" works, it's important to start with some basic terms:
| Term | Description |
|---|---|
| Range | CockroachDB stores all user data and almost all system data in a giant sorted map of key-value pairs. This keyspace is divided into "ranges", contiguous chunks of the keyspace, so that every key can always be found in a single range. |
| Range Replica | CockroachDB replicates each range (3 times by default) and stores each replica on a different node. |
| Range Lease | For each range, one of the replicas holds the "range lease". This replica, referred to as the "leaseholder", is the one that receives and coordinates all read and write requests for the range. |
How It Works
"Follow-the-workload" is based on the way range leases handle read requests. Read requests bypass the Raft consensus protocol, accessing the range replica that holds the range lease (the leaseholder) and sending the results to the client without needing to coordinate with any of the other range replicas. Bypassing Raft, and the network round trips involved, is possible because the leaseholder is guaranteed to be up-to-date due to the fact that all write requests also go to the leaseholder.
This increases the speed of reads, but it doesn't guarantee that the range lease will be anywhere close to the origin of requests. If requests are coming from the US West, for example, and the relevant range lease is on a node in the US East, the requests would likely enter a gateway node in the US West and then get routed to the node with the range lease in the US East.
However, you can cause the cluster to actively move range leases for even better read performance by starting each node with the --locality flag. With this flag specified, the cluster knows about the location of each node, so when there's high latency between nodes, the cluster will move active range leases to a node closer to the origin of the majority of the workload. This is especially helpful for applications with workloads that move around throughout the day (e.g., most of the traffic is in the US East in the morning and in the US West in the evening).
--locality flag, as shown in the tutorial below. No additional user action is required.Example
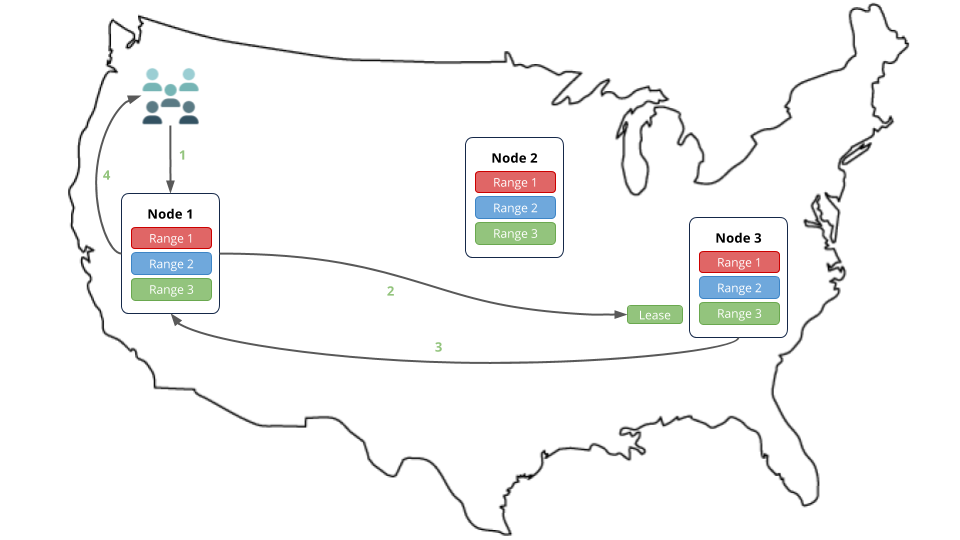
In this example, let's imagine that lots of read requests are going to node 1, and that the requests are for data in range 3. Because range 3's lease is on node 3, the requests are routed to node 3, which returns the results to node 1. Node 1 then responds to the clients.
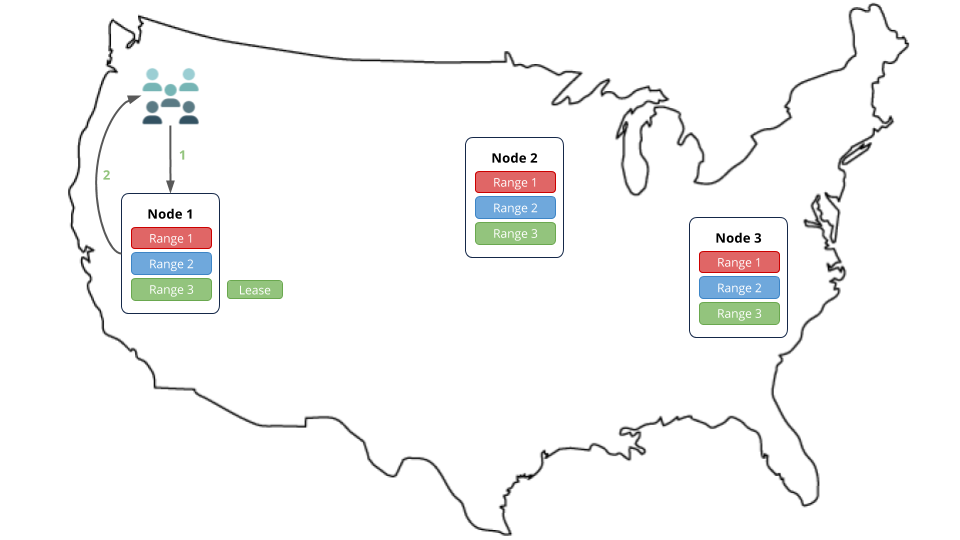
However, if the nodes were started with the --locality flag, after a short while, the cluster would move range 3's lease to node 1, which is closer to the origin of the workload, thus reducing the network round trips and increasing the speed of reads.
Tutorial
Step 1. Install prerequisites
In this tutorial, you'll use CockroachDB, the comcast network tool to simulate network latency on your local workstation, and the kv load generator to simulate client workloads. Before you begin, make sure these applications are installed:
- Install the latest version of CockroachDB.
- Install Go version 1.9 or higher. If you're on a Mac and using Homebrew, use
brew install go. You can check your local version by runninggo version. - Install the
comcastnetwork simulation tool:go get github.com/tylertreat/comcast - Install the
kvload generator:go get github.com/cockroachdb/loadgen/kv
Also, to keep track of the data files and logs for your cluster, you may want to create a new directory (e.g., mkdir follow-workload) and start all your nodes in that directory.
Step 2. Start simulating network latency
"Follow-the-workload" only kicks in when there's high latency between the nodes of the CockroachDB cluster. In this tutorial, you'll run 3 nodes on your local workstation, with each node pretending to be in a different region of the US. To simulate latency between the nodes, use the comcast tool that you installed earlier.
In a new terminal, start comcast as follows:
$ comcast --device lo0 --latency 100
For the --device flag, use lo0 if you're on Mac or lo if you're on Linux. If neither works, run the ifconfig command and find the interface responsible for 127.0.0.1 in the output.
This command causes a 100 millisecond delay for all requests on the loopback interface of your local workstation. It will only affect connections from the machine to itself, not to/from the Internet.
Step 3. Start the cluster
Use the cockroach start command to start 3 nodes on your local workstation, using the --locality flag to pretend that each node is in a different region of the US.
In a new terminal, start a node in the "US West":
$ cockroach start \
--insecure \
--locality=region=us-west \
--host=localhost \
--store=follow1 \
--port=26257 \
--http-port=8080 \
--join=localhost:26257,localhost:26258,localhost:26259
In a new terminal, start a node in the "US Midwest":
$ cockroach start \
--insecure \
--locality=region=us-midwest \
--host=localhost \
--store=follow2 \
--port=26258 \
--http-port=8081 \
--join=localhost:26257,localhost:26258,localhost:26259
In a new terminal, start a node in the "US East":
$ cockroach start \
--insecure \
--locality=region=us-east \
--host=localhost \
--store=follow3 \
--port=26259 \
--http-port=8082 \
--join=localhost:26257,localhost:26258,localhost:26259
Step 4. Initialize the cluster
In a new terminal, use the cockroach init command to perform a one-time initialization of the cluster:
$ cockroach init \
--insecure \
--host=localhost \
--port=26257
Step 5. Simulate traffic in the US East
Now that the cluster is live, use the kv load generator that you installed earlier to simulate multiple client connections to the node in the "US East".
In a new terminal, start
kv, pointing it at port26259, which is the port of the node with theus-eastlocality:$ kv -duration 1m -concurrency 32 -read-percent 100 -max-rate 100 'postgresql://root@localhost:26259?sslmode=disable'This command initiates 32 concurrent read-only workloads for 1 minute but limits the entire
kvprocess to 100 operations per second (since you're running everything on a single machine). Whilekvis running, it will print some stats to the terminal:_elapsed___errors__ops/sec(inst)___ops/sec(cum)__p95(ms)__p99(ms)_pMax(ms) 1s 0 23.0 23.0 838.9 838.9 838.9 2s 0 111.0 66.9 805.3 838.9 838.9 3s 0 100.0 78.0 209.7 209.7 209.7 4s 0 99.9 83.5 209.7 209.7 209.7 5s 0 100.0 86.8 209.7 209.7 209.7 ...Note:The latency numbers printed are over 200 milliseconds because the 100 millisecond delay in each direction (200ms round-trip) caused by thecomcasttool also applies to the traffic going from thekvprocess to thecockroachprocess. If you were to set up more advanced rules that excluded thekvprocess's traffic or to run this on a real network with real network delay, these numbers would be down in the single-digit milliseconds.Let the load generator run to completion.
Step 6. Check the location of the range lease
The load generator created a kv table that maps to an underlying key-value range. Verify that the range's lease moved to the node in the "US East" as follows.
In a new terminal, run the
cockroach node statuscommand against any node:$ cockroach node status --insecure --port=26257+----+-----------------+--------+---------------------+---------------------+ | id | address | build | updated_at | started_at | +----+-----------------+--------+---------------------+---------------------+ | 1 | localhost:26257 | v1.1.2 | 2017-11-18 05:22:34 | 2017-11-18 05:21:24 | | 2 | localhost:26258 | v1.1.2 | 2017-11-18 05:22:36 | 2017-11-18 05:21:26 | | 3 | localhost:26259 | v1.1.2 | 2017-11-18 05:22:36 | 2017-11-18 05:21:26 | +----+-----------------+--------+---------------------+---------------------+ (3 rows)In the response, note the ID of the node running on port
26259.In the same terminal, connect the built-in SQL shell to any node:
$ cockroach sql --insecure --port=26257Check where the range lease is for the
kvtable:> SHOW TESTING_RANGES FROM TABLE test.kv;+-----------+---------+----------+--------------+ | Start Key | End Key | Replicas | Lease Holder | +-----------+---------+----------+--------------+ | NULL | NULL | {1,2,3} | 3 | +-----------+---------+----------+--------------+ (1 row)ReplicasandLease Holderindicate the node IDs. As you can see, the lease for the range holding thekvtable's data is on node 3, which is the same ID as the node on port26259.
Step 7. Simulate traffic in the US West
In the same terminal, start
kv, pointing it at port26257, which is the port of the node with theus-westlocality:$ kv -duration 7m -concurrency 32 -read-percent 100 -max-rate 100 'postgresql://root@localhost:26257?sslmode=disable'This time, the command runs for a little longer, 7 minutes instead of 1 minute. This is necessary since the system will still "remember" the earlier requests to the other locality.
Let the load generator run to completion.
Step 8. Check the location of the range lease
Verify that the range's lease moved to the node in the "US West" as follows.
In a same terminal, run the
cockroach node statuscommand against any node:$ cockroach node status --insecure --port=26257+----+-----------------+--------+---------------------+---------------------+ | id | address | build | updated_at | started_at | +----+-----------------+--------+---------------------+---------------------+ | 1 | localhost:26257 | v1.1.2 | 2017-11-18 05:06:21 | 2017-11-18 04:56:41 | | 2 | localhost:26258 | v1.1.2 | 2017-11-18 05:06:21 | 2017-11-18 04:56:41 | | 3 | localhost:26259 | v1.1.2 | 2017-11-18 05:06:22 | 2017-11-18 04:56:42 | +----+-----------------+--------+---------------------+---------------------+ (3 rows)In the response, note the ID of the node running on port
26257.Connect the built-in SQL shell to any node:
$ cockroach sql --insecure --port=26257Check where the range lease is for the
kvtable:> SHOW TESTING_RANGES FROM TABLE test.kv;+-----------+---------+----------+--------------+ | Start Key | End Key | Replicas | Lease Holder | +-----------+---------+----------+--------------+ | NULL | NULL | {1,2,3} | 1 | +-----------+---------+----------+--------------+ (1 row)As you can see, the lease for the range holding the
kvtable's data is now on node 1, which is the same ID as the node on port26257.
Step 9. Stop the cluster
Once you're done with your cluster, press CTRL-C in each node's terminal.
If you do not plan to restart the cluster, you may want to remove the nodes' data stores:
$ rm -rf follow1 follow2 follow3
Step 10. Stop simulating network latency
Once you're done with this tutorial, you will not want a 100 millisecond delay for all requests on your local workstation, so stop the comcast tool:
$ comcast --device lo0 --stop
What's Next?
Use a local cluster to explore these other core CockroachDB benefits
