
CockroachDB's geo-partitioning feature gives you low-latency reads and writes in a broadly distributed cluster. This tutorial walks you through the process in a 9-node deployment across 3 US regions on GCE. If you follow along, you'll see dramatic improvements in latency, with the majority of reads and writes executing in 2 milliseconds or less.
See it in action
Watch a demo
Read a case study
Read about how an electronic lock manufacturer and multi-national bank are using the Geo-Partitioned Replicas topology in production for improved performance and regulatory compliance.
Before you begin
Review important concepts
To understand performance in a geographically distributed CockroachDB cluster, it's important to first review how reads and writes work in CockroachDB.
Review the cluster topology
You'll deploy a 9-node CockroachDB cluster across 3 GCE regions, with each node on a VM in a distinct availability zone for optimal fault tolerance:
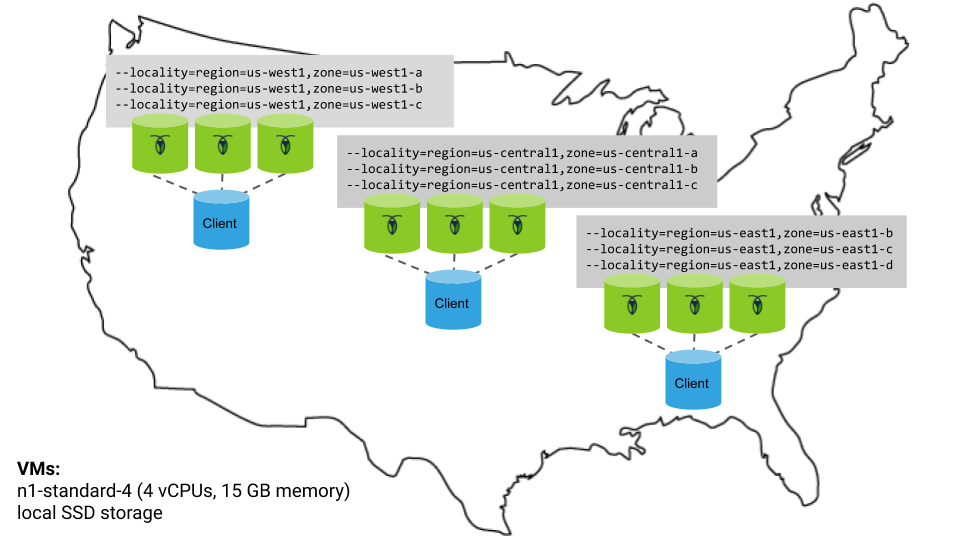
A few notes:
- For each CockroachDB node, you'll use the
n1-standard-4machine type (4 vCPUs, 15 GB memory) with the Ubuntu 16.04 OS image and a local SSD disk. - You'll start each node with the
--localityflag describing the node's region and availability zone. Before partitioning, this will lead CockroachDB to evenly distribute data across the 3 regions. After partitioning, this information will be used to pin data closer to users. - There will be an extra VM in each region for an instance of your application and the open-source HAProxy load balancer. The application in each region will be pointed at the local load balancer, which will direct connections only to the CockroachDB nodes in the same region.
Review the application
For your application, you'll use our open-source, fictional, peer-to-peer ride-sharing app, MovR. You'll run 3 instances of MovR, one in each US region, with each instance representing users in a specific city: New York, Chicago, or Seattle.
The schema
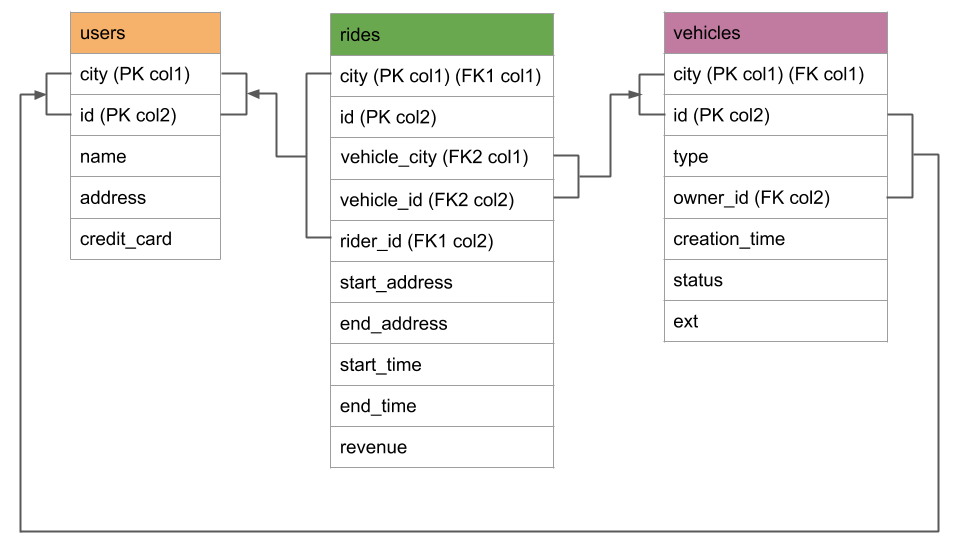
A few notes about the schema:
- There are just three self-explanatory tables:
usersrepresents the people registered for the service,vehiclesrepresents the pool of vehicles for the service, andridesrepresents when and where users have rented a vehicle. - Each table has a composite primary key of
cityandid, withcitybeing first in the key. These compound primary keys will enable you to geo-partition data at the row level bycity.
The workflow
The workflow for MovR is as follows:
A user loads the app and sees the 25 closest vehicles. Behind the scenes, this is a
SELECTfrom thevehiclestable:> SELECT id, city, status, ... FROM vehicles WHERE city = <user location>The user signs up for the service, which is an
INSERTof a row into theuserstable:> INSERT INTO users (id, name, address, ...) VALUES ...In some cases, the user adds their own vehicle to share, which is an
INSERTof a row into thevehiclestable:> INSERT INTO vehicles (id, city, type, ...) VALUES ...More often, the user reserves a vehicle and starts a ride, which is an
UPDATEof a row in thevehiclestable and anINSERTof a row into theridestable:> UPDATE vehicles SET status = 'in_use' WHERE ...> INSERT INTO rides (id, city, start_addr, ...) VALUES ...The user ends the ride and releases the vehicle, which is an
UPDATEof a row in thevehiclestable and anUPDATEof a row in theridestable:> UPDATE vehicles SET status = 'available' WHERE ...> UPDATE rides SET end_address = <value> ...
Step 1. Request a trial license
Geo-partitioning is an enterprise feature. For the purpose of this tutorial, request a 30-day trial license for use with your cluster.
You should receive your trial license via email within a few minutes. You'll enable your license once your cluster is up-and-running.
Step 2. Configure your network
CockroachDB requires TCP communication on two ports:
- 26257 (
tcp:26257) for inter-node communication (i.e., working as a cluster) - 8080 (
tcp:8080) for accessing the Admin UI
Since GCE instances communicate on their internal IP addresses by default, you do not need to take any action to enable inter-node communication. However, to access the Admin UI from your local network, you must create a firewall rule for your project:
| Field | Recommended Value |
|---|---|
| Name | cockroachweb |
| Source filter | IP ranges |
| Source IP ranges | Your local network's IP ranges |
| Allowed protocols | tcp:8080 |
| Target tags | cockroachdb |
The tag feature will let you easily apply the rule to your instances.
Step 3. Provision VMs
You need 9 VMs across 3 GCE regions, 3 per region with each VM in a distinct availability zone. You also need 3 extra VMs, 1 per region, for a region-specific version of MovR and the HAProxy load balancer.
Create 9 VMs for CockroachDB nodes.
When creating each VM:
- Use the
n1-standard-4machine type (4 vCPUs, 15 GB memory) and the Ubuntu 16.04 OS image. Select one of the following region and availability zone configurations. Be sure to use each region/availability combination only once.
VM Region Availability Zone 1 us-east1us-east1-b2 us-east1us-east1-c3 us-east1us-east1-d4 us-central1us-central1-a5 us-central1us-central1-b6 us-central1us-central1-c7 us-west1us-west1-a8 us-west1us-west1-b9 us-west1us-west1-cTo apply the Admin UI firewall rule you created earlier, click Management, disk, networking, SSH keys, select the Networking tab, and then enter
cockroachdbin the Network tags field.
- Use the
Create 3 VMs for the region-specific versions of MovR and HAProxy, one in each of the regions mentioned above, using same machine types and OS image as mentioned above.
Note the internal IP address of each VM. You'll need these addresses when starting the CockroachDB nodes, configuring HAProxy, and running the MovR application.
Step 4. Start CockroachDB
Now that you have VMs in place, start your CockroachDB cluster across the three US regions.
Nodes in US East
SSH to the first VM in the US East region where you want to run a CockroachDB node.
Download the CockroachDB archive for Linux, extract the binary, and copy it into the
PATH:$ curl https://binaries.cockroachdb.com/cockroach-v19.1.11.linux-amd64.tgz \ | tar -xz$ sudo cp -i cockroach-v19.1.11.linux-amd64/cockroach /usr/local/bin/Run the
cockroach startcommand:$ cockroach start \ --insecure \ --advertise-addr=<node1 internal address> \ --join=<node1 internal address>:26257,<node2 internal address>:26257,<node3 internal address>:26257 \ --locality=cloud=gce,region=us-east1,zone=<relevant zone> \ --cache=.25 \ --max-sql-memory=.25 \ --backgroundRepeat steps 1 - 3 for the other two CockroachDB nodes in the region. Each time, be sure to:
- Adjust the
--advertise-addrflag. - Use the appropriate availability zone of the VM in the
zoneportion of the--localityflag.
- Adjust the
On any of the VMs in the US East region, run the one-time
cockroach initcommand to join the first nodes into a cluster:$ cockroach init --insecure --host=<address of any node>
Nodes in US Central
SSH to the first VM in the US Central region where you want to run a CockroachDB node.
Download the CockroachDB archive for Linux, extract the binary, and copy it into the
PATH:$ curl https://binaries.cockroachdb.com/cockroach-v19.1.11.linux-amd64.tgz \ | tar -xz$ sudo cp -i cockroach-v19.1.11.linux-amd64/cockroach /usr/local/bin/Run the
cockroach startcommand:$ cockroach start \ --insecure \ --advertise-addr=<node1 internal address> \ --join=<node1 internal address>:26257,<node2 internal address>:26257,<node3 internal address>:26257 \ --locality=cloud=gce,region=us-central1,zone=<relevant zone> \ --cache=.25 \ --max-sql-memory=.25 \ --backgroundRepeat steps 1 - 3 for the other two CockroachDB nodes in the region. Each time, be sure to:
- Adjust the
--advertise-addrflag. - Use the appropriate availability zone of the VM in the
zoneportion of the--localityflag.
- Adjust the
Nodes in US West
SSH to the first VM in the US West region where you want to run a CockroachDB node.
Download the CockroachDB archive for Linux, extract the binary, and copy it into the
PATH:$ curl https://binaries.cockroachdb.com/cockroach-v19.1.11.linux-amd64.tgz \ | tar -xz$ sudo cp -i cockroach-v19.1.11.linux-amd64/cockroach /usr/local/bin/Run the
cockroach startcommand:$ cockroach start \ --insecure \ --advertise-addr=<node1 internal address> \ --join=<node1 internal address>:26257,<node2 internal address>:26257,<node3 internal address>:26257 \ --locality=cloud=gce,region=us-west1,zone=<relevant zone> \ --cache=.25 \ --max-sql-memory=.25 \ --backgroundRepeat steps 1 - 3 for the other two CockroachDB nodes in the region. Each time, be sure to:
- Adjust the
--advertise-addrflag. - Use the appropriate availability zone of the VM in the
zoneportion of the--localityflag.
- Adjust the
Step 5. Set up the client VMs
Next, install Docker and HAProxy on each client VM. Docker is required so you can later run MovR from a Docker image, and HAProxy will serve as the region-specific load balancer for MovR in each region.
SSH to the VM in the US East region where you want to run MovR and HAProxy.
Install HAProxy:
$ sudo apt-get update$ sudo apt-get install haproxyDownload the CockroachDB archive for Linux, extract the binary, and copy it into the
PATH:$ curl https://binaries.cockroachdb.com/cockroach-v19.1.11.linux-amd64.tgz \ | tar -xz$ sudo cp -i cockroach-v19.1.11.linux-amd64/cockroach /usr/local/bin/The
cockroachbinary needs to be on these VMs so you can run some client commands built into the binary, such as the command in the next step and the command for starting the built-in SQL shell.Run the
cockroach gen haproxycommand to generate an HAProxy config file, specifying the address of any CockroachDB node and the--localityof nodes in the US East region:$ cockroach gen haproxy \ --insecure \ --host=<address of any node> \ --locality=region=us-east1The generated configuration file is called
haproxy.cfgand looks as follows, with theserveraddresses pre-populated with just the nodes in US East based on the--localityflag used:global maxconn 4096 defaults mode tcp # Timeout values should be configured for your specific use. # See: https://cbonte.github.io/haproxy-dconv/1.8/configuration.html#4-timeout%20connect timeout connect 10s timeout client 1m timeout server 1m # TCP keep-alive on client side. Server already enables them. option clitcpka listen psql bind :26257 mode tcp balance roundrobin option httpchk GET /health?ready=1 server cockroach1 <node1 address>:26257 check port 8080 server cockroach2 <node2 address>:26257 check port 8080 server cockroach3 <node3 address>:26257 check port 8080Start HAProxy, with the
-fflag pointing to thehaproxy.cfgfile:$ haproxy -f haproxy.cfg &Repeat the steps above for the client VMs in the other two regions. For each region, be sure to adjust the
--localityflag when running thecockroach gen haproxycommand.
Step 6. Configure the cluster
Before you can run MovR against the cluster and demonstrate the geo-partitioning feature, you must create a movr database and enable an enterprise license.
SSH to the client VM in the US East region.
Use the
cockroach sqlcommand to start the built-in SQL shell, specifying the address of the HAProxy load balancer in the region:$ cockroach sql --insecure --host=<address of HAProxy in US East>In the SQL shell, create the
movrdatabase:> CREATE DATABASE movr;Enable the trial license you requested earlier:
> SET CLUSTER SETTING cluster.organization = '<your organization>';> SET CLUSTER SETTING enterprise.license = '<your license key>';Set the longitude and latitude of the regions where you are running CockroachDB nodes:
> INSERT into system.locations VALUES
    ('region', 'us-east1', 33.836082, -81.163727),
    ('region', 'us-central1', 42.032974, -93.581543),
    ('region', 'us-west1', 43.804133, -120.554201);
Inserting these coordinates enables you to visualize your cluster on the Node Map feature of the Admin UI.
Exit the SQL shell:
\q
Step 7. Access the Admin UI
Now that you've deployed and configured your cluster, take a look at it in the Admin UI:
Open a browser and go to
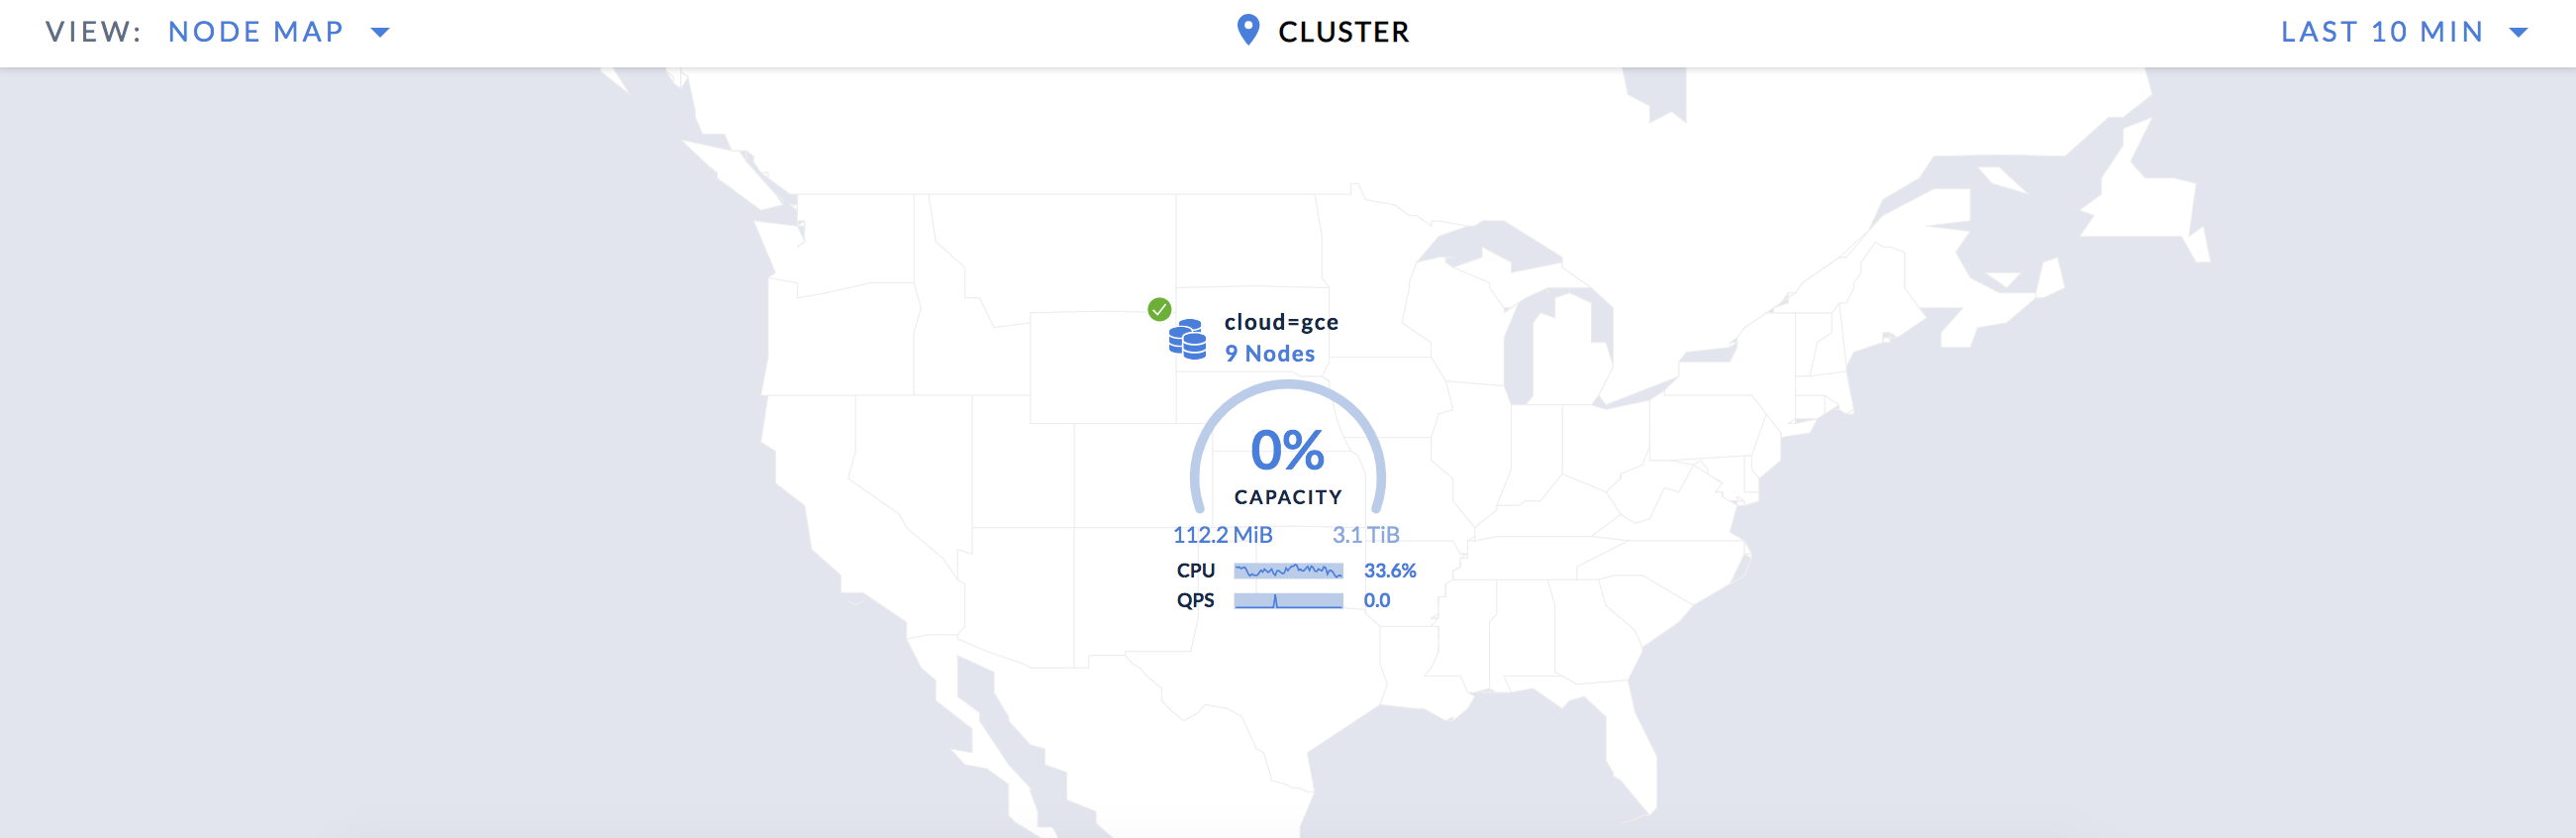
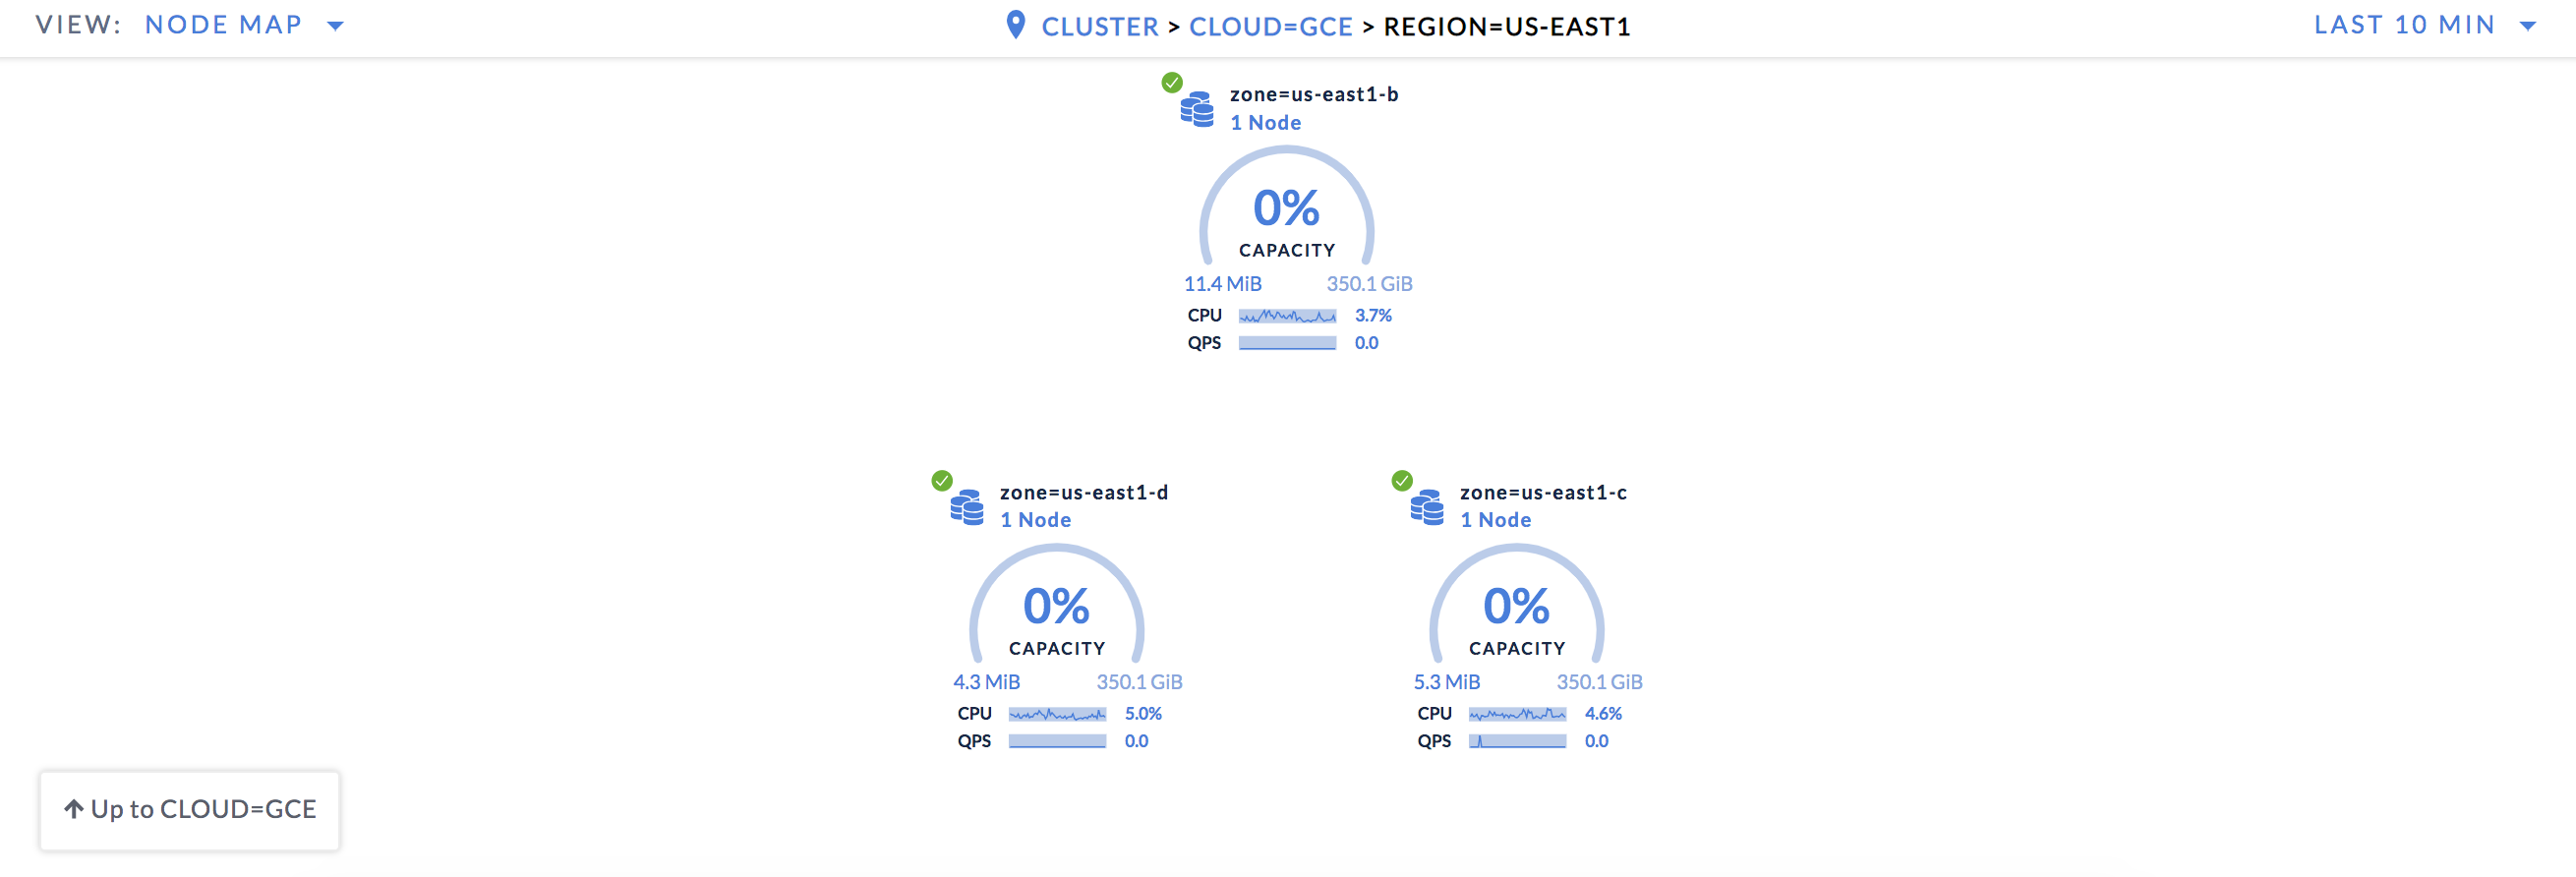
http://<external address of any node>:8080.On the Cluster Overview page, select View: Node Map to access the Node Map, which visualizes your CockroachDB cluster on a map of the US:
Drill down one level to see your nodes across 3 regions:
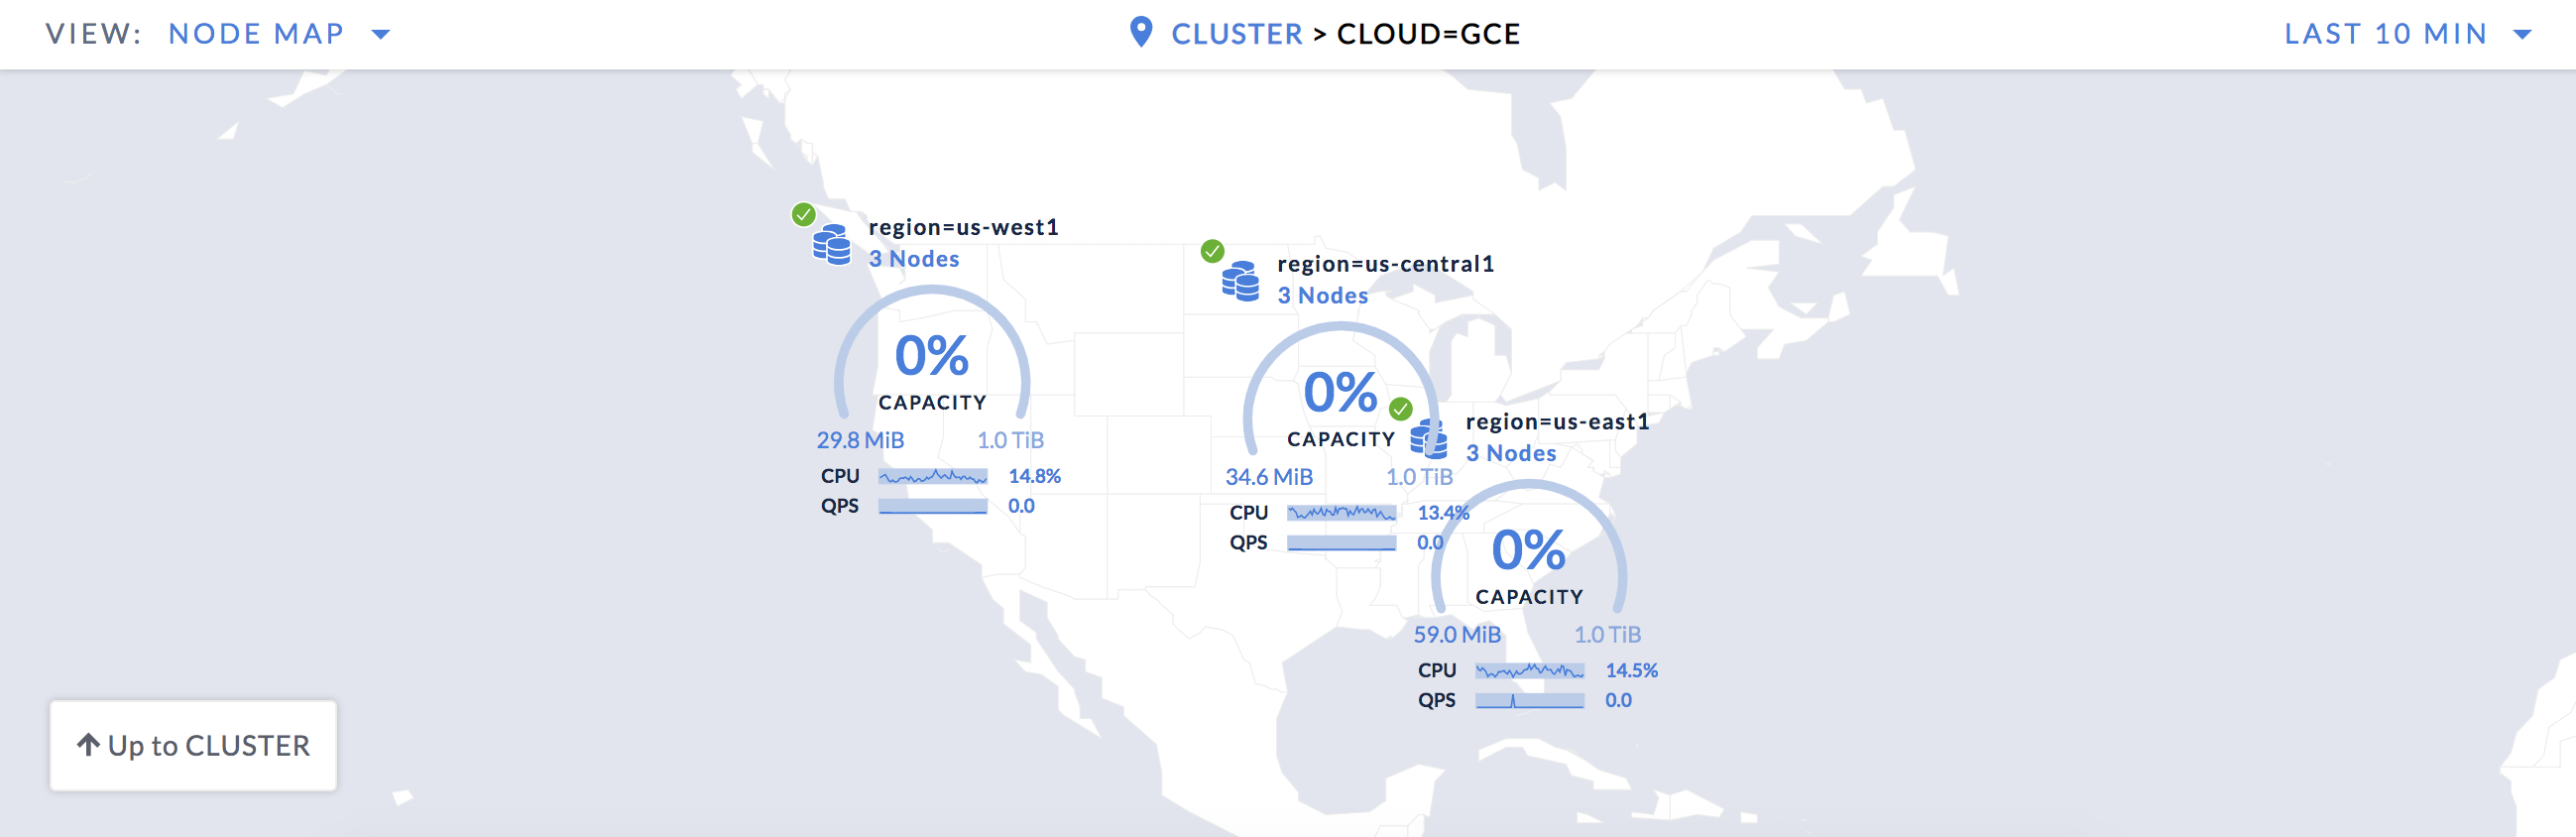
Drill into a region to see that each node is in a distinct availability zone:
Step 8. Start MovR
Be sure to use the exact version of MovR specified in the commands: movr:19.03.2. This tutorial relies on this specific version. Later versions use an expanded schema and will be featured in future tutorials.
MovR in US East
Still on the client VM in the US East region, load the MovR schema and initial data for the cities of New York, Chicago, and Seattle, pointing at the address of the US East load balancer:
$ sudo docker run -it --rm cockroachdb/movr:19.03.2 \
--app-name "movr-load" \
--url "postgres://root@<address of HAProxy in US East>:26257/movr?sslmode=disable" \
load \
--num-users 100 \
--num-rides 100 \
--num-vehicles 10 \
--city-pair us_east:"new york" \
--city-pair central:chicago \
--city-pair us_west:seattle
After the Docker image downloads, you'll see data being generated for the specified cities:
...
[INFO] (MainThread) initializing tables
[INFO] (MainThread) loading cities ['new york', 'chicago', 'seattle']
[INFO] (MainThread) loading movr data with ~100 users, ~10 vehicles, and ~100 rides
[INFO] (MainThread) Only using 3 of 5 requested threads, since we only create at most one thread per city
[INFO] (Thread-1  ) Generating user data for new york...
[INFO] (Thread-2  ) Generating user data for chicago...
[INFO] (Thread-3  ) Generating user data for seattle...
[INFO] (Thread-2  ) Generating vehicle data for chicago...
[INFO] (Thread-3  ) Generating vehicle data for seattle...
[INFO] (Thread-1  ) Generating vehicle data for new york...
[INFO] (Thread-2  ) Generating ride data for chicago...
[INFO] (Thread-3  ) Generating ride data for seattle...
[INFO] (Thread-1  ) Generating ride data for new york...
[INFO] (Thread-2  ) populated chicago in 9.173931 seconds
[INFO] (Thread-3  ) populated seattle in 9.257723 seconds
[INFO] (Thread-1  ) populated new york in 9.386243 seconds
[INFO] (MainThread) populated 3 cities in 20.587325 seconds
[INFO] (MainThread) - 4.954505 users/second
[INFO] (MainThread) - 4.954505 rides/second
[INFO] (MainThread) - 0.582883 vehicles/second
Start MovR in the US East region, representing users in New York. Be sure to point at the address of the US East load balancer:
$ sudo docker run -it --rm cockroachdb/movr:19.03.2 \
--app-name "movr-east" \
--url "postgres://root@<address of HAProxy in US East>:26257/movr?sslmode=disable" \
--num-threads=15 \
run \
--city="new york"
MovR in US Central
SSH to the client VM in the US Central region.
Start MovR in the US Central region, representing users in Chicago. Be sure to point at the address of the US Central load balancer:
$ sudo docker run -it --rm cockroachdb/movr:19.03.2 \
--app-name "movr-central" \
--url "postgres://root@<address of HAProxy in US Central>:26257/movr?sslmode=disable" \
--num-threads=15 \
run \
--city="chicago"
MovR in US West
SSH to the client VM in the US West region.
Start MovR in the US West region, representing users in Seattle. Be sure to point at the address of the US West load balancer:
$ sudo docker run -it --rm cockroachdb/movr:19.03.2 \
--app-name "movr-west" \
--url "postgres://root@<address of HAProxy in US West>:26257/movr?sslmode=disable" \
--num-threads=15 \
run \
--city="seattle"
Step 9. Check SQL latency
Now that MovR is running in all 3 regions, use the Admin UI to check the SQL latency before partitioning.
Go back to the Admin UI.
Click Metrics on the left and hover over the Service Latency: SQL, 99th percentile timeseries graph:
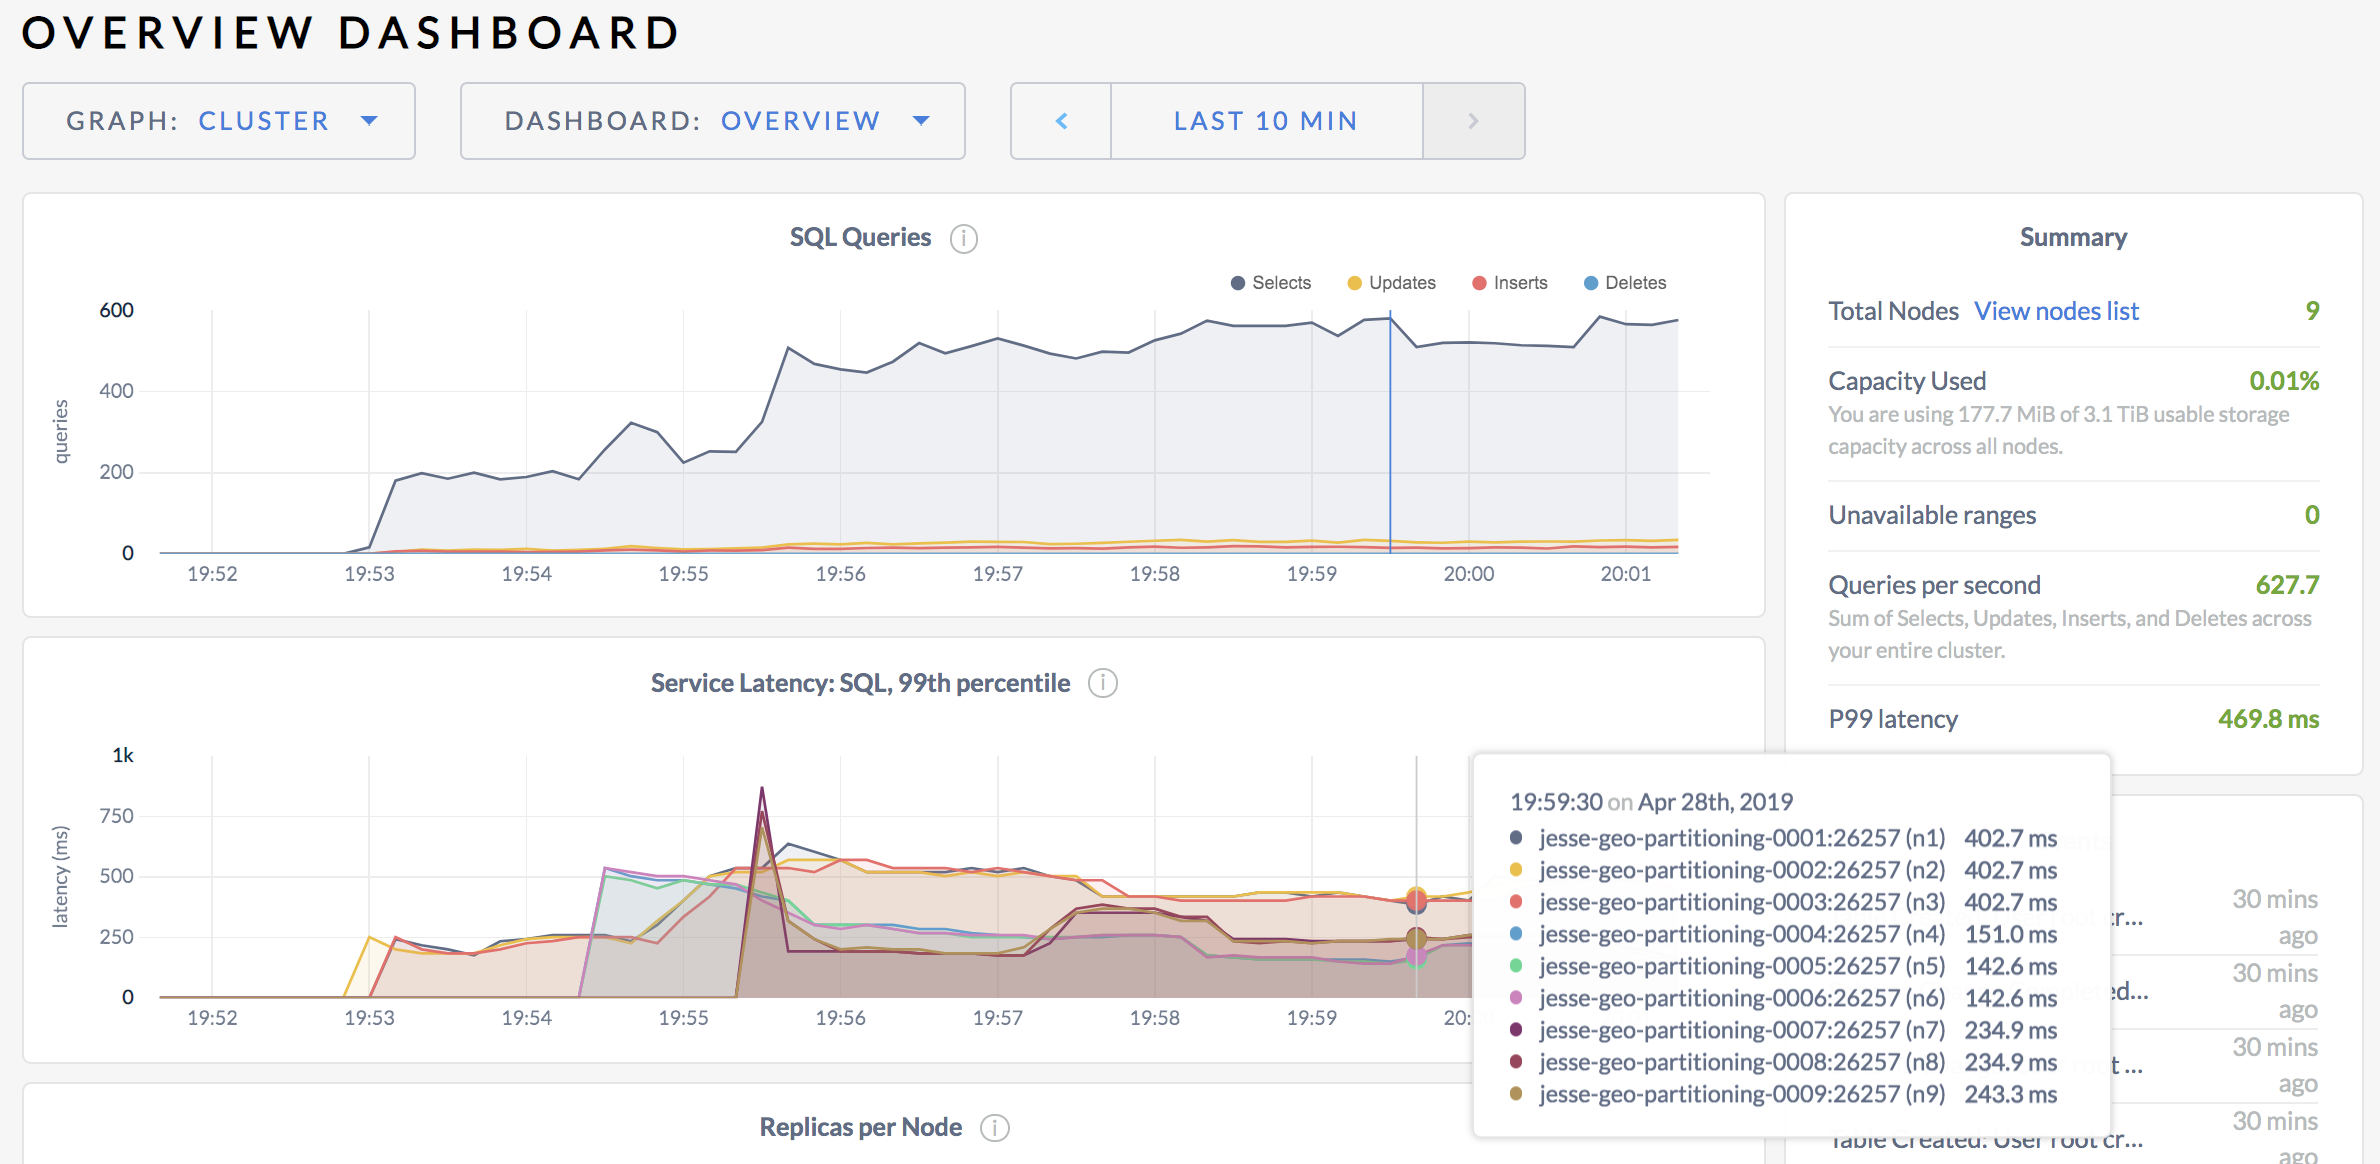
For each node, you'll see that the max latency of 99% of queries is in the 100s of milliseconds.
Step 10. Check replica distribution
To understand why SQL latency is so high, use the built-in SQL shell to check the distribution of replicas.
SSH to the client VM in any region.
Use the
cockroach sqlcommand to start the built-in SQL shell, specifying the address of the HAProxy load balancer in the region:$ cockroach sql --insecure --database=movr --host=<address of HAProxy in region>In the SQL shell, use the
SHOW EXPERIMENTAL_RANGESstatement to view the location of replicas for each of the 3 tables and their secondary indexes:> SHOW EXPERIMENTAL_RANGES FROM TABLE users; SHOW EXPERIMENTAL_RANGES FROM TABLE vehicles; SHOW EXPERIMENTAL_RANGES FROM INDEX vehicles_auto_index_fk_city_ref_users; SHOW EXPERIMENTAL_RANGES FROM TABLE rides; SHOW EXPERIMENTAL_RANGES FROM INDEX rides_auto_index_fk_city_ref_users; SHOW EXPERIMENTAL_RANGES FROM INDEX rides_auto_index_fk_vehicle_city_ref_vehicles;start_key | end_key | range_id | replicas | lease_holder +-----------+---------+----------+----------+--------------+ NULL | NULL | 21 | {3,6,9} | 6 (1 row) Time: 4.205387878s start_key | end_key | range_id | replicas | lease_holder +-------------+-------------+----------+----------+--------------+ NULL | /"new york" | 23 | {1,4,7} | 1 /"new york" | /"seattle" | 51 | {2,5,9} | 2 /"seattle" | NULL | 32 | {1,5,9} | 5 (3 rows) Time: 64.121µs start_key | end_key | range_id | replicas | lease_holder +-----------+---------+----------+----------+--------------+ NULL | NULL | 32 | {1,5,9} | 5 (1 row) Time: 37.14µs start_key | end_key | range_id | replicas | lease_holder +-----------+---------+----------+----------+--------------+ NULL | NULL | 31 | {3,5,7} | 7 (1 row) Time: 28.988µs start_key | end_key | range_id | replicas | lease_holder +-----------+---------+----------+----------+--------------+ NULL | NULL | 31 | {3,5,7} | 7 (1 row) Time: 25.707µs start_key | end_key | range_id | replicas | lease_holder +-----------+---------+----------+----------+--------------+ NULL | NULL | 31 | {3,5,7} | 7 (1 row)Here's a node/region mapping:
Nodes Region 1 - 3 us-east14 - 6 us-central17 - 9 us-west1You'll see that most tables and indexes map to a single range. The one exception is the
vehiclestable, which maps to 3 ranges. In all cases, each range has 3replicas, with each replica on a node in a distinct region. For each range, one of the replicas is thelease_holder.Thinking back to how reads and writes work in CockroachDB, this tells you that many reads are leaving their region to reach the relevant leaseholder replica, and all writes are spanning regions to achieve Raft consensus. This explains the currently high latencies.
For example, based on output above, the replicas for the
userstable are on nodes 3, 6, and 9, with the leaseholder on node 6. This means that when a user in New York registers for the MovR service:- A request to write a row to the
userstable goes through the load balancer in the US east to a gateway node in the US east. - The request is routed to the leaseholder on node 6 in the US central.
- The leaseholder waits for consensus from a replica in the US east or US west.
- The leaseholder returns acknowledgement to the gateway node in the US east.
- The gateway node responds to the client.
- A request to write a row to the
The Network Latency debug page, available at http://<external address of any node>:8080/#/reports/network, gives you added insight into latency between regions. You'll see that nodes within a region experience sub-millisecond latency, while latency between nodes in different regions is much higher.
Step 11. Partition data by city
The most effective way to prevent the high SQL latency resulting from cross-region operations is to partition each table and secondary index by city. Essentially, this will create a distinct set of ranges for each city partition, which you can then pin to nodes in the relevant region using replication zones (next step).
Back in the SQL shell on one of your client VMs, partition the
userstable by city:> ALTER TABLE users PARTITION BY LIST (city) ( PARTITION new_york VALUES IN ('new york'), PARTITION chicago VALUES IN ('chicago'), PARTITION seattle VALUES IN ('seattle') );Partition the
vehiclestable and its secondary index by city:> ALTER TABLE vehicles PARTITION BY LIST (city) ( PARTITION new_york VALUES IN ('new york'), PARTITION chicago VALUES IN ('chicago'), PARTITION seattle VALUES IN ('seattle') );> ALTER INDEX vehicles_auto_index_fk_city_ref_users PARTITION BY LIST (city) ( PARTITION new_york_idx VALUES IN ('new york'), PARTITION chicago_idx VALUES IN ('chicago'), PARTITION seattle_idx VALUES IN ('seattle') );Partition the
ridestable and its secondary indexes by city:> ALTER TABLE rides PARTITION BY LIST (city) ( PARTITION new_york VALUES IN ('new york'), PARTITION chicago VALUES IN ('chicago'), PARTITION seattle VALUES IN ('seattle') );> ALTER INDEX rides_auto_index_fk_city_ref_users PARTITION BY LIST (city) ( PARTITION new_york_idx1 VALUES IN ('new york'), PARTITION chicago_idx1 VALUES IN ('chicago'), PARTITION seattle_idx1 VALUES IN ('seattle') );> ALTER INDEX rides_auto_index_fk_vehicle_city_ref_vehicles PARTITION BY LIST (vehicle_city) ( PARTITION new_york_idx2 VALUES IN ('new york'), PARTITION chicago_idx2 VALUES IN ('chicago'), PARTITION seattle_idx2 VALUES IN ('seattle') );
Step 12. Pin partitions to regions
Now that all tables and secondary indexes have been partitioned by city, for each partition, you can create a replication zone that pins the partition's replicas to nodes in a specific region, using the localities specified when nodes were started.
Still in the SQL shell on one of your client VMs, create replication zones for the partitions of the
userstable:> ALTER PARTITION new_york OF TABLE movr.users CONFIGURE ZONE USING constraints='[+region=us-east1]'; ALTER PARTITION chicago OF TABLE movr.users CONFIGURE ZONE USING constraints='[+region=us-central1]'; ALTER PARTITION seattle OF TABLE movr.users CONFIGURE ZONE USING constraints='[+region=us-west1]';Create replication zones for the partitions of the
vehiclestable:> ALTER PARTITION new_york OF TABLE movr.vehicles CONFIGURE ZONE USING constraints='[+region=us-east1]'; ALTER PARTITION chicago OF TABLE movr.vehicles CONFIGURE ZONE USING constraints='[+region=us-central1]'; ALTER PARTITION seattle OF TABLE movr.vehicles CONFIGURE ZONE USING constraints='[+region=us-west1]';Create replication zones for the partitions of the secondary index on the
vehiclestable:> ALTER PARTITION new_york_idx OF TABLE movr.vehicles CONFIGURE ZONE USING constraints='[+region=us-east1]'; ALTER PARTITION chicago_idx OF TABLE movr.vehicles CONFIGURE ZONE USING constraints='[+region=us-central1]'; ALTER PARTITION seattle_idx OF TABLE movr.vehicles CONFIGURE ZONE USING constraints='[+region=us-west1]';Create replication zones for the partitions of the
ridestable:> ALTER PARTITION new_york OF TABLE movr.rides CONFIGURE ZONE USING constraints='[+region=us-east1]'; ALTER PARTITION chicago OF TABLE movr.rides CONFIGURE ZONE USING constraints='[+region=us-central1]'; ALTER PARTITION seattle OF TABLE movr.rides CONFIGURE ZONE USING constraints='[+region=us-west1]';Create replication zones for the partitions of the first secondary index on the
ridestable:> ALTER PARTITION new_york_idx1 OF TABLE movr.rides CONFIGURE ZONE USING constraints='[+region=us-east1]'; ALTER PARTITION chicago_idx1 OF TABLE movr.rides CONFIGURE ZONE USING constraints='[+region=us-central1]'; ALTER PARTITION seattle_idx1 OF TABLE movr.rides CONFIGURE ZONE USING constraints='[+region=us-west1]';Create replication zones for the partitions of the other secondary index on the
ridestable:> ALTER PARTITION new_york_idx2 OF TABLE movr.rides CONFIGURE ZONE USING constraints='[+region=us-east1]'; ALTER PARTITION chicago_idx2 OF TABLE movr.rides CONFIGURE ZONE USING constraints='[+region=us-central1]'; ALTER PARTITION seattle_idx2 OF TABLE movr.rides CONFIGURE ZONE USING constraints='[+region=us-west1]';
Step 13. Re-check replica distribution
Still in the SQL shell on one of your client VMs, use the SHOW EXPERIMENTAL_RANGES statement to check replica placement after partitioning:
> SELECT * FROM [SHOW EXPERIMENTAL_RANGES FROM TABLE users]
    WHERE "start_key" NOT LIKE '%Prefix%';
  SELECT * FROM [SHOW EXPERIMENTAL_RANGES FROM TABLE vehicles]
    WHERE "start_key" NOT LIKE '%Prefix%';
  SELECT * FROM [SHOW EXPERIMENTAL_RANGES FROM INDEX vehicles_auto_index_fk_city_ref_users]
    WHERE "start_key" NOT LIKE '%Prefix%';
  SELECT * FROM [SHOW EXPERIMENTAL_RANGES FROM TABLE rides]
    WHERE "start_key" NOT LIKE '%Prefix%';
  SELECT * FROM [SHOW EXPERIMENTAL_RANGES FROM INDEX rides_auto_index_fk_city_ref_users]
    WHERE "start_key" NOT LIKE '%Prefix%';
  SELECT * FROM [SHOW EXPERIMENTAL_RANGES FROM INDEX rides_auto_index_fk_vehicle_city_ref_vehicle]
    WHERE "start_key" NOT LIKE '%Prefix%';
   start_key  |        end_key        | range_id | replicas | lease_holder
+-------------+-----------------------+----------+----------+--------------+
  /"chicago"  | /"chicago"/PrefixEnd  |       62 | {4,5,6}  |            6
  /"new york" | /"new york"/PrefixEnd |       66 | {1,2,3}  |            2
  /"seattle"  | /"seattle"/PrefixEnd  |       64 | {7,8,9}  |            8
(3 rows)

Time: 2.858236902s

   start_key  |        end_key        | range_id | replicas | lease_holder
+-------------+-----------------------+----------+----------+--------------+
  /"chicago"  | /"chicago"/PrefixEnd  |       52 | {4,5,6}  |            5
  /"new york" | /"new york"/PrefixEnd |       51 | {1,2,3}  |            3
  /"seattle"  | /"seattle"/PrefixEnd  |       32 | {7,8,9}  |            7
(3 rows)

Time: 74.36µs

   start_key  |        end_key        | range_id | replicas | lease_holder
+-------------+-----------------------+----------+----------+--------------+
  /"chicago"  | /"chicago"/PrefixEnd  |       37 | {4,5,6}  |            4
  /"new york" | /"new york"/PrefixEnd |       35 | {1,2,3}  |            3
  /"seattle"  | /"seattle"/PrefixEnd  |       39 | {7,8,9}  |            8
(3 rows)

Time: 72.98µs

   start_key  |        end_key        | range_id | replicas | lease_holder
+-------------+-----------------------+----------+----------+--------------+
  /"chicago"  | /"chicago"/PrefixEnd  |      113 | {4,5,6}  |            4
  /"new york" | /"new york"/PrefixEnd |      111 | {1,2,3}  |            3
  /"seattle"  | /"seattle"/PrefixEnd  |      115 | {7,8,9}  |            9
(3 rows)

Time: 71.446µs
You'll see that the replicas for each partition are now located on nodes in the relevant region:
- New York partitions are on nodes 1 - 3
- Chicago partitions are on nodes 4 - 6
- Seattle partitions are on nodes 7 - 9
This means that requests from users in a city no longer leave the region, thus removing all cross-region latencies.
Step 14. Re-check SQL latency
Now that you've verified that replicas are located properly, go back to the Admin UI, click Metrics on the left, and hover over the Service Latency: SQL, 99th percentile timeseries graph:
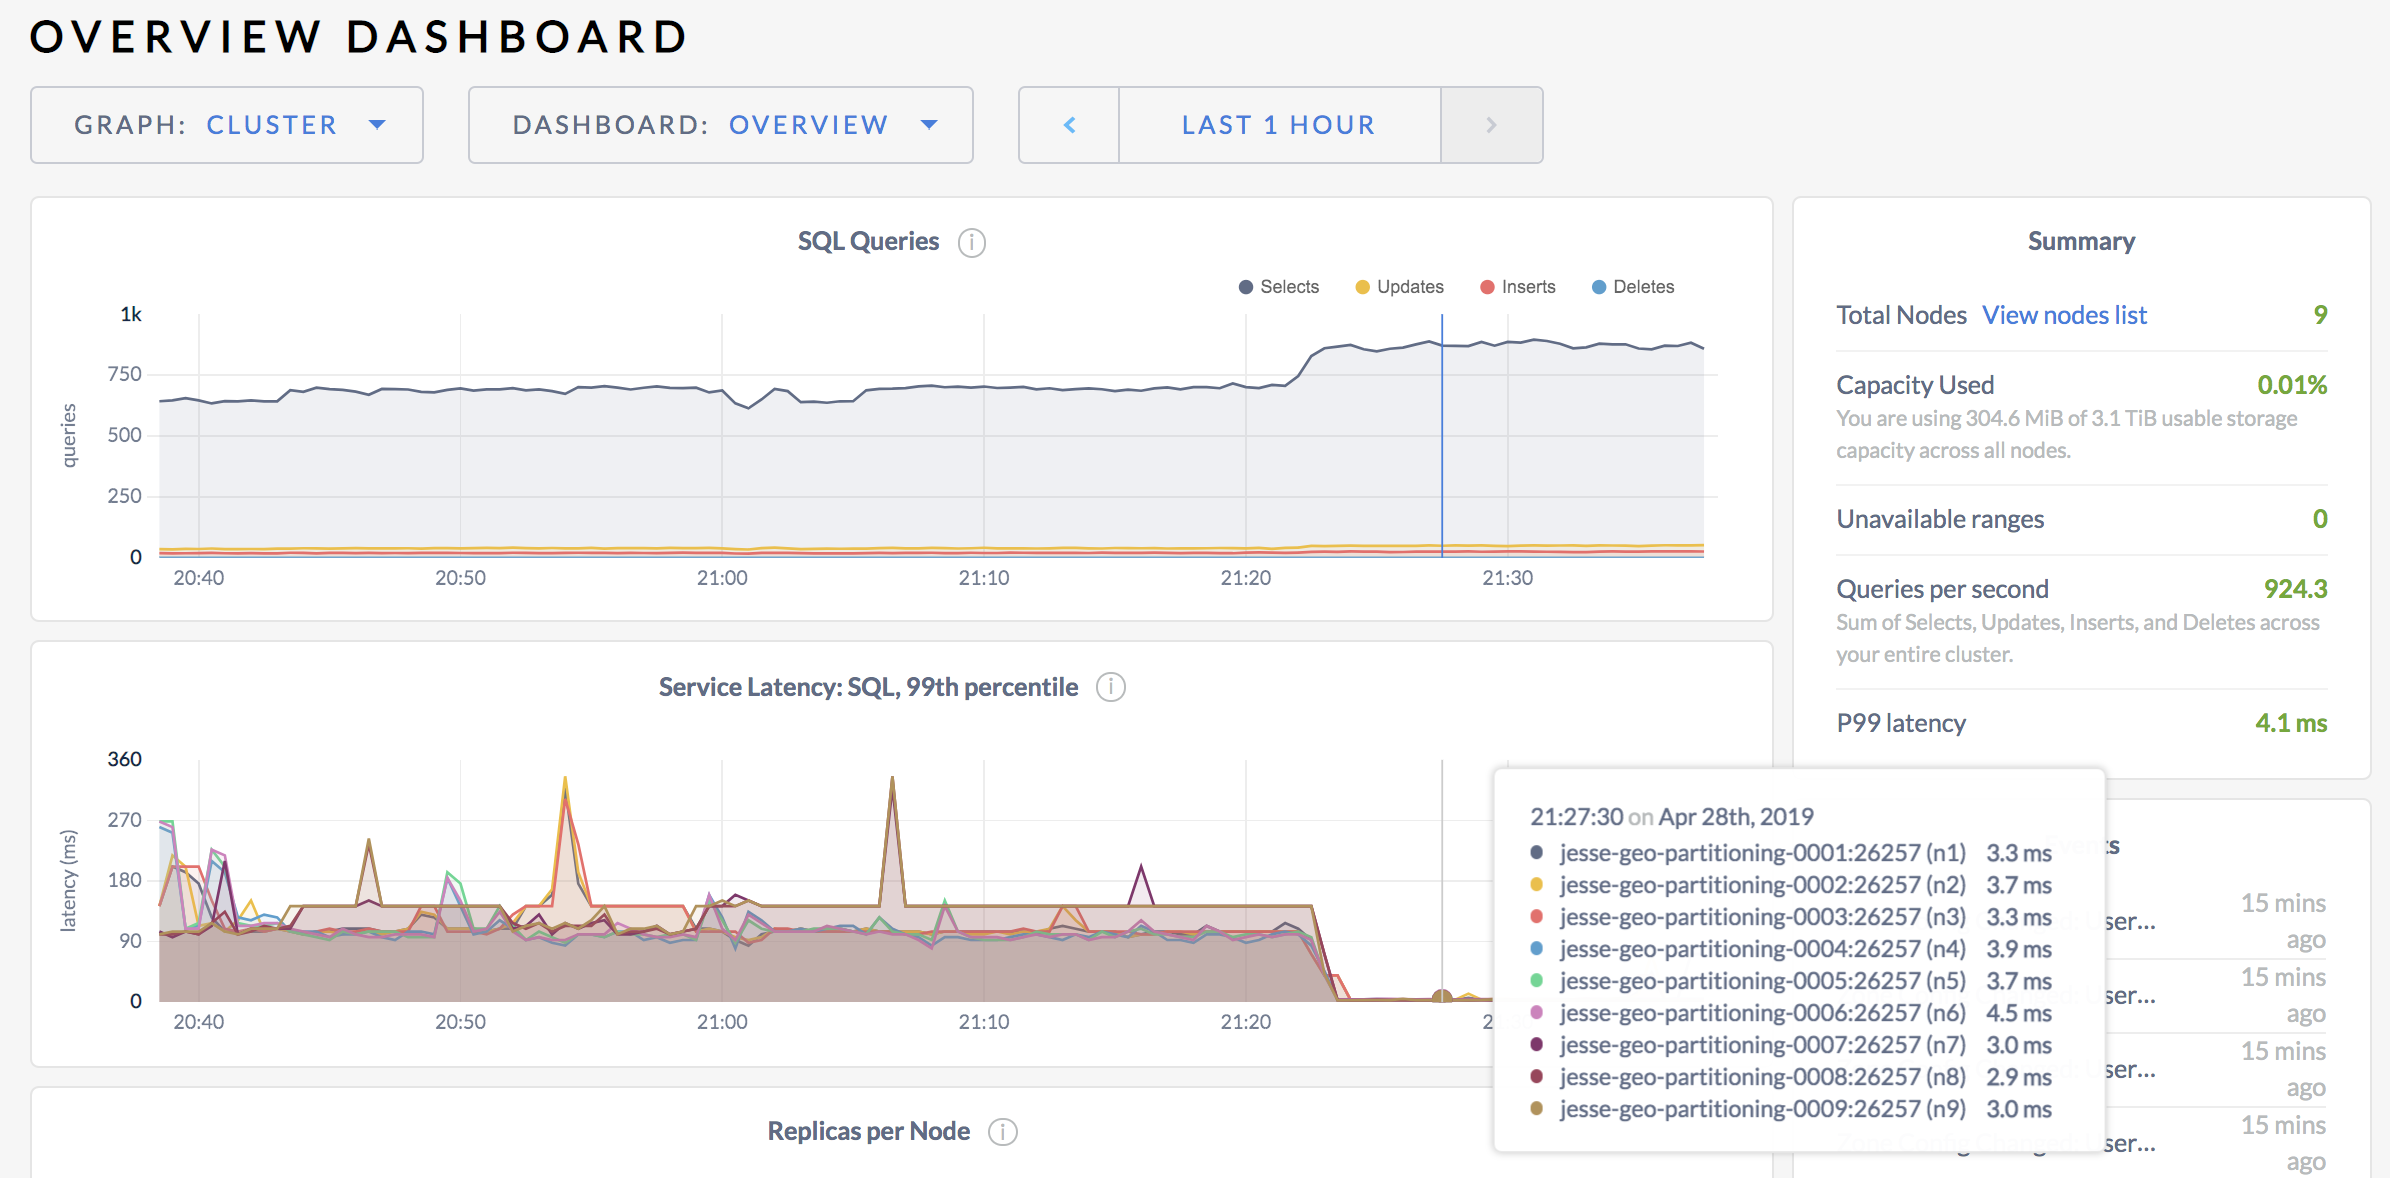
For each node, you'll see that 99% of all queries are now 4 milliseconds or less.
99th percentile latency can be influenced by occasional slow queries. For a more accurate sense of typical SQL latency, go to the following URL to view a custom graph for 90th percentile latency:
http://<external address of any node>:8080/#/debug/chart?charts=%5B%7B%22metrics%22%3A%5B%7B%22downsampler%22%3A3%2C%22aggregator%22%3A3%2C%22derivative%22%3A0%2C%22perNode%22%3Atrue%2C%22source%22%3A%22%22%2C%22metric%22%3A%22cr.node.sql.exec.latency-p90%22%7D%5D%2C%22axisUnits%22%3A2%7D%5D
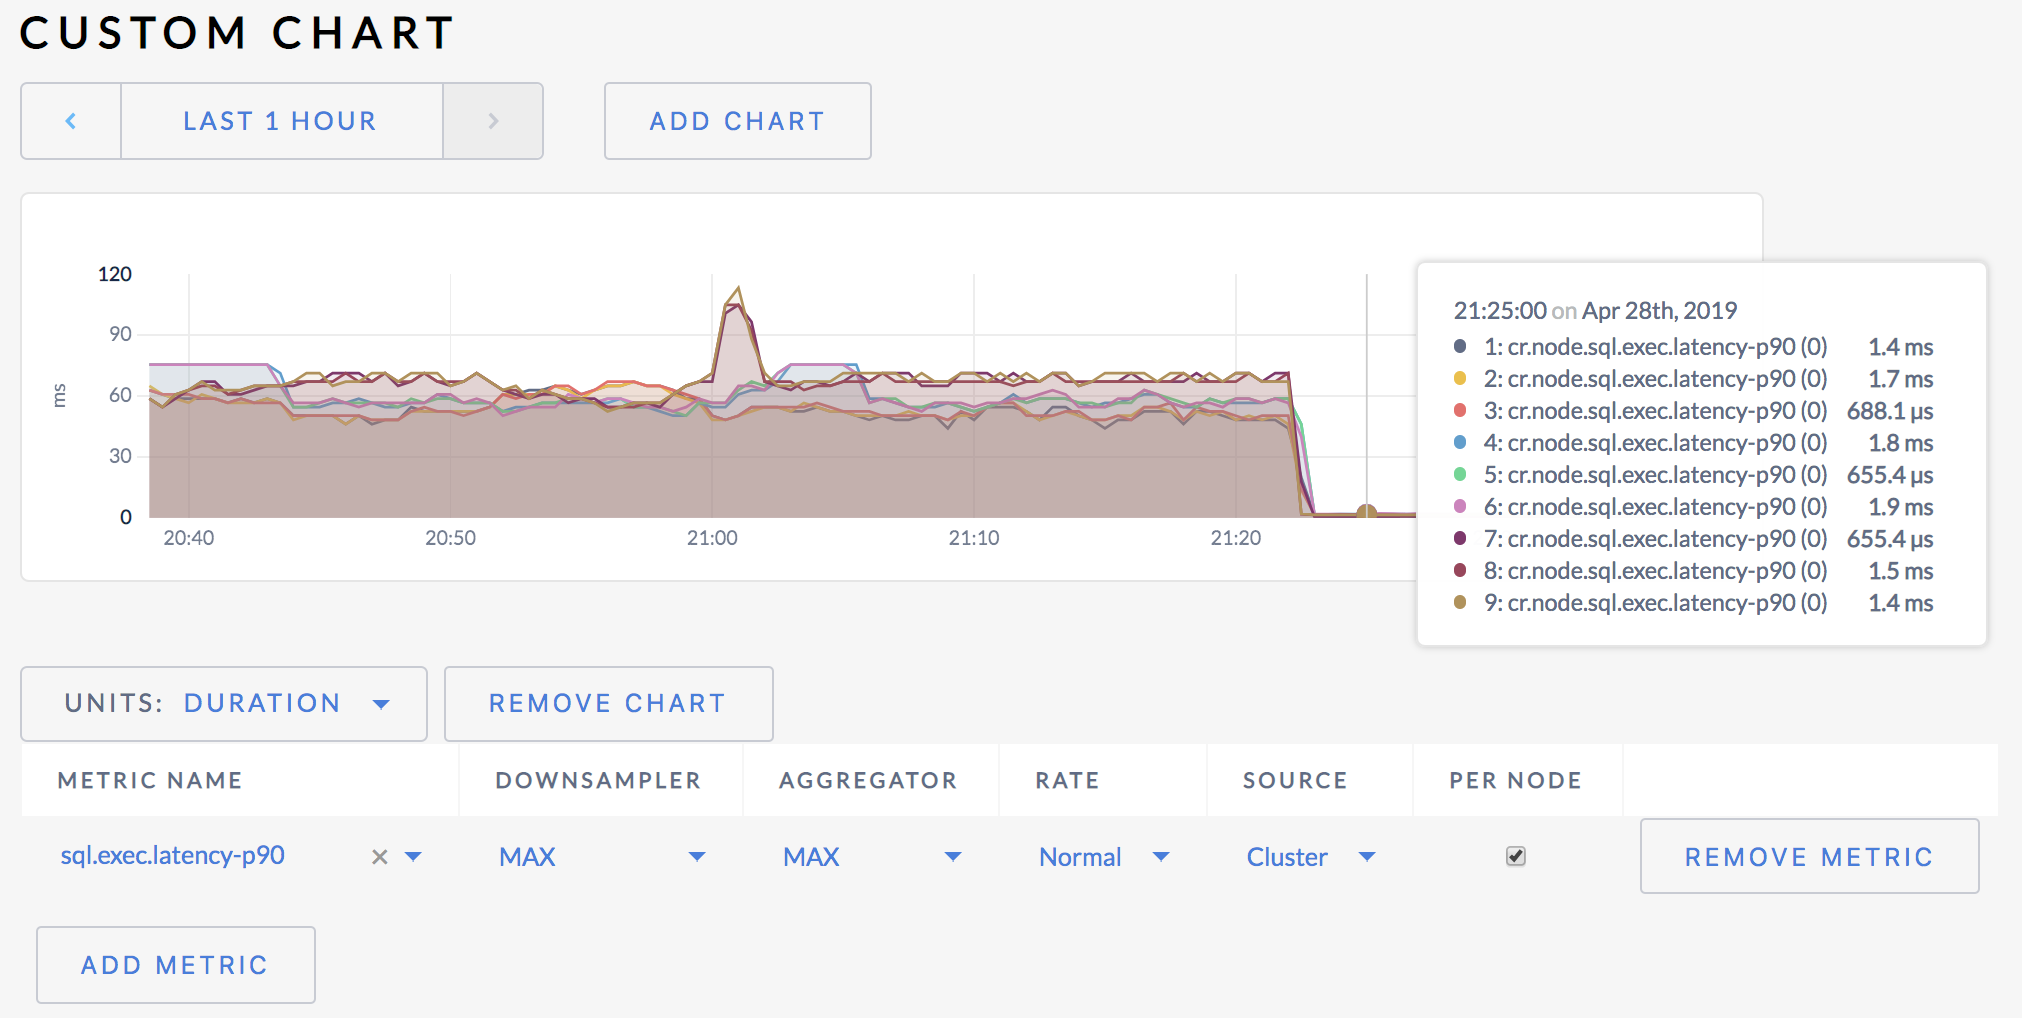
As you can see, 90% of all SQL queries execute in less than 2 milliseconds. In some cases, latency is even sub-millisecond.
