
This page walks you through a simple demonstration of how CockroachDB automatically rebalances data as you scale. Starting with a 3-node local cluster, you'll run a sample workload and watch the replica count increase. You'll then add 2 more nodes and watch how CockroachDB automatically rebalances replicas to efficiently use all available capacity.
Before you begin
Make sure you have already installed CockroachDB.
Step 1. Start a 3-node cluster
Use the cockroach start command to start 3 nodes:
# In a new terminal, start node 1:
$ cockroach start \
--insecure \
--store=scale-node1 \
--listen-addr=localhost:26257 \
--http-addr=localhost:8080 \
--join=localhost:26257,localhost:26258,localhost:26259
# In a new terminal, start node 2:
$ cockroach start \
--insecure \
--store=scale-node2 \
--listen-addr=localhost:26258 \
--http-addr=localhost:8081 \
--join=localhost:26257,localhost:26258,localhost:26259
# In a new terminal, start node 3:
$ cockroach start \
--insecure \
--store=scale-node3 \
--listen-addr=localhost:26259 \
--http-addr=localhost:8082 \
--join=localhost:26257,localhost:26258,localhost:26259
Step 2. Initialize the cluster
In a new terminal, use the cockroach init command to perform a one-time initialization of the cluster:
$ cockroach init \
--insecure \
--host=localhost:26257
Step 3. Verify that the cluster is live
In a new terminal, connect the built-in SQL shell to any node to verify that the cluster is live:
$ cockroach sql --insecure --host=localhost:26257
> SHOW DATABASES;
  database_name
+---------------+
  defaultdb
  postgres
  system
(3 rows)
Exit the SQL shell:
> \q
Step 4. Run a sample workload
CockroachDB comes with built-in load generators for simulating different types of client workloads, printing out per-operation statistics every second and totals after a specific duration or max number of operations. In this tutorial, you'll use the tpcc workload to simulate transaction processing using a rich schema of multiple tables.
Load the initial schema and data:
$ cockroach workload init tpcc \
'postgresql://root@localhost:26257?sslmode=disable'
The initial data is enough for the purpose of this tutorial, but you can run the workload for as long as you like to increase the data size, adjusting the
--durationflag as appropriate:$ cockroach workload run tpcc \ --duration=30s \ 'postgresql://root@localhost:26257?sslmode=disable'You'll see per-operation statistics print to standard output every second.
Step 5. Watch the replica count increase
Open the Admin UI at http://localhost:8080 and you’ll see the replica count increase as the tpcc workload writes data.

Step 6. Add 2 more nodes
Adding capacity is as simple as starting more nodes and joining them to the running cluster:
# In a new terminal, start node 4:
$ cockroach start \
--insecure \
--store=scale-node4 \
--listen-addr=localhost:26260 \
--http-addr=localhost:8083 \
--join=localhost:26257,localhost:26258,localhost:26259
# In a new terminal, start node 5:
$ cockroach start \
--insecure \
--store=scale-node5 \
--listen-addr=localhost:26261 \
--http-addr=localhost:8084 \
--join=localhost:26257,localhost:26258,localhost:26259
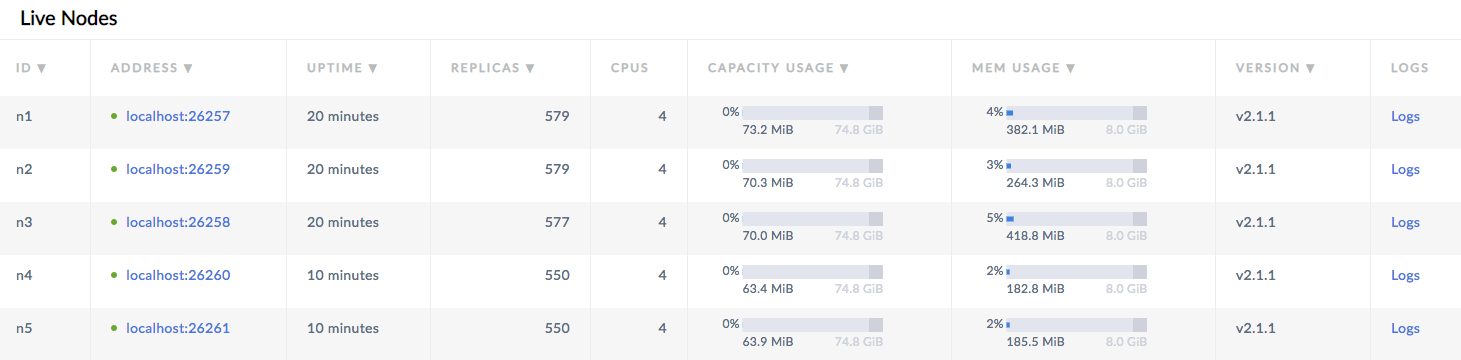
Step 7. Watch data rebalance across all 5 nodes
Back in the Admin UI, you'll now see 5 nodes listed. At first, the replica count will be lower for nodes 4 and 5. Very soon, however, you'll see those numbers even out across all nodes, indicating that data is being automatically rebalanced to utilize the additional capacity of the new nodes.
After scaling to 5 nodes, the Admin UI will call out a number of under-replicated ranges. This is due to the cluster preferring 5 replicas for important internal system data by default. When the cluster is less than 5 nodes, this preference is ignored in reporting, but as soon as there are more than 3 nodes, the cluster recognizes this preference and reports the under-replicated state in the UI. As those ranges are up-replicated, the under-replicated range count will decrease to 0.
Step 8. Stop the cluster
Once you're done with your test cluster, stop each node by switching to its terminal and pressing CTRL-C.
For the last node, the shutdown process will take longer (about a minute) and will eventually force stop the node. This is because, with only 1 node still online, a majority of replicas are no longer available (2 of 3), and so the cluster is not operational. To speed up the process, press CTRL-C a second time.
If you do not plan to restart the cluster, you may want to remove the nodes' data stores:
$ rm -rf scale-node1 scale-node2 scale-node3 scale-node4 scale-node5
What's next?
Explore other core CockroachDB benefits and features:
