
This page walks you through a simple demonstration of how CockroachDB replicates and distributes data. Starting with a 1-node local cluster, you'll write some data, add 2 nodes, and watch how the data is replicated automatically. You'll then update the cluster to replicate 5 ways, add 2 more nodes, and again watch how all existing replicas are re-replicated to the new nodes.
Before You Begin
Make sure you have already installed CockroachDB.
Step 1. Start a 1-node cluster
$ cockroach start \
--insecure \
--store=repdemo-node1 \
--host=localhost
Step 2. Write data
In a new terminal, use the cockroach gen command to generate an example intro database:
$ cockroach gen example-data intro | cockroach sql --insecure
CREATE DATABASE
SET
DROP TABLE
CREATE TABLE
INSERT 1
INSERT 1
INSERT 1
INSERT 1
...
In the same terminal, open the built-in SQL shell and verify that the new intro database was added with one table, mytable:
$ cockroach sql --insecure
# Welcome to the cockroach SQL interface.
# All statements must be terminated by a semicolon.
# To exit: CTRL + D.
> SHOW DATABASES;
+--------------------+
|      Database      |
+--------------------+
| information_schema |
| pg_catalog         |
| intro              |
| system             |
+--------------------+
(4 rows)
> SHOW TABLES FROM intro;
+---------+
|  Table  |
+---------+
| mytable |
+---------+
(1 row)
> SELECT * FROM intro.mytable WHERE (l % 2) = 0;
+----+-----------------------------------------------------+
| l  |                          v                          |
+----+-----------------------------------------------------+
|  0 | !__aaawwmqmqmwwwaas,,_        .__aaawwwmqmqmwwaaa,, |
|  2 | !"VT?!"""^~~^"""??T$Wmqaa,_auqmWBT?!"""^~~^^""??YV^ |
|  4 | !                    "?##mW##?"-                    |
|  6 | !  C O N G R A T S  _am#Z??A#ma,           Y        |
|  8 | !                 _ummY"    "9#ma,       A          |
| 10 | !                vm#Z(        )Xmms    Y            |
| 12 | !              .j####mmm#####mm#m##6.               |
| 14 | !   W O W !    jmm###mm######m#mmm##6               |
| 16 | !             ]#me*Xm#m#mm##m#m##SX##c              |
| 18 | !             dm#||+*$##m#mm#m#Svvn##m              |
| 20 | !            :mmE=|+||S##m##m#1nvnnX##;     A       |
| 22 | !            :m#h+|+++=Xmm#m#1nvnnvdmm;     M       |
| 24 | ! Y           $#m>+|+|||##m#1nvnnnnmm#      A       |
| 26 | !  O          ]##z+|+|+|3#mEnnnnvnd##f      Z       |
| 28 | !   U  D       4##c|+|+|]m#kvnvnno##P       E       |
| 30 | !       I       4#ma+|++]mmhvnnvq##P`       !       |
| 32 | !        D I     ?$#q%+|dmmmvnnm##!                 |
| 34 | !           T     -4##wu#mm#pw##7'                  |
| 36 | !                   -?$##m####Y'                    |
| 38 | !             !!       "Y##Y"-                      |
| 40 | !                                                   |
+----+-----------------------------------------------------+
(21 rows)
Exit the SQL shell:
> \q
Step 3. Add two nodes
In a new terminal, add node 2:
$ cockroach start \
--insecure \
--store=repdemo-node2 \
--host=localhost \
--port=26258 \
--http-port=8081 \
--join=localhost:26257
In a new terminal, add node 3:
$ cockroach start \
--insecure \
--store=repdemo-node3 \
--host=localhost \
--port=26259 \
--http-port=8082 \
--join=localhost:26257
Step 4. Watch data replicate to the new nodes
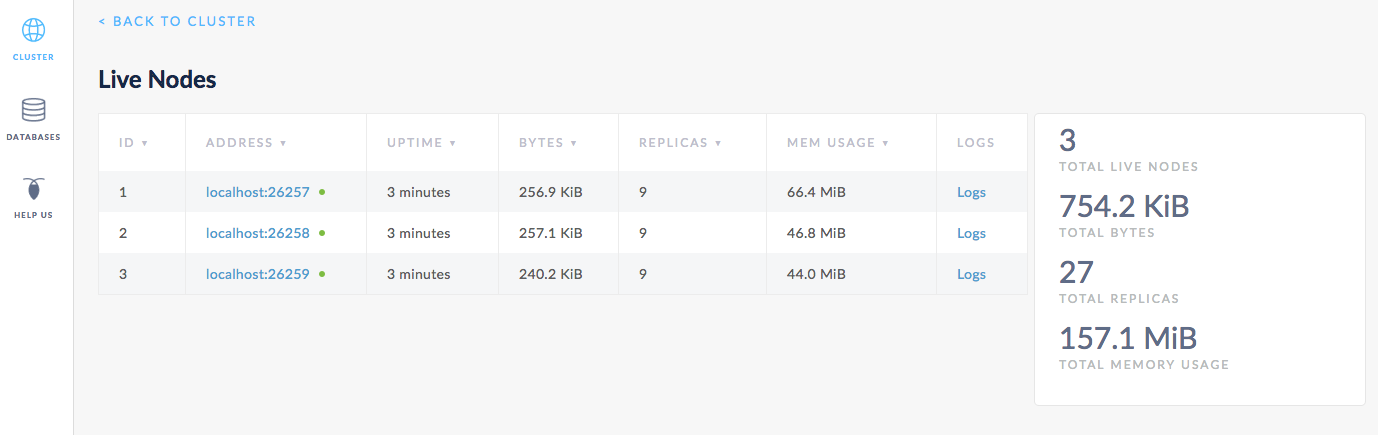
Open the Admin UI at http://localhost:8080 and click View nodes list on the right. You'll see that all three nodes are listed. At first, the replica count will be lower for nodes 2 and 3. Very soon, the replica count will be identical across all three nodes, indicating that all data in the cluster has been replicated 3 times; there's a copy of every piece of data on each node.
Step 5. Increase the replication factor
As you just saw, CockroachDB replicates data 3 times by default. Now, in the terminal you used for the built-in SQL shell or in a new terminal, edit the default replication zone to replicate data 5 times:
$ echo 'num_replicas: 5' | cockroach zone set .default --insecure -f -
range_min_bytes: 1048576
range_max_bytes: 67108864
gc:
  ttlseconds: 86400
num_replicas: 5
constraints: []
Step 6. Add two more nodes
In a new terminal, add node 4:
$ cockroach start --insecure \
--host=localhost \
--store=repdemo-node4 \
--port=26260 \
--http-port=8083 \
--join=localhost:26257
In a new terminal, add node 5:
$ cockroach start \
--insecure \
--host=localhost \
--store=repdemo-node5 \
--port=26261 \
--http-port=8084 \
--join=localhost:26257
Step 7. Watch data replicate to the new nodes
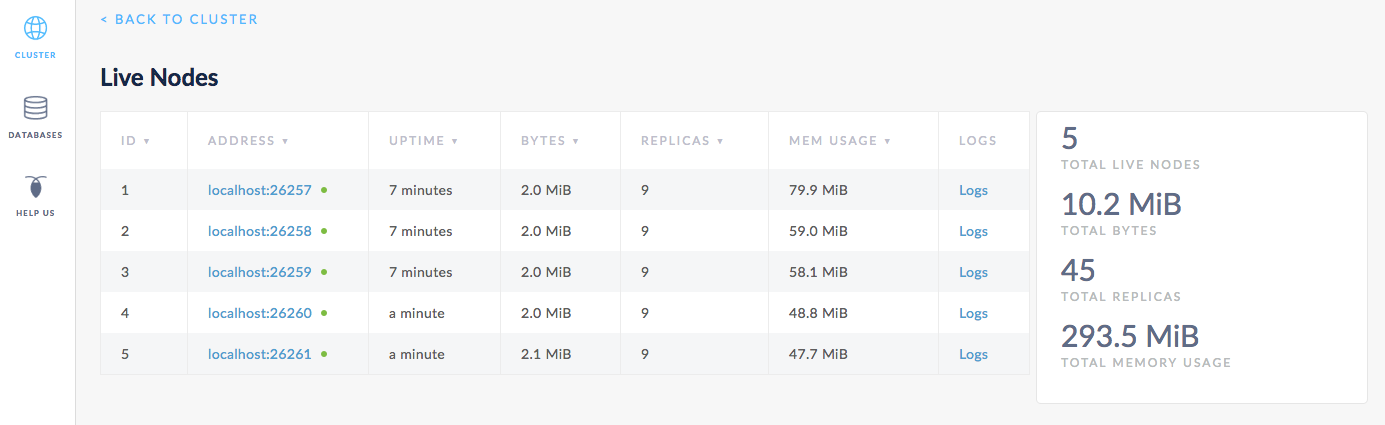
Back in the Admin UI, you'll see that there are now 5 nodes listed. Again, at first, the replica count will be lower for nodes 4 and 5. But because you changed the default replication factor to 5, very soon, the replica count will be identical across all 5 nodes, indicating that all data in the cluster has been replicated 5 times.
Step 8. Stop the cluster
Once you're done with your test cluster, stop each node by switching to its terminal and pressing CTRL-C.
If you do not plan to restart the cluster, you may want to remove the nodes' data stores:
$ rm -rf repdemo-node1 repdemo-node2 repdemo-node3 repdemo-node4 repdemo-node5
What's Next?
Use a local cluster to explore these other core CockroachDB benefits:
