
In case you hadn’t already heard, Heroku is shutting down its free plans.
The change has left many developers scrambling to replace what Heroku offered with other free services. And while CockroachDB doesn’t replace everything Heroku’s free tier offered, developers looking to replace the free cloud Postgres database that Heroku offered can already access an excellent replacement in CockroachDB serverless, a forever-free cloud database that actually offers some major advantages over Heroku Postgres.
Why move to CockroachDB?
It has a generous free tier
The free tier of Heroku Postgres, when it existed, offered a free cloud Postgres instance, but it came with quite a few limitations. Among them: a maximum storage limit of 1 GB and a maximum row count of 10,000.
CockroachDB serverless’s free tier offers more. For the current specifics in terms of storage and performance guarantees for the free tier, see this page.
CockroachDB serverless also offers more flexible paid plans for when that level of performance becomes necessary. Where Herkou only offered predefined subscription tiers (only one of which cost less than $50 per month), CockroachDB serverless allows users to set a custom monthly resource limit for their cluster and pay up to (but never more than) that amount each months, depending on their usage.
It’s easy to scale
Because it’s a cloud-native distributed database, CockroachDB was built for automated scale in ways that Postgres never was. While Heroku Postgres scaling relies on active-passive configurations, CockroachDB is active-active, and serverless databases scale up and down automatically based on usage and on your preset spending limit.
For more on how CockroachDB compares to Postgres, check out this blog post which digs into some of the details.
How to export a database from Heroku Postgres using pg_dump
Thankfully, exporting a Postgres database from Heroku and importing it into CockroachDB serverless isn’t too complicated. There are a number of ways it can be done, but in this post we’ll focus on an approach using pg_dump and psql, with which many Postgres users may already be familiar.
Note that Heroku doesn’t recommend pg_dump for exports of databases larger than 20 GB. If you were a Heroku free user, this won’t matter – Heroku free accounts were limited to 1 GB of database storage. But if you were a paying user with a larger database, you should follow these steps instead of what’s below.
Step 1: Download your Heroku Postgres schema and data
The first step is to download two separate files: a copy of our database schema, and a copy of the actual data.
Documentation on how to generate these dump files from Postgres using pg_dump is here. Heroku supports both pg_dump and pg_restore via PGBackups, so we can run pg_dump commands with Heroku to generate the files:
(Note you should have your Heroku Postgres database URL set as an environment variable prior to running these commands.)
heroku run 'pg_dump -s $DATABASE_URL' > schema.sql
heroku run 'pg_dump -a $DATABASE_URL' > data.sql
This will generate two .sql files, one with your database’s schema, and the other with the data. This is exactly what we’ll need to proceed with importing our data and schema to CockroachDB.
An alternate approach: download a backup from Heroku
If we don’t want to use psql, we can also use Heroku to generate and then download a backup. (Note, however, that this will generate a single file with both data and schema. Depending on the size of your database, you may need to separate them manually to use CockroachDB’s schema conversion tool in a subsequent step.)
heroku pg:backups:capture --app example-app
heroku pg:backups:download --app example-app
This will download a .dump file, so we’ll then need to use pg_restore to quickly convert this to a .sql file (replacing the paths and filenames below with the desired and actual paths and filenames for the .sql and .dump files, respectively):
pg_restore -f /path/file.sql /path/file.dump
How to import a database to CockroachDB serverless
Note: This tutorial is focused on Heroku Postgres to CockroachDB database migrations. For instructions that cover how import data from non-Postgres databases into CockroachDB, see our post on how to get your data into CockroachDB serverless.
Step 2: Create a CockroachDB cloud account
Note: If you already have a CockroachDB cloud account and are familiar with the process of spinning up and accessing a free serverless cluster, you can jump directly to step 6.
To start, we’ll need to create a free CockroachDB cloud account. There are several single-sign-on options (Google, Github, and Microsoft) to choose from, and we can also create an account using an email address.
Step 3: Spin up a free serverless cluster
Once the account has been created, log in and navigate to the clusters page. We’ll click on the “Create Cluster” button and then select our preferred option, including:
Serverless or dedicated – For a free account, we will need to select serverless.
Cloud provider – AWS or GCP, both are good options
Regions – We recommend selecting the available region that is geographically closest
Spend limit – To create a free account, we’ll keep this set to $0. (Note that if you set a higher resource limit, you still get 5 GB of storage and 250 million request units (compute) for free, you’ll only be charged for what you use above the free allowance in a given month.)
Cluster name – a default name will be generated, but we can customize it if desired
Once we’ve selected our options, we’ll hit “Create your free cluster” and wait 5-10 seconds for the cluster to be created.
Step 4: Get the connection string
Once the cluster has been created, a Connection window will appear that will prompt us to create a SQL username, generate a password for that user – save this somewhere safe, we’ll need it shortly – and then provide a variety of options for getting connected to the database.
For the purposes of this tutorial, all we’ll need is the general connection string, which can be found in the connection window under “Select language/option > general connection string.”
It’ll look something like this (but the username, password, numbers, etc. will be specific to the cluster we just created):
postgresql://username:password@free-tier11.gcp-us-east1.cockroachlabs.cloud:00000/defaultdb?sslmode=verify-full&options=--cluster%3Dcluster-name-0000
All we need to do is copy that string somewhere safe, and then we can proceed to the next step.
Step 5: Import your schema using the schema migration tool
Importing database schema from one relational database to another is typically a manual process, and it can be a painful one. CockroachDB has a schema conversion tool that makes this process much smoother for Postgres databases, so rather than trying to manually adjust the schema, we’ll use that.
To do this, we’ll start from our clusters page and click on the specific cluster we’d like to migrate to.
Once we’re on the page for the cluster, there will be a “Migrations” tab in the left-hand navigation menu. Clicking that will bring us to the migrations page, which looks like this:

On this page, we can simply drag and drop our .sql file into the gray upload box to begin the migration.
Note that file uploads are limited to 4 MB. If you’re working with a large database, your file may be larger than this. But don’t worry, you can still import your database!
PostgreSQL allows for the export of schema-only database dumps (see the Postgres documentation for details on how to do this). This should result in a much smaller .sql file that contains only the database schema; we can use the schema conversion tool to import that. The schema conversion tool doesn’t process INSERT or COPY statements anyway, so we’ll be getting our data into the database separately in step 2, but we need to move the schema over first.
When we’ve uploaded our .sql file, the schema conversion tool will take a little time to process it, and then we’ll be taken to a page that looks like this:
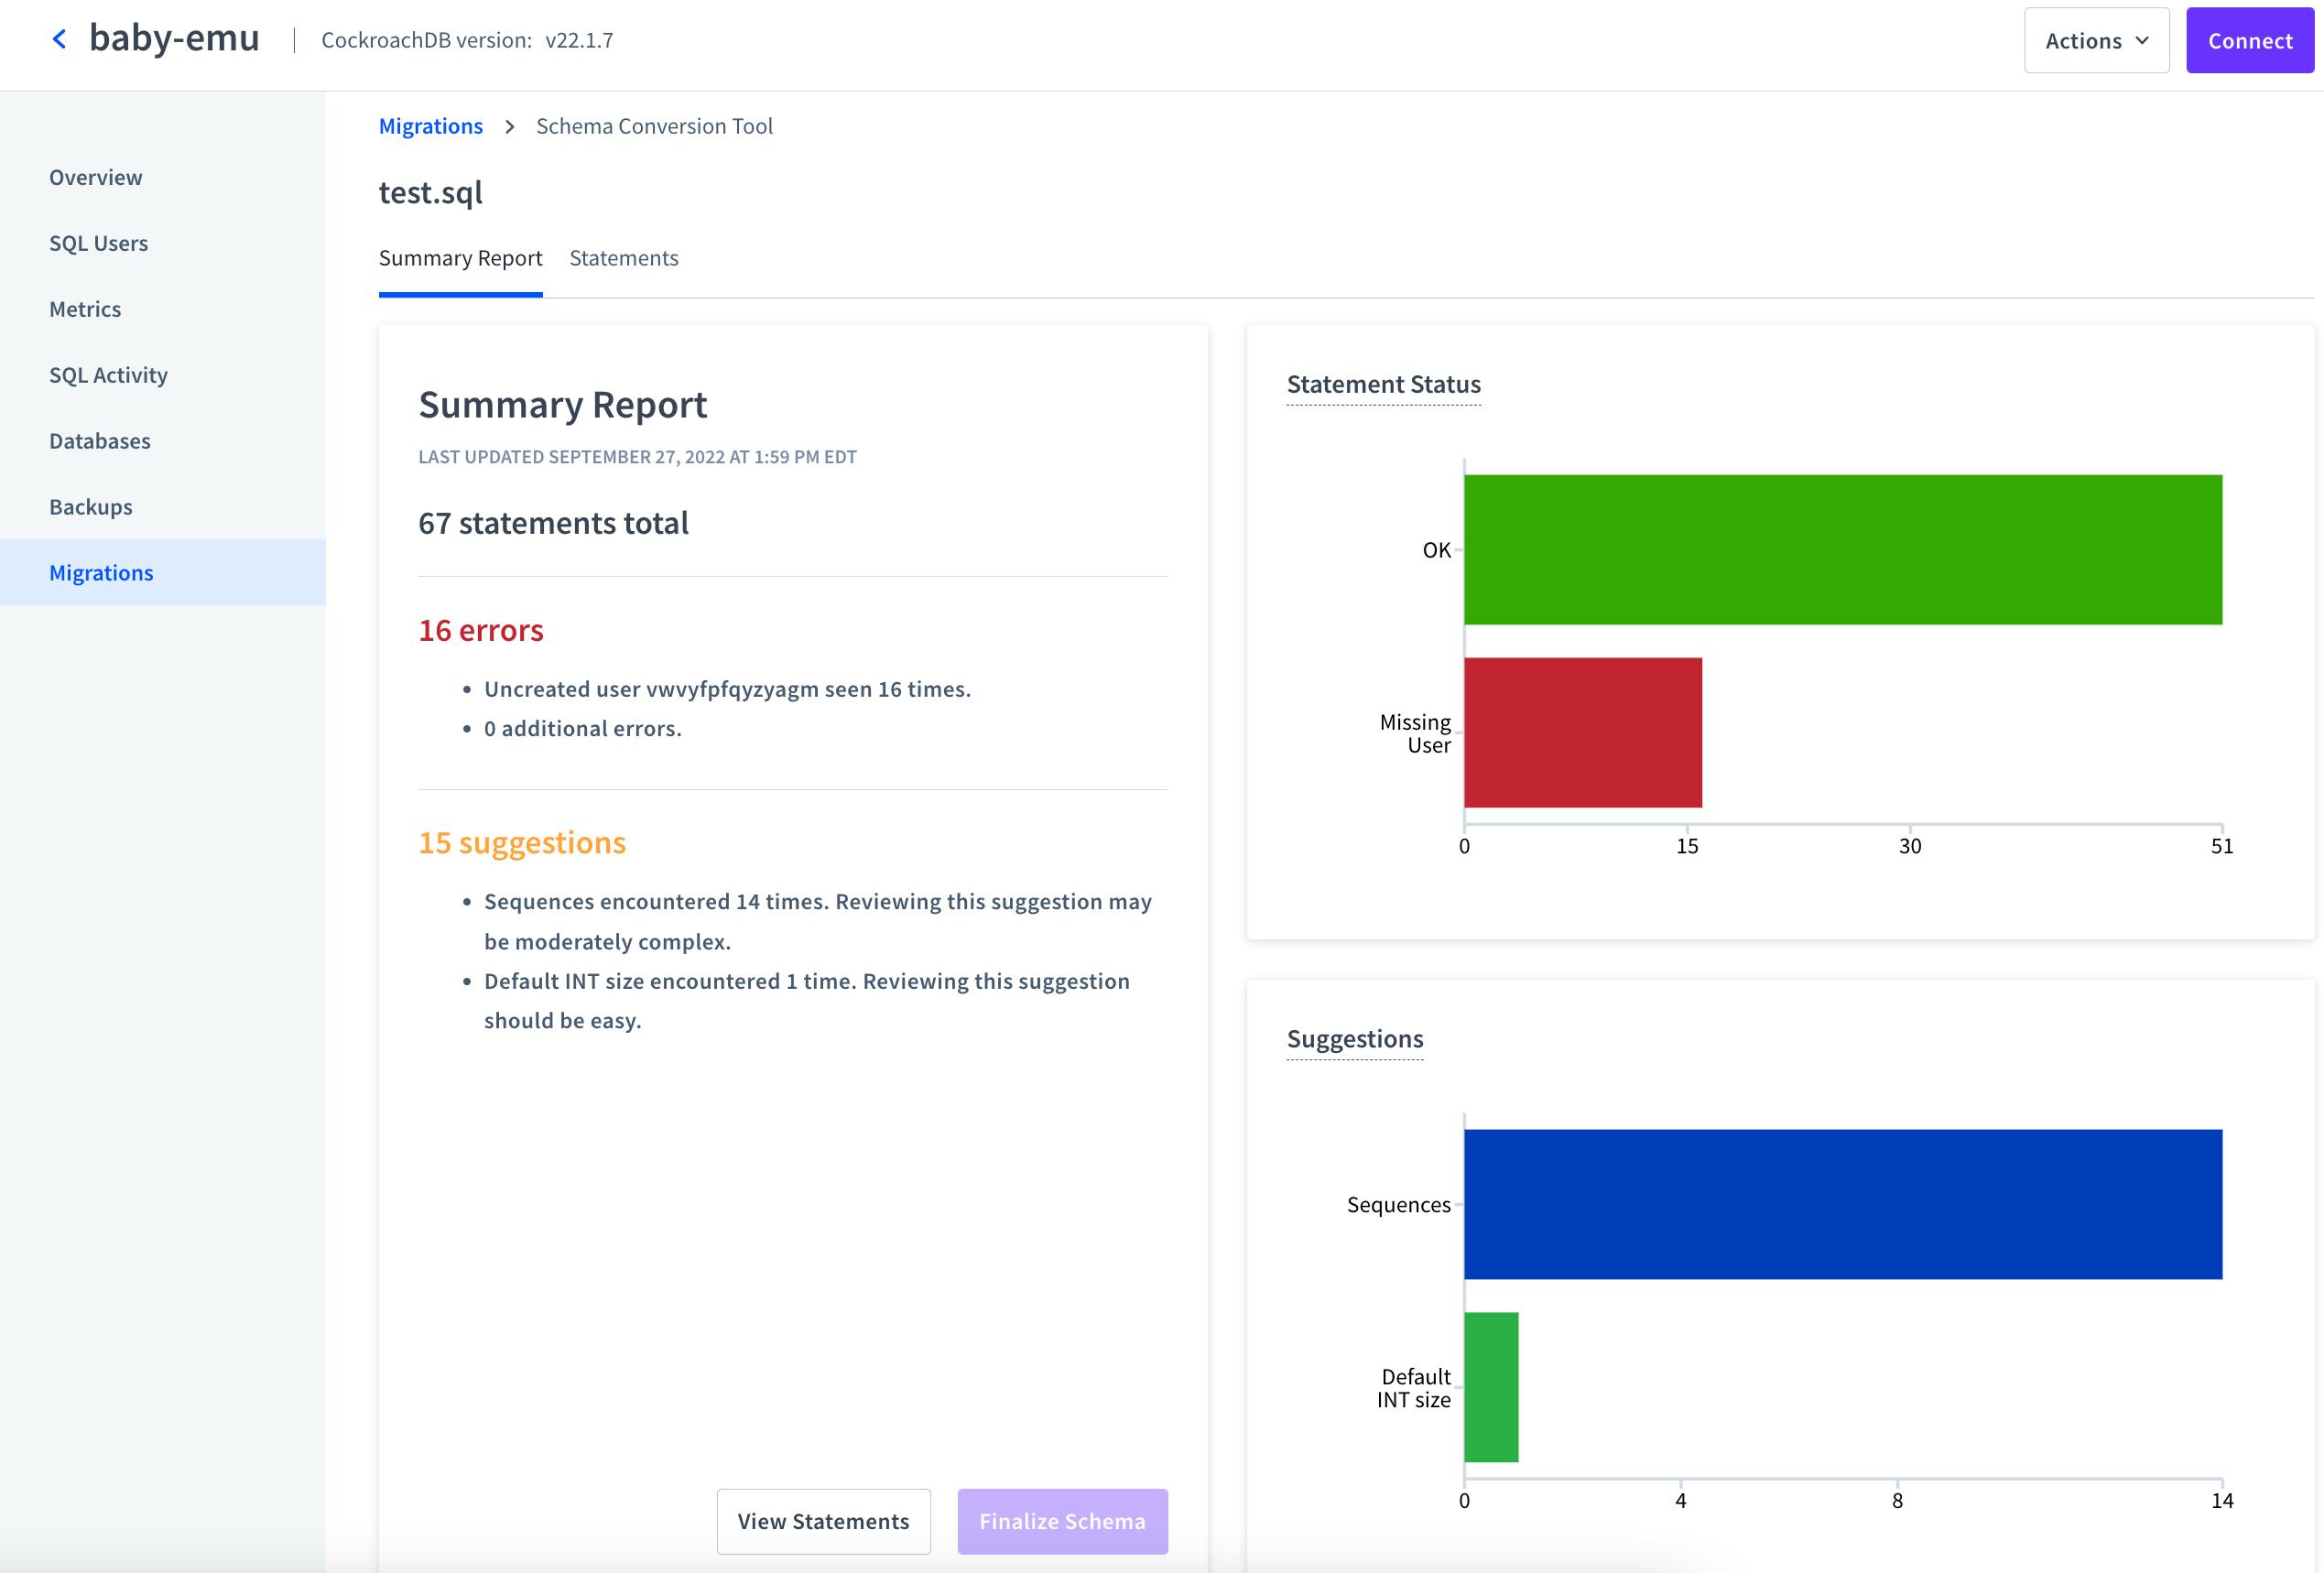
As every database schema is different, each migration will produce different results, but this page will always display two things:
The number of error. Errors must be resolved before we can finalize the migration.
The number of suggestion. These are issues we may want to address for a variety of reasons, but we won’t need to address them to finalize the migration.
From here, we can click on the “Statements” tab at the top or the “View Statements” button at the bottom, and we’ll get a page like this:
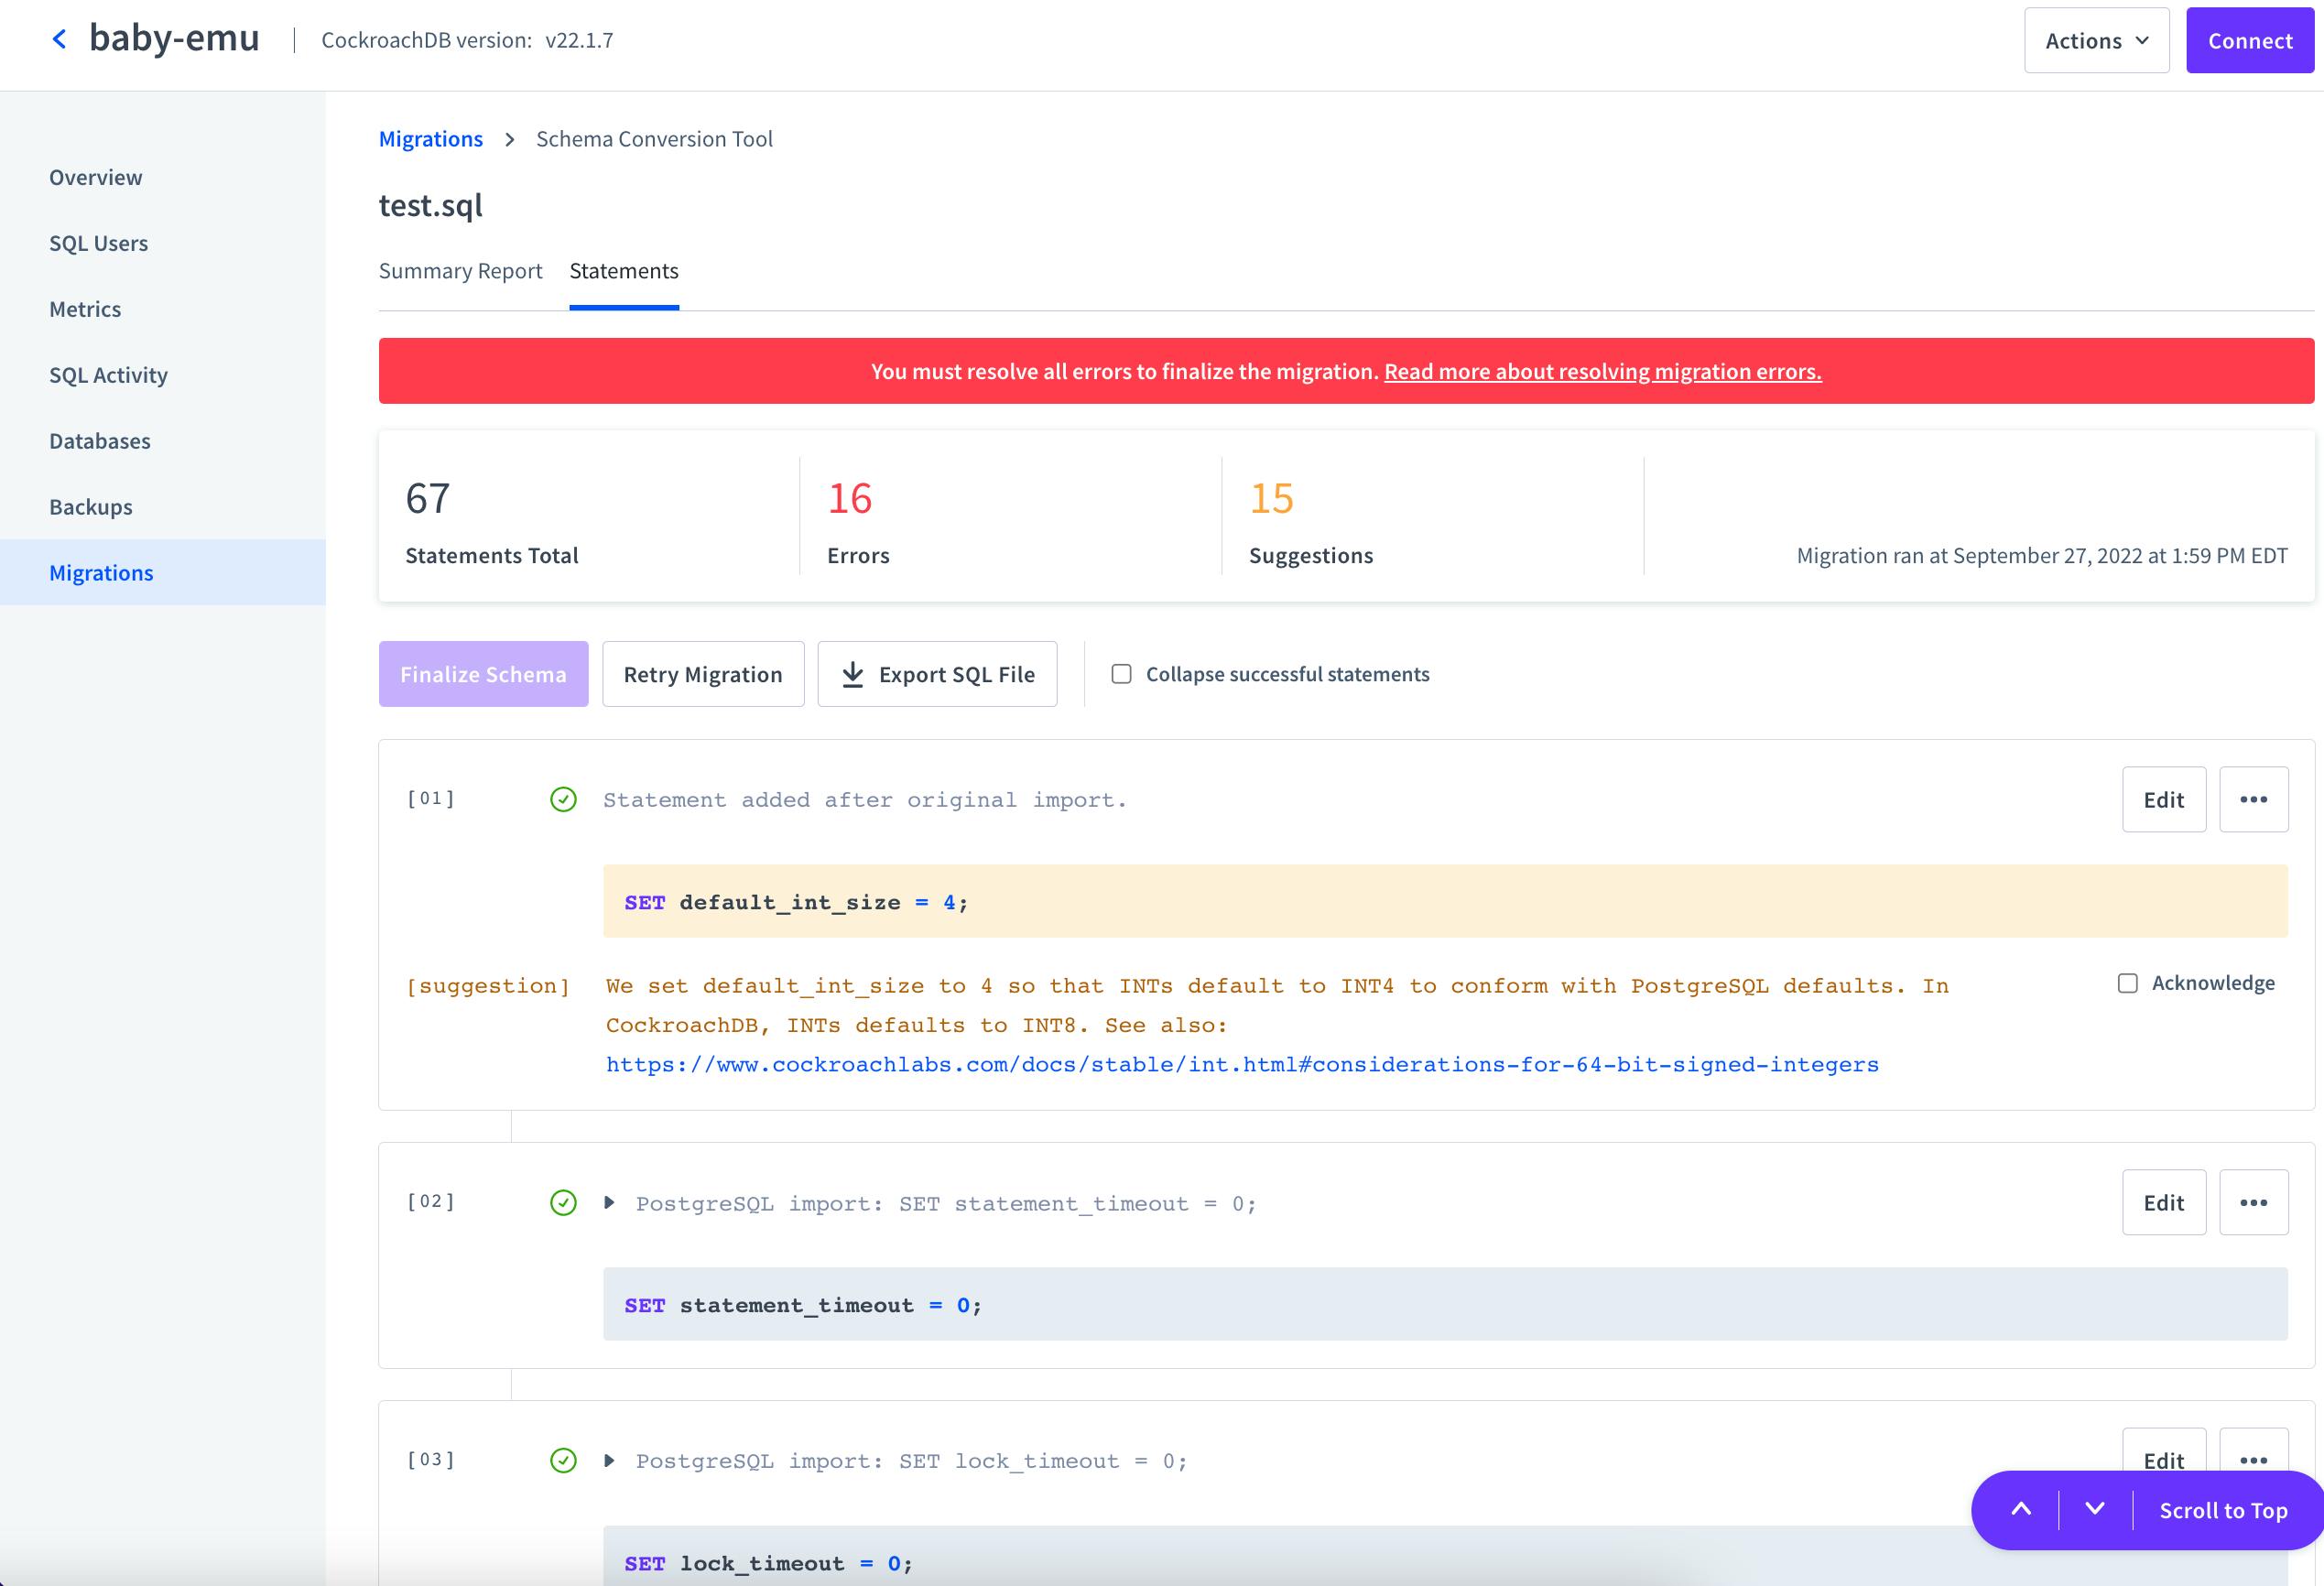
This page walks through each statement we may want to address, and we can adjust them directly on this page by hitting the edit button.
At this point, we can’t provide step-by-step instructions because the statements on this page will be different for every database. However, the schema conversion tool should make it clear what needs to be done, and facilitate making those changes.
For example, in these screenshots we’ve been migrating a real database dumped from an application that had been using Heroku Postgres, and the only error we’ve encountered is that that database had a user that doesn’t yet exist in our CockroachDB cluster.

If we click “Add User”, we’ll be prompted to generate a password for the missing user, and once we’ve done this, all of the errors will be cleared.
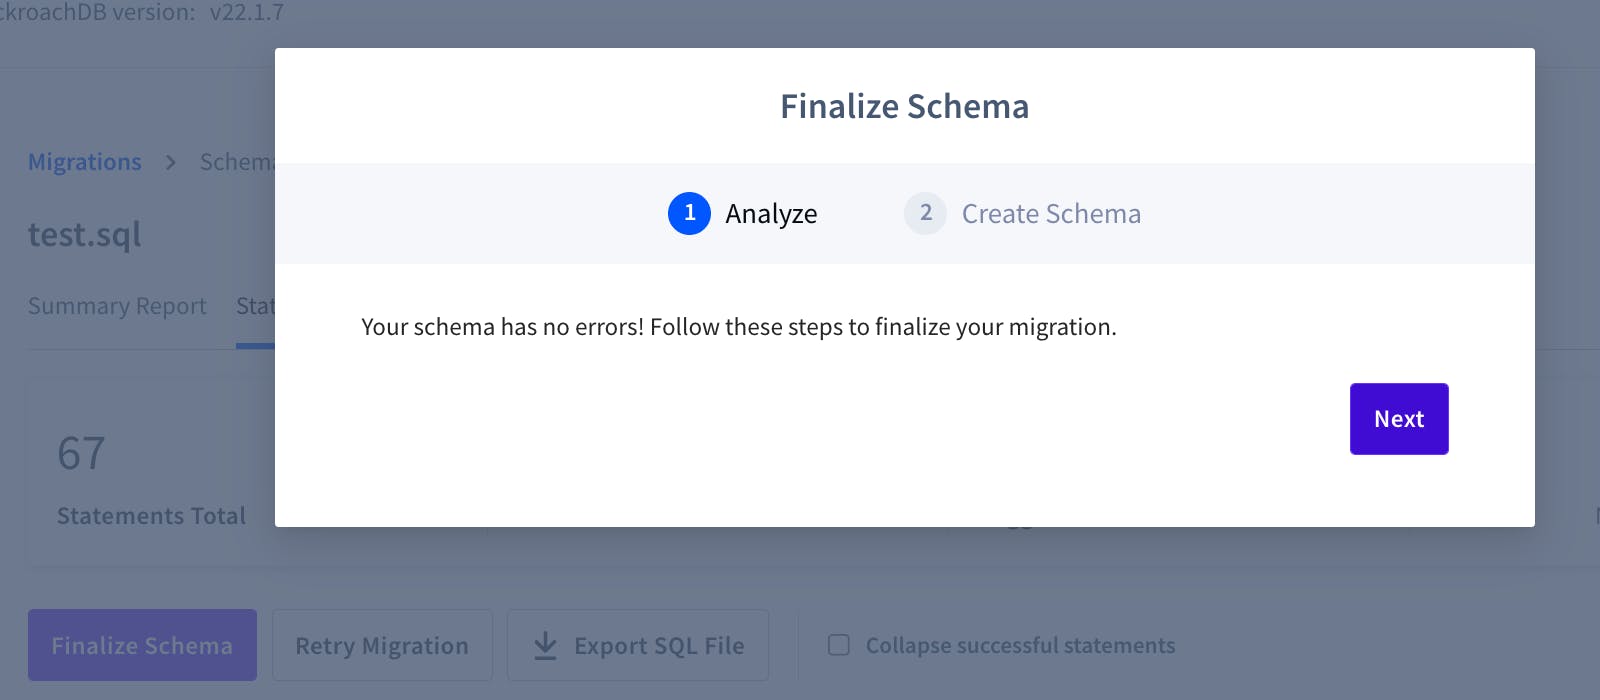
Once the errors have all been dealt with, we can scroll back to the top of the page and hit “Retry Migration.” The migration will be processed again, and with all of the errors cleared, we’ll then be able to click the “Finalize Schema” button.
We’ll then be prompted with a window confirming the schema has no errors:
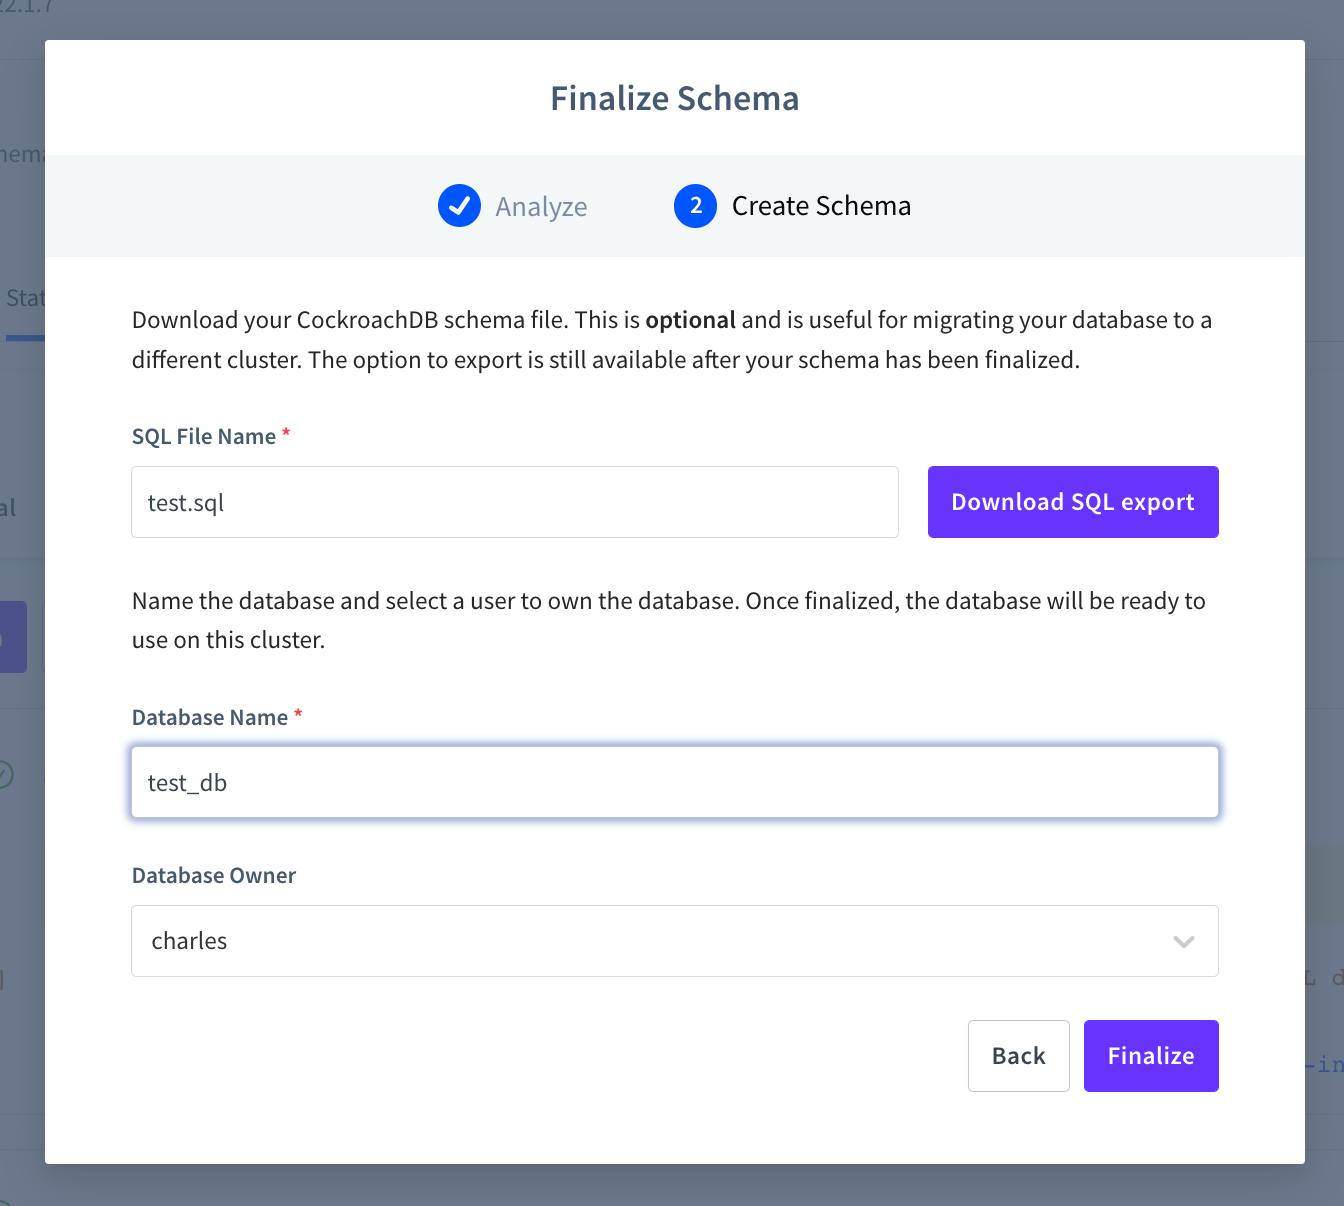
Click next, and we’ll get another window prompting us to give our new database a name (in this case, test_db) and specify a user who owns the database. Note that we can also download the edited .sql file (i.e., a version of our Postgres database dump that has the errors resolved and any other changes we made on the Statements page) if we want. This is optional, and this file will still be available after finalizing the schema:
Clicking “Finalize” will return us to the statements page, but we can click the “Migrations” tab in the left-side navigation to return to the main migrations page and confirm that the migration has finalized:

Note the value FINALIZED in the Status column in the image above.
To further confirm the migration has been completed, we can click on “Databases” in the left-side navigation menu, and we’ll see that test_db is now there and has the correct number of tables listed.
However, if we actually query the database, we’ll see that our tables don’t have any actual data. This is because the schema migration tool doesn’t interpret INSERT or COPY statements. Now that our schema’s set up properly, let’s get that data in there, too!
Step 6: Import the data to CockroachDB serverless
Once your new database is set up with its schema, there are a number of different ways to approach importing your data. We will outline some of the most common below.
Option 1: Import local files using the SQL shell
We can import locally-stored data such as our Postgres data.sql file directly to our CockroachDB cluster using the shell. (Note that this is recommended only for small databases of about 15 MB or less. For larger databases, use the IMPORT command or use AWS DMS).
This approach requires installing the CockroachDB SQL client, if you haven’t already done so. Hit the “Connect” button from the page of any cluster to quickly access the command for downloading and installing the client if you haven’t already.
Below, is an example of what this command looks like, but you should navigate to your CockroachDB cloud account on the web and hit the “Connect” button from a cluster page to get the correct command, as the latest version of the client may have changed by the time you’re reading this post.
curl https://binaries.cockroachdb.com/cockroach-v22.1.8.darwin-10.9-amd64.tgz | tar -xz; sudo cp -i cockroach-v22.1.8.darwin-10.9-amd64/cockroach /usr/local/bin/
Once that’s installed, importing from a local file is pretty straightforward. While there are various ways to approach this task, the simplest is probably to use the SQL client we just installed in the command line to pipe our .sql file into the database like so:
cockroach sql --url "cluster connection string" < filepath/file.sql
In the command above, we’ll need to replace "cluster connection string" with our unique connection string, making sure to replace defaultdb with the name of the db we created when migrating our schema. This command will execute the statements .sql file inside the cluster and database specified by the connection string.
Troubleshooting: if completing this step results in a “relation ___ does not exist” SQLSTATE: 42P01 error, the most likely explanation is that we are connecting to defaultdb rather than the database with the schema we just created. Double-check the connection string.
Option 2: Use the IMPORT command with cloud storage
When working with database dumps from Postgres, we can use the IMPORT command in CockroachDB. Precisely how we import the .sql file containing our data will depend on where it is stored. Below, we’ll run through the basic commands for importing a .sql file from Postgres or MySQL from each of the three major cloud storage providers. Remember that in addition to replacing all of the account and access parameters in the commands below, we must also replace the .sql filenames with the name of our actual .sql file.
These commands can be executed from within the CockroachDB SQL shell or any other tool that can connect to your serverless cluster and execute SQL statements.
If stored in Amazon S3
IMPORT PGDUMP 's3://{BUCKET NAME}/{customers.sql}?AWS_ACCESS_KEY_ID={ACCESS KEY}&AWS_SECRET_ACCESS_KEY={SECRET ACCESS KEY}'
    WITH ignore_unsupported_statements;
If stored in Google Cloud Storage
IMPORT PGDUMP 'gs://{BUCKET NAME}/{employees.sql}?AUTH=specified&CREDENTIALS={ENCODED KEY}'
    WITH ignore_unsupported_statements;
If stored in Azure Storage
IMPORT PGDUMP 'azure://{CONTAINER NAME}/{employees.sql}?AZURE_ACCOUNT_NAME={ACCOUNT NAME}&AZURE_ACCOUNT_KEY={ENCODED KEY}'
    WITH ignore_unsupported_statements;
Option 3: Use other tools such as AWS DMS
There are a number of other ways to get data into CockroachDB serverless. For larger and production databases, for example, we recommend using AWS DMS.
We can also use other tools, such as a built-in Postgres tool psql:
psql 'your-connection-string-here' -f /path/file.sql
For this to work, we’ll need to replace your-connection-string-here with our connection string (inside single quotes) and /path/file.sql with whatever the correct file path is for the .sql file.
(If you don’t already have psql installed, you can run the command brew install libpq and then brew link brew link --force libpq to get it set up and ready on Mac. Installing Postgres on any system will also install psql, so you can follow the instructions for downloading Postgres on any system and you should be good to go.)
That’s it!
Congratulations! You’ve imported your Heroku Postgres database to CockroachDB serverless. Change the appropriate connection information within your application to point to your new CockroachDB cluster – quickstart instructions for various languages available here – and you’ll be up and running!
We’ve also got a free Introduction to Serverless Databases and CockroachDB Serverless course that you can check out to learn more about how CockroachDB serverless works and (as of this writing) get some free swag in the process!