To help people get outdoors and improve their physical well-being, we’ll create an outdoor activity tracker. Although we won’t cover aspects such as user management, the app will have an input page where users can enter activities such as hiking, skating, swimming, and soccer, with details such as date, duration, distance, and a description. The application’s activities page will list activities from the database and let users sort by fields like date, distance, and duration.
The Jamstack web application architecture comprises JavaScript, an API, and markups. A static site generator such as React-Static, Hugo, or Gatsby provides the frontend application with static markups.
Let’s explore how to use React-Static to generate our static Jamstack application. This application will store data in a CockroachDB using Netlify Functions and serve end-users using Netlify.
To follow this tutorial, you just need to know some JavaScript and basic Git operations and we’ll guide you through the rest.
Prerequisites
To follow this tutorial, you should have:
Access to a CockroachDB Serverless account. You can
create a CockroachDB Serverless account to get a free cluster.
A basic understanding of JavaScript and how to build single-page applications.
Node.js on your system with either the Yarn or npm package manager.
A free Netlify account.
The Git command-line interface (CLI) installed on your computer and a GitHub account
An understanding of basic Git operations.
Preparing the Application Resources
This tutorial stores data on CockroachDB within a Jamstack application. CockroachDB is a highly available and distributed SQL database. You can use it locally on your computer or through the CockroachDB Serverless platform.
In this section, we’ll write SQL queries to a database within a free CockroachDB Serverless beta cluster to store data from a client application. We use Netlify Functions to manage serverless functions that connect the app to the CockroachDB cluster.
In the next section, we’ll create a free cluster on CockroachDB Serverless, then install the tools necessary to connect our system to the cluster. In the third section, we’ll create a database for our application within the cluster.
Creating a Database Cluster on CockroachDB Serverless
Note: If you already have a cluster on CockroachDB Serverless, you can skip this section and proceed to the next section.
To create a cluster on CockroachDB Serverless, we must first create a free account on CockroachDB Serverless if we are a new user. After signing up for our account, we follow the prompt to create a new free cluster in beta mode.
We can either leave the default values or specify a cluster name, region, and cloud provider on the Create your cluster page.
Next, we click Create your free database. Our cluster is ready within 5 to 10 seconds.
As soon as we create our cluster, the Connection Info modal opens to display the cluster’s connection details. We make sure to note the cluster password as we can’t see it after closing the modal. To do this, we hover over or click REVEAL_PASSWORD to show the cluster password, then copy the password into a notepad.
We now see the newly-created cluster listed on the Clusters page.
As the image above shows, we are the cluster’s default root user. In the next section, we’ll connect to the cluster from our computer and create a database within the cluster.
Connecting the Cockroach Shell to the Cluster
To connect to the cluster on CockroachDB Serverless from our machine, we can use any Postgres client driver because CockroachDB supports the Postgres Wire Protocol. The PostgreSQL Compatibility section of the CockroachDB documentation explains its compatibility with PostgreSQL, including unsupported features from PostgreSQL. If we use the Linux operating system, we execute the command below to download the CockroachDB CLI using curl and unzip it in our system’s bin directory for installation:
curl https://binaries.cockroachdb.com/cockroach-v21.1.5.linux-amd64.tgz | tar -xz
  && sudo cp -i cockroach-v21.1.5.linux-amd64/cockroach /usr/local/bin/
Alternatively, if we use a Mac computer, we execute the command below to download the CockroachDB CLI using curl and unzip it in our system’s bin directory:
curl https://binaries.cockroachdb.com/cockroach-v21.1.5.darwin-10.9-amd64.tgz |
  tar -xJ && cp -i cockroach-v21.1.5.darwin-10.9-amd64/cockroach /usr/local/bin/
Next, we paste the command below into our terminal, replacing the CLUSTER_ID placeholder with our previously-created cluster’s ID. Then, we execute the following command to download the certificate authority (CA) certificate file:
curl --create-dirs -o ~/.postgresql/root.crt -O
https://cockroachlabs.cloud/clusters/<CLUSTER_ID>/certNote: Find your cluster ID in the Connection Info modal via the CockroachDB Serverless console. Click Connect to open the modal, then click the Connection String tab to show the step for downloading our cluster’s CA file containing our cluster ID.
We execute the command below to connect to the cloud cluster using the curl connection method with the Cockroach CLI. We replace the placeholder values with the cluster credentials the Connection Info modal previously displayed.
cockroach sql --url='postgresql://<USERNAME>@<HOST>:26257/defaultdb?sslmode=verify-full&sslrootcert='$HOME'/.postgresql/root.crt&options=--cluster=<CLUSTER_NAME>-<cluster-id>'
The connection string passing to the –url parameter in the command above comprises the cluster’s USERNAME, DATABASE, HOST, and PASSWORD credentials. It also includes the path to the CA certificate file for the cluster we saved on our computer in the previous step.
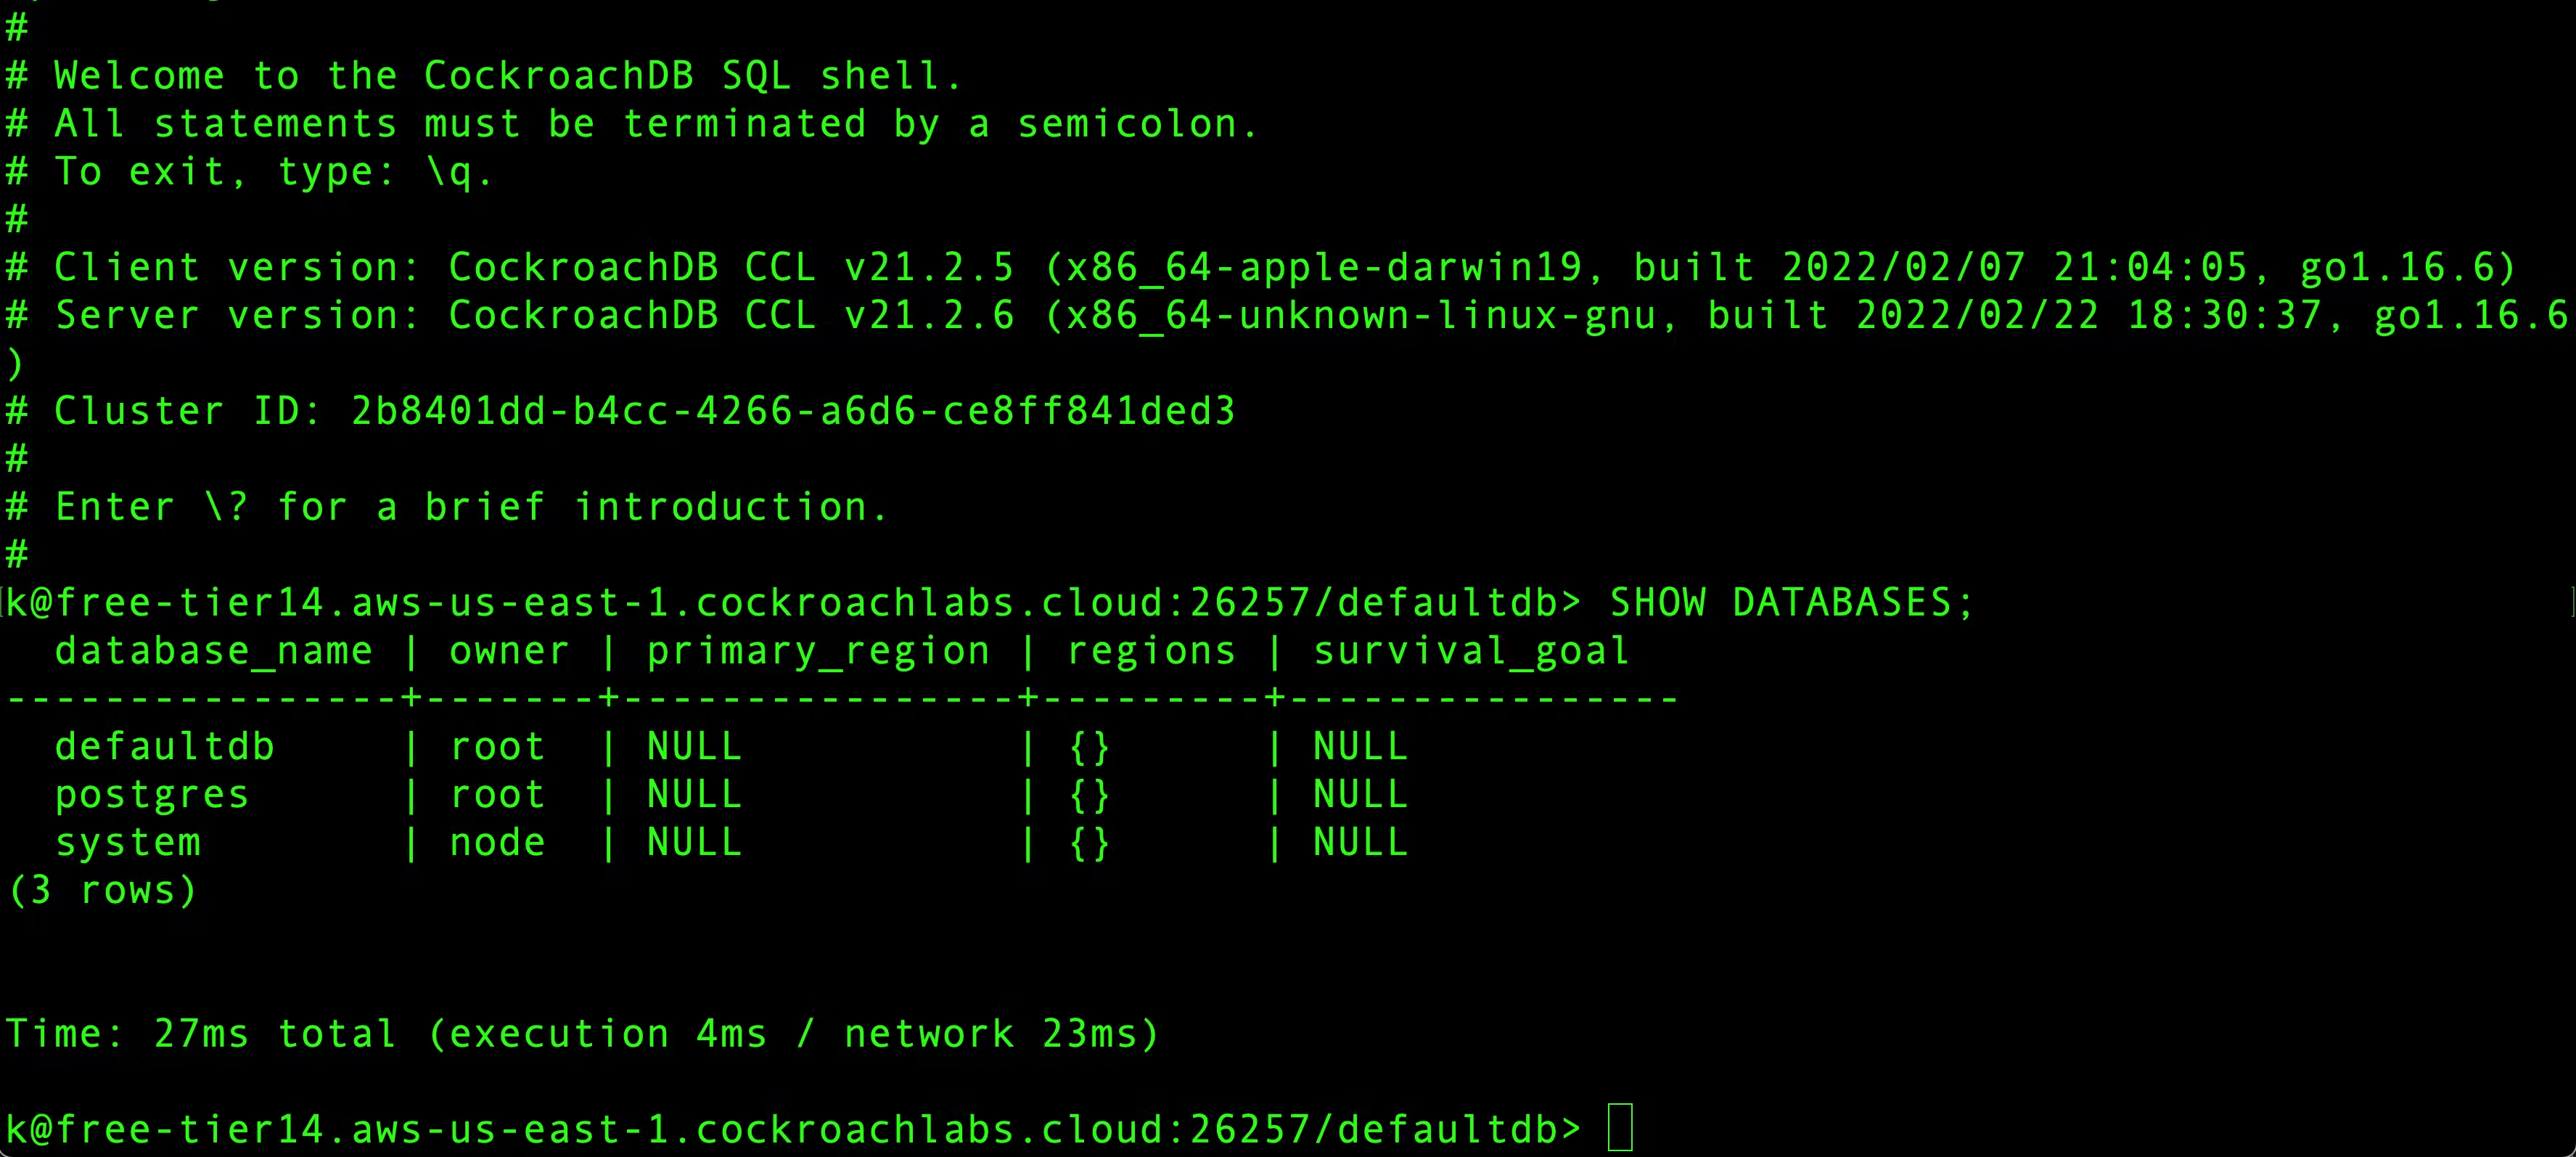
After authentication, we have a Cockroach shell with access to our cloud cluster. We can now perform operations on the cluster by executing SQL queries. For example, the SHOW DATABASES command shows the default databases within the cluster, like this:
Note: You can try the CockroachDB SQL Playground to tinker with a sample CockroachDB database safely.
Modeling the Application Data
Modeling the database schema is the next step in developing our activity tracker app. The database has a simple structure, using a single table to store activities without relation to another table.
In the active Cockroach shell, we execute the SQL query below to create a database for the Jamstack application:
CREATE DATABASE jamstack;Now, we switch from the default defaultdb database to the new Jamstack database. This action enables us to execute a query without specifying the database, as Jamstack is the default.
USE jamstack;Next, we create an Activities table in the Jamstack database by executing the SQL query below in our active Cockroach shell:
CREATE TABLE activities (ID varchar(125) PRIMARY KEY, Name varchar(75) NOT NULL,
  Description varchar(255) NOT NULL, Activity_Type varchar(55) NOT NULL, Duration
  varchar(55) NOT NULL, Distance varchar(55) NOT NULL, Date_Created date NOT NULL
  DEFAULT CURRENT_DATE);
After executing the query above, we can confirm that we created the table by fetching the new structure.
Next, we execute the SQL command below to fetch the table structure for the Activities table: \d activities;
The command above should print a table structure like the one below:

In the image above, we can see the properties of each column within the Activities table.
We have prepared our Jamstack application’s data layer by provisioning a cloud database on CockroachDB Serverless, with a table and respective columns using CockroachDB. We can now exit the Cockroach shell with the \q command.
Our next step is to use the database within Netlify Functions to store the user’s activities coming from a web application.
Creating Netlify Functions
Netlify Functions are event-driven, serverless functions that we deploy and manage on Netlify. Each function is a JavaScript file, which acts as an endpoint that we invoke by making an HTTP request to the endpoint URL.
The JavaScript files for the Netlify Functions are in the same directory as the React-Static web application. They are also in the same project when we deploy it to Netlify.
To get started, we install the React-Static and Netlify CLI globally on our computer using npm by executing this command in a new terminal tab:
npm install -g react-static netlify-cli
After installing the React-Static CLI, we bootstrap a new project by executing this command:
react-static create
The command launches an interactive installer that walks us through creating a new project. In the template section of the installer, we select the basic option to bootstrap an application with a basic blog template and some defined routes.
Note: For this tutorial, we call the application Jamstack. Feel free to use your preferred name.
Now, we change the directory into the newly created project directory using this command: cd Jamstack Next, we install six new packages to use within the web application and Netlify Function:
yarn add dotenv pg pg-format uuid react-helmet react-iconsWe also execute the init command below to create a project on Netlify directly from our command line. Creating a project will allow us to store the environment variables remotely within the Netlify project.
Note: If this is your first time creating a project using the Netlify CLI, your default browser will launch for you to authenticate the Netlify CLI with your Netlify Account.
netlify init
As the image below shows, the screen prompts us to provide a unique name for our Netlify project or use a randomly generated name.
After creating the project, we use the env command within the Netlify CLI to set the environment variables needed.
We obtained the credentials we use below from our CockroachDB Serverless dashboard’s Connection Info modal. We store the credentials in the following format, replacing the placeholders in the angle brackets with our corresponding credentials.
Note: The database we copied from the Connection Info modal comprises CLUSTER_NAME.TENANT_ID.DATABASE. The database name is defaultdb.
Replace “defaultdb” with “jamstack”, when setting the DATABASE variable through the commands below. For example, “fire-camel-841.defaultdb” should be changed to “fire-camel-841.jamstack”. jamstack is the name of the database that we created in the previous section.
The DB_CERT environment variable will read the content of the root.crt file which was downloaded while we were setting up our local Cockroach shell to the CockroachDB cluster.
netlify env:set DATABASE <DATABASE>
netlify env:set HOST <HOST>
netlify env:set DB_CERT "$(cat $HOME/.postgresql/root.crt)"
netlify env:set USERNAME <USER>
netlify env:set PASSWORD <PASSWORD>
netlify env:set PORT <PORT>
The Netlify Functions use the credentials above to establish a connection to our CockroachDB using the dotenv package.
We next open the new React-Static project in our preferred code editor or integrated development environment (IDE) to create new files for Netlify Functions.
Using our code editor or IDE, we now create a netlify.toml file in the project (root) directory to store this project’s Netlify configurations. We paste the code block below into the netlify.toml file:
[dev]
port=5050

[build]
publish = "dist"
command = "npm run build"

[[headers]]
for = "/*"

[headers.values]
Access-Control-Allow-Origin = "*"
The following configurations we specify above in TOML format configure the dev, and it builds an environment of Netlify Functions as follows:
The headers configuration block specifies the request headers applied to the Netlify Functions each time they receive a request.
Next, we execute the mkdir command below to create two directories nested in each within the project directory to store the JavaScript files for the Netlify Functions. mkdir -p netlify/functions
Note: If you are using a Windows operating system, the -p flag in the command above will not work, hence you need to create the nested directories manually.
For now, the functions directory is empty. In the next step, we’ll create and implement the function endpoints after setting up Netlify dev to run the functions locally on our computer.
Using our code editor, we add the start:function command into the scripts object in the package.json file as highlighted below to start the Netlify dev server:
"scripts": {
  "start:functions": "netlify dev",
   "start": "react-static start",
   "stage": "react-static build --staging",
   "build": "react-static build",
   "analyze": "react-static build --analyze",
   "serve": "serve dist -p 3000"
 }
When it matches and executes, the start:functions field above launches the Netlify dev server using the configurations specified in the netlify.toml file.
Now, we execute the command below to launch the Netlify dev server using the matched command key in the package.json script object:
yarn start:functions
The Netlify dev server launches in the terminal, printing out the project’s function metrics, like in the image below:
Creating the New Activity Netlify Function
Now, we make a create-activity.js file inside the netlify/functions directory and add the code block below to implement the application logic within the function:
const { Pool } = require("pg");
const format = require("pg-format");
const { v4 } = require("uuid");

const client = new Pool({
  user: process.env.USERNAME,
  host: process.env.HOST,
  database: process.env.DATABASE,
  password: process.env.PASSWORD,
  port: process.env.PORT,
  ssl : {
    ca: process.env.DB_CERT
  }
});

exports.handler = async ({ body }, context, callback) => {
 const { duration, activity_type, distance, description, name } =
   JSON.parse(body);

 try {
   const clientPool = await client.connect();

   const uuid = v4();
   const sqlStatement = format(
     "INSERT INTO activities(id, name, description , activity_type, duration, distance, date_created) VALUES(%L, %L, %L, %L, %L, %L, %L)",
     uuid,
     name,
     description,
     activity_type,
     duration,
     distance,
     new Date()
   );

	try {
  	await clientPool.query(sqlStatement);

  	return {
    	statusCode: 200,
    	body: JSON.stringify({ response: `${activity_type} activity created` }),
  	};
	} catch (e) {
  	return {
    	statusCode: 422,
    	body: JSON.stringify({ response: "Error inserting activity" }),
  	};
	}
 } catch (error) {
   clientPool.release();

   return {
     statusCode: 500,
     body: JSON.stringify({
      error,
       message: "An internal error occurred. Try again later",
     }),
   };
 }
}
;
The entire code block above handles a POST request to insert a new activity record into the CockroachDB cluster using data in the request body. The following steps achieve this task.
First, we connect to the Cockroach cluster by creating a connection pool using the node pg driver and passing the cluster credentials, and self-signed certificate file as parameters to the pool class.
Note: We are using the default configurations provided by the node-pg for the database connection pool. If you are building a more complex application, it is advised that you go through the configurations and configure them to suit your needs.
The code destructures the JSON data in the request body from the event argument in the function request. It parses the request body, then further destructures the duration, activity_type, distance, name, and description values from the JSON data.
We create a SQL query to insert the new activity record using the Node pg-format package to include the destructured activity details in the query.
Note: Rather than directly interpolating the activity details into the SQL query statement using ES6 template literals, we use pg-format to reduce the SQL injection attack risk. To further reduce the risk of an SQL injection attack, we can validate each activity detail using a validation library such as Validator or Joi.
The pg driver passes the SQL statement as a parameter to the query method in the client class. It includes a callback returning both an error from the executed query and an object.
To test this function, we execute the command below from a new terminal window. We can use curl to make a POST request to the /create-activity function with the details of a sample activity in the request body.
Note: We can alternatively use our preferred API testing tools, such as Postman or Insomnia, to test the function endpoints.
curl -X POST -H "Content-Type: application/json" http://localhost:5050/.netlify/functions/create-activity -d '{"activity_type":"Hiking", "distance":"2KM", "name":"Trip to the mountains", "description":"My personal trip to the high mountains","duration":"2 Hours"}'After the console executes the request above, the JSON formatted response below indicates that the function ran successfully and created a new activity.
$ -> { "response" : "Hiking activity was created"}At this point, we have created the first Netlify Function to insert a new user activity record into our CockroachDB. The next step is to create another function to receive all user activity records from the database.
Creating the User Activity Records Retrieval Function
Next, we create the Netlify function to retrieve the user activities from the database. First, we create an activities.js file with the code below:
const { Pool } = require("pg");
const format = require("pg-format");

  const client = new Pool({
  host: process.env.HOST,
  database: process.env.DATABASE,
  password: process.env.PASSWORD,
  port: process.env.PORT,
  user: process.env.USERNAME,
  ssl: {
    ca : process.env.DB_CERT
   },
  });

  exports.handler = async ({ queryStringParameters }, context, callback) => {
   const { order } = queryStringParameters;

   try {
    const clientPool = await client.connect();

     const sqlStatement = format(
       "SELECT * FROM activities ORDER BY date_created %s",
       order || "ASC"
     );

     const { rows } = await clientPool.query(sqlStatement);

     return {
       statusCode: 200,
       body: JSON.stringify({ data: rows }),
     };
   } catch (e) {
     clientPool.release();

     return {
       statusCode: 500,
       body: JSON.stringify({
         response: "An internal server error occurred"
       }),
     };
   }
  }
;
The activities function code block above performs a process like in the POST /create-activity endpoint. But, this time, the operation retrieves all rows in the activities table.
First, the code establishes a connection to the cluster. Then it constructs an SQL query containing filter request parameters using the pg-format to avoid an SQL injection attack. The SQL statement consists of anORDERfilter.
After that, it performs an asynchronous operation to query the database through the Node pg driver using the created SQL statement. After resolving the query promise, it destructures the returned data and sends it back as a response.
To test the function above, we execute the command below that uses curl to make a GET request to the function’s endpoint within the running Netlify dev server:
curl -X GET http://localhost:5050/.netlify/functions/activities
The JSON data below is an array of activities in the data field. This array appears on our console as a response from the GET request above.
$ -> { data: [ { "activity_type":"Hiking", "distance":"2KM", "name":"Trip to the
  mountains", "description":"My personal trip to the high mountains","duration":"2
  Hours" } ] }
With the two APIs available, we can now build the client application using React-Static, which generates static markup during the deployment process.
Building the Client-Side Application Using React-Static
React-Static is one of the fastest and most lightweight static site generators within the React ecosystem. One reason we chose React-Static for this project is its close compatibility with React’s core APIs.
The web application here has two pages. The default or index page appears immediately after the user opens the application. It displays all user-created activities, and the second page, create-activity, is for a user to create a new activity.
Application Styling
To start, using our preferred code editor, we modify the App component within the src/App.js file to use the React-helmet package. Using react-helmet, we employ an HTML link element that references Bootstrap’s CDN for styling the entire application.
import React from 'react'
import { Root, Routes, addPrefetchExcludes } from 'react-static'
import { Helmet } from 'react-helmet'
import { Router } from 'components/Router'
import Dynamic from 'containers/Dynamic'

import './app.css'
// Any routes that start with 'dynamic' will be treated as non-static routes
addPrefetchExcludes(['dynamic'])
function App() {
 return (
   <Root>
     <Helmet>
         <link
           rel="stylesheet"       href="https://cdn.jsdelivr.net/npm/bootstrap@5.0.2/dist/css/bootstrap.min.css"         integrity="sha384-EVSTQN3/azprG1Anm3QDgpJLIm9Nao0Yz1ztcQTwFspd3yD65VohhpuuCOmLASjC"
           crossorigin="anonymous"
         />
         <link
           rel="stylesheet"    href="https://cdn.jsdelivr.net/npm/bootstrap-icons@1.5.0/font/bootstrap-icons.css"
         />
     </Helmet>
     <div className="content">
       <React.Suspense fallback={<em>Loading...</em>}>
         <Router>
           <Dynamic path="dynamic" />
           <Routes path="*" />
         </Router>
       </React.Suspense>
     </div>
   </Root>
 )
}
export default
 App
Next, we open the boilerplate src/app.css file to add custom CSS styles that the components we create next will use:
/* ACTIVITIES STYLING */
.title {
 font-weight: normal;
 font-size: 1.4rem;
}
.icon-ctn {
 padding: 0 .2rem;
}
.input-element {
 height: 45px;
 width: 98%;
 border-radius: 5px;
 padding: 0 1rem;
 border: 1px solid #c0c0c0;
}
.activity-header {
 width: 100%;
 background: #6933ff;
 color: #fff;
 height: 55px;
 display: flex;
 justify-content: center;
 align-items: center;
}

.title {
 font-size: 1.4rem;
}
.title-sm {
 font-size: 1.2rem;
 text-transform: capitalize;
}
.cards-list {
 display: flex;
 flex-direction: column;
 list-style: none;
 padding: 0;
 row-gap: 50px;
}
.activity-type {
 width: 7rem;
 height: 45px;
 list-style: none;
 padding: 0.5rem 1rem;
 border: 1px solid #c0c0c0;
 text-align: center;
 border-radius: 50px;
 transition: all 300ms;
}
.activity-btn {
 background: #6933ff;
 color: #fff;
 border: 1px solid #6933ff;
 border-radius: 5px;
 height: 42px;
 font-size: .9rem;
 padding: .5rem 2rem;
 transition: all 300ms;
}

.activity-btn:hover {
 color: #6933ff;
 cursor: pointer;
 background: transparent;
}

/* CREATE ACTIVITY PAGE STYLING */

.type-list {
 display: grid;
 place-content: center;
 grid-gap: 0.5rem 1rem;
 grid-template-columns: repeat(auto-fit, minmax(7rem, 1fr));
}

/* ACTIVITY CARD STYLING */
.card {
 border: 0;
 box-shadow: 0 2px 3px #c0c0c0;
 padding: 0.5rem 1rem;
 border-radius: 7px;
}

.activity-type:hover {
 cursor: pointer;
 background: #6933ff;
 border: 0;
 color: #fff;
}

label {
 font-size: 1.1rem;
 margin-bottom: 0.5rem;
}

.activities-items {
 max-width: 700px;
 margin: 0 auto;
}

.activities {
 background: #ebf4fd;
 height: 100%;
}

.align-center {
 display: flex;
 justify-content: center;
 align-content: center;
}

.flex {
 display: flex;
}
At this point, the application’s styles are in place. We can now define the routes to pages that will use the custom styles.
Creating Application Routes
Next, we open the static-config.js file in the root of the project to create routes for two pages within the application.
We modify the static-config.js file code block below to create a default route and a create-activity route using the getRoutes API.
import path from "path";

export default {
 getRoutes: async () => {
   return [
     {
       path: "/",
       template: "src/pages/activities",
     },
     {
       path: "/create-activity",
       template: "src/pages/createActivity",
     },
   ];
 },
 plugins: [
   [
     require.resolve("react-static-plugin-source-filesystem"),
     {
       location: path.resolve("./src/pages"),
     },
   ],
   require.resolve("react-static-plugin-reach-router"),
   require.resolve("react-static-plugin-sitemap"),
 ],
};
By modifying our static-config.js file code block, we add a default page and a create-activity page to the application. However, we haven’t created the components to render on these pages. We’ll do that in the next section.
Creating the Activity Page
Using our code editor, we make a createActivity.js file in the src/pages directory and add the code block contents below. This file serves as a page containing input fields for a user to type in an activity’s details.
import React, { useState } from "react";
import { navigate } from "@reach/router";
import "../app.css";

const activities = ["Hiking", "Skating", "Swimming", "Soccer"];

const CreateActivity = () => {
 const [isLoading, setLoading] = useState(false);
 const [selectedActivity, selectActivity] = useState(null);
 const [activityName, setActivityName] = useState("");
 const [description, setDescription] = useState("");
 const [distance, setDistance] = useState("");
 const [duration, setDuration] = useState("");

 const createAnActivity = async () => {
   setLoading(true);

   try {
     await fetch(`/.netlify/functions/create-activity`, {
       method: "POST",
       body: JSON.stringify({
         duration,
         distance,
         description,
         activity_type: selectedActivity,
         name: activityName,
       })
     });
   } catch (e) {
     console.log(e);
   } finally {
     setLoading(false);
   }
 };

 return (
   <div className="activities" style={{ height: "100vh" }}>
     <header className="activity-header">
       <h2 className="title"> Outdoor Activity Tracker </h2>
     </header>
     <br />

     <div className={"activities-items"}>
       <div className="flex" style={{ justifyContent: "space-between" }}>
         <h2 className="title"> Create New Activity </h2>

         <div className="align-center">
           <button onClick={() => navigate("/")} className="activity-btn">View Previous Activities</button>
         </div>
       </div>
       <hr />
       <div>
         <label id={"newActivity"}> Activity Name: </label>
         <br />

         <div className="align-center">
           <input
             value={activityName}
             onChange={(e) => {
               setActivityName(e.target.value);
             }}
             className={"input-element"}
             type={"text"}
             placeholder={"What is your activity name?"}
           />
         </div>

         <br />
         <label id={"newActivity"}> Activity Description: </label>
         <br />

         <div className="align-center">
           <input
             value={description}
             onChange={(e) => setDescription(e.target.value)}
             className={"input-element"}
             type={"text"}
             placeholder={"What is your activity about?"}
           />
         </div>
         <br />
         <div className="flex" style={{ justifyContent: "space-between" }}>
           <div className="flex" style={{ flexDirection: "column" }}>
             <label>Distance Covered</label>
             <input
               value={distance}
               onChange={({ target }) => setDistance(target.value)}
               className="input-element"
               placeholder={"Distance Covered"}
             />
           </div>

           <div className="flex" style={{ flexDirection: "column" }}>
             <label>Total Time Spent</label>
             <input
               value={duration}
               onChange={({ target }) => setDuration(target.value)}
               className="input-element"
               placeholder={"Total Time Spent"}
             />
           </div>
         </div>
         <br />
         <label> Activity Type: </label>
         <ul className={"type-list"}>
           {activities.map((i) => (
             <li
               key={i}
               className={"activity-type"}
               onClick={() => selectActivity(i)}
               style={{
                 background: i === selectedActivity && "#6933ff",
                 color: i === selectedActivity && "#fff",
                 border: i === selectedActivity && 0,
               }}
             >
               <p>{i}</p>
             </li>
           ))}
         </ul>
         <br />

         <div className="align-center">
           <button
             className="activity-btn"
             style={{ width: "100%" }}
             onClick={() => createAnActivity()}
           >
             {isLoading ? "Creating" : "Create"} Activity
           </button>
         </div>
       </div>
       <br />
       <br />
     </div>
   </div>
 );
};

export default
 CreateActivity;
The code block above contains a React component. Its state variables store data from the input fields where a user types in an activity name, description, distance, and duration. The page also contains a button positioned at the center for a user to click when submitting the activity.
Within the CreateActivity component is the asynchronous createAnActivity function. This function uses the browser fetch API to make a POST request. Its request body contains the activity details to submit to the Netlify Function.
Next, create an activities.js file in the src/pages directory and add the content of the code block below into the file. This is to ensure we have the activities.js file referenced in the static-config.js file as we will later come back to implement the activities page.
import React from "react";

const Activities = () => (
	<p> Activities page to retrieve all activities </p>
)

export default Activities;
To view the CreateActivity page, we ensure the application server is running in our terminal, then navigate to the /create-activity page using the address bar in our web browser. We can test this page by filling the input fields with values for an imaginary activity, like the image below.
When a user clicks Create Activity after filling in the form fields, it invokes the createAnActivity function to submit the details.
We’ll implement the default page to fetch all created activities using the GET /activities Netlify Function in the next section.
Creating the Default Activities Page
Now, we create the second page of our application, the default activities page. First, using our code editor, we make an activityCard.js file within the src/components folder in the project and add the code block contents below. This file will contain a component that renders a card of data that a parent component passes in as props.
import React from "react";
import { FiCalendar, FiClock } from 'react-icons/fi'
import { BsConeStriped } from 'react-icons/bs'

const ActivityCard = ({
   distance,
   duration,
   date_created,
   name,
   description,
   activity_type
}) => {
   return (
       <div className="card" >
           <div className="flex" style={{ justifyContent: 'space-between' }} >
               <h3 className="title-sm" > {name} </h3>

               <div className="activity-type" >
                   {activity_type}
               </div>
           </div>

           <div className="flex" >
               <div className="icon-ctn" >
                   <FiCalendar size={19} />
               </div>
               <p>{new Date(date_created).toDateString()}</p>
           </div>

           <hr />

           <div className="flex" style={{ justifyContent: 'space-between' }} >
               <div className="flex" >
                   <div className="icon-ctn" >
                       <FiClock size={19} />
                   </div>
                   {duration} Spent
               </div>
              <div className="flex" >
                   <div className="icon-ctn" >
                       <BsConeStriped size={19} />
                   </div>
                   {distance} Covered
               </div>
           </div>
           <br />
           <br />
           <p> {description} </p>
       </div>
   )
}

export default ActivityCard;
Next, we replace the boilerplate code in the src/pages/activities.js file with the code block contents below. This new code will display a list of user-created activities in the default route.
import React, { useState, useEffect } from "react";
import "../app.css";
import { navigate } from "@reach/router";
import ActivityCard from "../components/activityCard";

const Activities = () => {
 const [activitiesData, setActivitiesData] = useState([]);
 const [isLoading, setLoading] = useState(true);
 const [sortMode, setSortMode] = useState("ASC");

 useEffect(() => {
   fetchActivities();

   return () => fetchActivities();
 }, [sortMode]);

 const fetchActivities = async () => {
   setLoading(true);

   try {
     const body = await fetch(
       `/.netlify/functions/activities?order=${sortMode}`
     );
     const { data } = await body.json();

     if (data) {
        setActivitiesData(data);
     }
   } catch (e) {
     console.log("error fetching data", e);
   } finally {
     setLoading(false);
   }
 };

 return (
   <div className="activities">
     <header className="activity-header">
       <h2 className="title"> Outdoor Activity Tracker </h2>
     </header>
     <br />

     <section className={"activities-items"}>
       {isLoading ? (
         <div className="align-center" style={{ height: "100vh" }}>
           <h4> Fetching Your Activities .... </h4>
         </div>
       ) : activitiesData.length === 0 ? (
         <div style={{ height: "100vh" }}>
           <div className="align-center" style={{display: 'flex', justifyContent : 'center'}}>
             <button
               className={"activity-btn"}
               onClick={() => navigate("/create-activity")}
             >
               Create New Activity
             </button>
           </div>
           <h4 style={{ textAlign: "center" }}>
             You currently have no past activity. <br /> Click the button above
             to create your first activity
           </h4>
         </div>
       ) : (
         <div>
           <div className={"flex"} style={{ justifyContent: "space-between" }}>
             <div className={"align-center"}>
               <h2 className="title"> All Outdoor Activities </h2>
             </div>

             <div>
               <button
                 onClick={() => navigate("/create-activity")}
                 className={"activity-btn"}
               >
                 Create New Activity
               </button>
             </div>
           </div>
           <hr />

           <div className={"flex"}>
             <p style={{ margin: "0 .5rem" }}> Sort By: </p>
             <div>
               <select
                 onChange={(e) => {
                   setSortMode(e.target.value);
                 }}
                 value={sortMode}
                 className={"align-center"}
               >
                 <option value="ASC"> Recently Created </option>
                 <option value="DESC"> First Created </option>
               </select>
             </div>
           </div>

           <ul className={"cards-list"}>
             {activitiesData.map(
               ({
                 activity_type,
                 duration,
                 distance,
                 date_created,
                 name,
                 id,
                 description,
               }) => {
                 return (
                   <li key={id}>
                     <ActivityCard
                       distance={distance}
                       duration={duration}
                       date_created={date_created}
                       name={name}
                       description={description}
                       activity_type={activity_type}
                     />
                   </li>
                 );
               }
             )}
           </ul>
         </div>
       )}
     </section>
   </div>
 );
};

export default Activities;
The component in the code block above fetches and displays all activities that the /create-activity Netlify Function retrieves from the database using a useEffect hook to execute the fetchActivities function. The function makes a GET request to the /create-activity Netlify Function immediately after the component is mounted. The GET request contains an order request parameter with a value from the component state.
Note that the useEffect hook we use in the create-activity component takes a sortMode local state in its dependency array and watches sortMode for changes. A drop-down element sets the sortMode value, and we can use this element to filter the activities shown. When a user selects a new filter option, the sortMode state changes, thus firing or refiring the useEffect hook, which executes the fetchAcitivities function to fetch new data with the new filter.
The activitiesData local state stores the array containing the activities the network request returns. The code maps the array further to display the ActivityCard, which takes all the activity details as a property.
Testing Our Application
To view the new default page, we use the address bar in our web browser (http://locahost:5050). We should see two activity cards containing the details of the activity we created earlier.
The image above shows the default page with two activities. We created the first activity when we made a POST request using curl, and we made the second activity by filling and submitting the input fields on the create-activity page.
At this point, the application works on our computer. But, our application must go through a build process where the React components generate static markups. After this, we can host the static pages using a cloud service for access over the internet using other devices.
We can now further clean up by deleting the src/pages/blog.js, src/pages/about.js, and src/pages/index.js files that were created when we bootstrapped the application.
In the next section, we focus on deploying the entire application to Netlify.
Deploying the Application
We can deploy Jamstack applications to various hosting providers such as Netlify or Vercel to serve them on the internet. However, we can only deploy Netlify Functions to Netlify. Since this application uses Netlify Functions, it’s best to deploy the entire project to Netlify only.
The deploy command within the netlify CLI can deploy the entire project directly from our terminal without having to use the Netlify console.
We execute the command below to generate a production bundle of the JAMstack application in a dist directory:
npm run build
Next, we execute the command below to deploy the generated production bundle to the project we created within Netlify:
netlify deploy --prod --dir dist
Our Jamstack application is now complete and deployed to Netlify. We can view the deployed application through the Website URL in the deploy command’s output.
Next Steps
By following this tutorial, you have built a Jamstack application using JavaScript as the primary language. You used Netlify Functions to manage the REST API layer that stores data in a CockroachDB in a free beta cluster. Finally, you used React-Static to generate markups for Netlify’s content delivery network (CDN) to serve end-users.
You can find the directory containing this application’s source code in this GitHub repository. Feel free to clone and reuse the Netlify functions to expand this application with more database fields, such as terrain type, weather conditions, or other features. Or, sign up for your CockroachDB Serverless account to begin building your own CockroachDB-powered Jamstack web app for free.