As a CockroachDB Tech Writer, when I document a new feature, generally, I first try to learn the business value behind it, then I test the feature thoroughly, and then I try to write up concise, informative guidance for users. Sometimes, the business value and usage aren’t unique to CockroachDB (it’s a SQL database, after all, and SQL has been around for a while). Other times, I get to document capabilities so novel and powerful that straight-up user documentation just doesn’t seem enough.
The ability to span a CockroachDB cluster across multiple cloud platforms, and then completely migrate data from one cloud to another with a single command, was one such case. In the docs, I could explain how simple it is to take advantage of these capabilities, and I could walk users through a local simulation. But to really get the point across, I decided to do a little dogfooding: I recorded myself deploying a 6-node cluster across Digital Ocean and GCE and then using CockroachDB’s replication controls to migrate data off and on to each cloud, all while running the open-source YCSB load generator and HAProxy load balancer to simulate continuous client traffic.
Have a look! And then read below on how it works and how to test this yourself. Also keep an eye out for upcoming posts explaining the mechanics of automated rebalancing and CockroachDB’s replication controls.
Flexible Deployment
As you saw in the video, the deployment process is simple. In essence, on each machine where you want a node, you download the binary and then execute the cockroach start command, using the --host flag to identify the address on which the node talks to other nodes and clients. For all but the first node, you also use the --join flag to specify the address of the first node. This is the way in which a new node knows it’s joining an existing cluster.
That’s pretty much it! As long as the networking setup allows the nodes to talk to each other, it really doesn’t matter where the nodes reside. They can be on machines in a single datacenter, in multiple datacenters, in different public clouds (as shown in the video), or even in a mixture of public and private clouds.
What’s behind this flexibility? It’s a combination of how the nodes self-organize via a Gossip protocol and how the cluster replicates data via the Raft consensus algorithm.
Future posts and documentation will go into more technical detail, but in summary, the Gossip protocol ensures that every node has up-to-date details about every other node in the cluster, including the location of data and the storage capacity of each node. This means that every node can serve as a suitable SQL gateway for clients and that the cluster as a whole can work to continuously move data around to maintain balance. As for the Raft consensus algorithm, it’s the mechanism by which CockroachDB ensures that every "range" of data is replicated (3 times by default) and that replicas of the same "range" always remain consistent (a range is the basic unit of data for the purpose of replication).
Flexible Migration
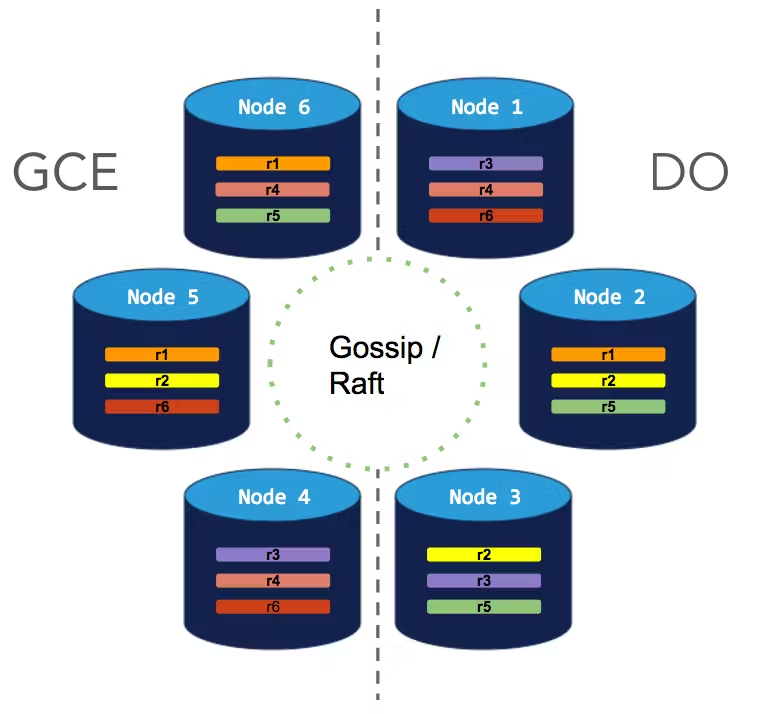
The ease with which you can control the location of data is another key point in the video, and it ties into CockroachDB’s replication controls, specifically the notion of node locality.
When you start a node, you can pass the --locality flag to describe its location. This can be anything from region to country to cloud to datacenter to rack, or any combination of these. If you set localities consistently on all nodes, CockroachDB automatically aims to balance replicas evenly across them. But you can also configure what we call "replication zones" to force data onto or off of nodes that match specific localities (as well as other node attributes).
For example, in the video, I started the 3 nodes on Digital Ocean with --locality=cloud=do and the 3 nodes on GCE with --locality=cloud=gce, resulting in an even balance of data across all 6 nodes. Then with a single command, I was able to update the default replication zone for the cluster to require that all replicas reside on nodes with --locality=cloud=gce. The cluster then pretty quickly ensured that all replicas were on GCE nodes, leaving the Digital Ocean nodes empty:


Once that migration completed, I then reversed the migration, again with a single command, by changing the constraint to require that all replicas reside on nodes with --locality=cloud=do. Again, the cluster enforced the constraint pretty quickly:
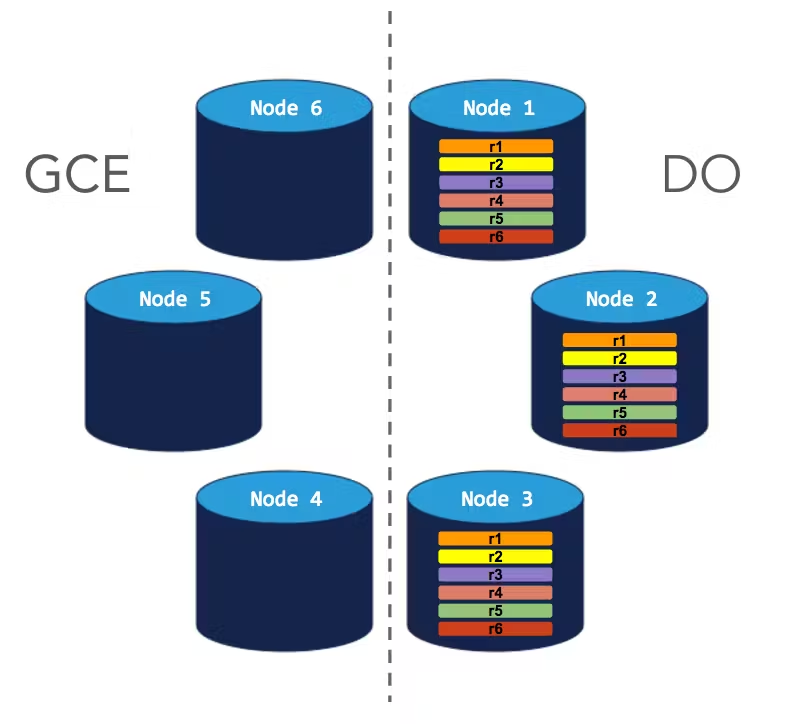

Migration was very fast in my case because the cluster didn’t hold much data. Of course, the larger the cluster, the longer the migration. Nonetheless, the key point is that, with CockroachDB, you have the flexibility to deploy where you want and never feel locked into a specific vendor; migrating from one cloud to another is something CockroachDB handles for you behind-the-scenes, while the cluster continues to operate normally for clients and users, with no service interruption. It’s a powerful capability. Consider testing it yourself!
Test It Yourself
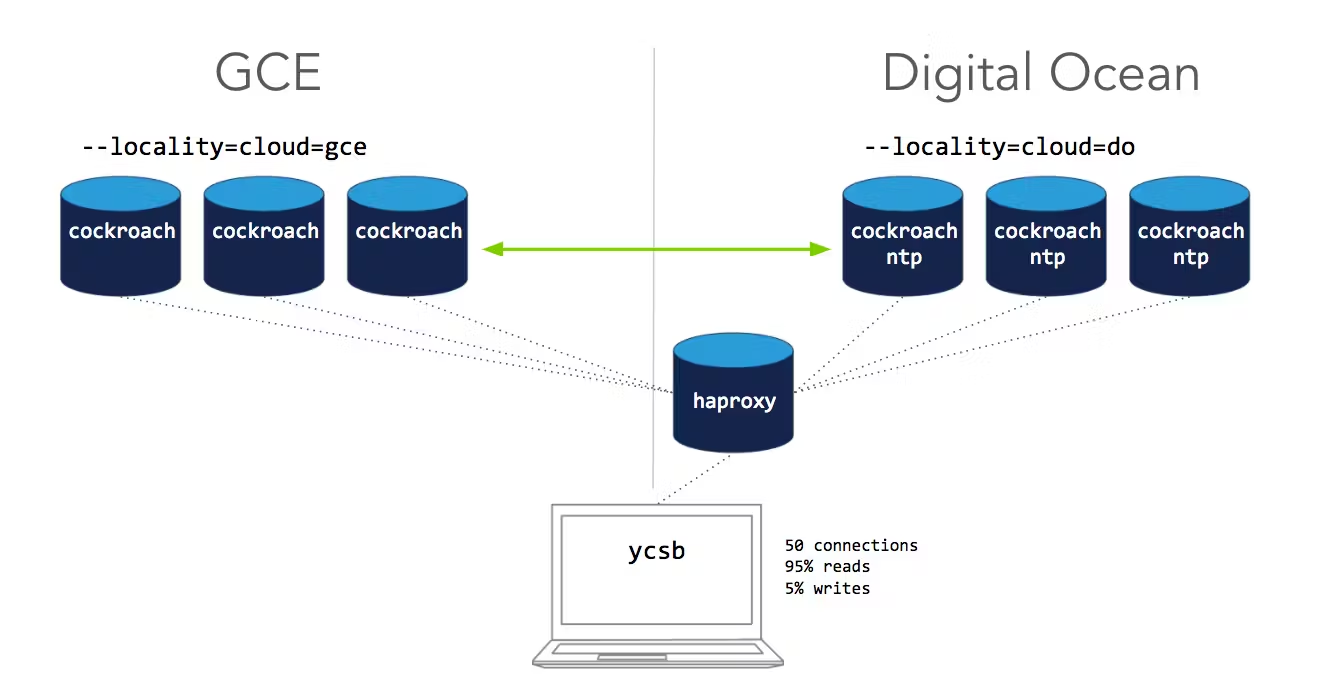
Create 3 VMs on GCE and 4 VMs on Digital Ocean (3 for cockroach, 1 for haproxy).
Create GCE ingress/egress firewall rules allowing all traffic on ports 26257 (for inter-node communication) & 8080 (for accessing Admin UIs).
Install and start NTP on the Digital Ocean VMs to ensure proper clock synchronization (running by default on GCE VMs):
$ sudo apt-get install ntpInstall the
cockroachbinary on all the VMs and on your local machine.Start CockroachDB nodes on the 3 Digital Ocean VMs:
$ cockroach start --insecure --background --advertise-host=<node 1 external IP> --locality=cloud=do

$ cockroach start --insecure --background --advertise-host=<node 2 external IP> --join=<node 1 external IP>:26257 --locality=cloud=do

$ cockroach start --insecure --background --advertise-host=<node 3 external IP> --join=<node 1 external IP>:26257 --locality=cloud=do
Start CockroachDB nodes on the 3 GCE VMs:
$ cockroach start --insecure --background --advertise-host=<node 4 external IP> --join=<node 1 external IP>:26257 --locality=cloud=gce

$ cockroach start --insecure --background --advertise-host=<node 5 external IP> --join=<node 1 external IP>:26257 --locality=cloud=gce

$ cockroach start --insecure --background --advertise-host=<node 6 external IP> --join=<node 1 external IP>:26257 --locality=cloud=gce
Open the Admin UI at
http://<IP of any node>:8080and check the Replicas per Node graph. You should see that replicas are evenly balanced across all 6 nodes.On the remaining Digital Ocean VM, install the HAProxy load balancer:
$ apt-get install haproxyOn the same VM, use the
cockroachbinary to generate an HAProxy config file, pointing to any node in the running cluster:$ cockroach gen haproxy --insecure --host=<external IP of any node> --port=26257On the same VM, start HAProxy:
$ haproxy -f haproxy.cfgOn your local machine, install and build our version of the YCSB load generator, and then start it, pointing at the HAProxy IP:
$ ycsb -duration 2h -splits 50 -tolerate-errors -concurrency 50 -initial-load 100 'postgresql://root@<HAProxy IP>:26257?sslmode=disable'Go back to the Admin UI and check out the effect of running 50 concurrent YCSB connections against the cluster.
On your local machine, using the
cockroachbinary as a client, update the default zone config with a required constraint to force all data onto GCE:$ echo 'constraints: [+cloud=gce]' | cockroach zone set .default --insecure --host=<external IP of any node> -f -Go back to the Admin UI and again check the Replicas per Node graph. After a few minutes, you should see the replica count double on the GCE nodes and drop to 0 on the Digital Ocean nodes.
On your local machine, using the
cockroachbinary as a client, change the default zone config’s required constraint to force all data onto Digital Ocean:$ echo 'constraints: [+cloud=do]' | cockroach zone set .default --insecure --host=<external IP of any node> -f -Go back to the Admin UI and check the Replicas per Node graph one more time. After a few minutes, you should see all replicas on the Digital Ocean nodes and 0 replicas on the GCE nodes.