tutorial.roads table, which contains the U.S. National Atlas data set.
Many of the instructions on this page come from the following GeoServer documentation pages:
Before you begin
You must have the following set up before proceeding with this tutorial:- CockroachDB
- GeoServer installed on the local machine.
Step 1. Start CockroachDB and connect to your cluster
Start a CockroachDB cluster by following the instructions in .Step 2. Load spatial data
Connect to the running cluster from the and enter the statements below.-
the
tutorialdatabase: -
Switch to the
tutorialdatabase: -
Load the spatial data set:
Step 3. Turn on CockroachDB’s experimental box comparison operators
CockroachDB’s support for GeoServer is still in development. To use CockroachDB with GeoServer, you will need to enable the use of certain experimental box2d comparison operators by changing the following :- PostGIS uses the
&&,~, and@operators to do bounding box comparisons. These comparisons can always be index-accelerated by PostgreSQL since it uses R-tree based indexing to generate its coverings. - CockroachDB since this is necessary for .
- This means that the coverings generated by CockroachDB’s
&&,~, and@operators for index-accelerated lookups are not the same as the bounding box coverings generated by PostGIS. - In practice, CockroachDB may return a smaller set of results for the same query, as the space-filling curve covering is often more exact than a bounding box covering, and will exclude from the result set any geometries that have an intersecting bounding box but where no part of the geometry hits the actual bounding box.
- Note that the behavior described above only applies to index-accelerated lookups.
- This means that the coverings generated by CockroachDB’s
Step 4. Start GeoServer
The easiest place to create the GeoServer data directory is in your user’s home directory.-
In the UNIX shell, run the following command:
-
Start GeoServer by running the following command:
Step 5. Log in to GeoServer
In this and the following steps we will set up GeoServer so it can access the spatial data we loaded in Step 2. Open your web browser and navigate to your locally running GeoServer instance. Log in using the default credentials: usernameadmin, password geoserver.
Step 6. Set up a GeoServer Workspace
In the left-hand navigation menu, click Data > Workspaces. The Workspaces page will load. Click the Add new workspace button. On the New Workspace page, enter the following information:- In the Name field, enter the text “spatial-tutorial”.
- In the Namespace URI field, enter the URL for the spatial tutorial where this data set is used:
/docs/v23.2/spatial-tutorial.html.
Step 7. Configure GeoServer to use CockroachDB
In the left-hand navigation menu, click Data > Stores. The Stores page will load. Click the Add new Store button. You will be taken to the New data source page. Under the list of Vector Data Sources, click PostGIS. This opens the New Vector Data Source page, where you need to enter the following information:- Under Basic Store Info, fill in the Data Source Name field with the text:
CockroachDB - Under Connection Parameters, edit port to the default CockroachDB port:
26257 - Edit the database field to add the text:
tutorial - Fill in the user field with the text:
root - Delete the contents of the passwd field, if any
- bookstore_routes
- bookstores
- roads
roads layer.
This will bring you to the Edit Layer page, where you need to enter the following information:
- In the Bounding Boxes section, for the Native Bounding Box settings, click the Compute from data button, which will fill in the form fields.
- Also in the Bounding Boxes section, for the Lat/Lon Bounding Box setting, click the Compute from native bounds button, which will fill in the form fields.
Step 8. View the roads layer
In the left-hand navigation menu, click Data > Layer Preview.
You will be redirected to the Layer Preview page.
In the row for the roads layer, click the OpenLayers button under the Common Formats column.
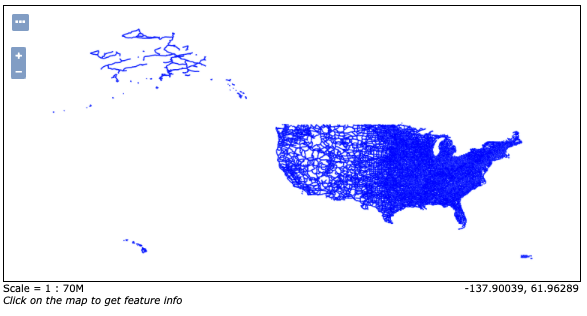
Your browser should open a new tab with the title OpenLayers map preview. It should show a map view that looks like the following: