
This page provides step-by-step examples for using Core and Enterprise changefeeds. Creating Enterprise changefeeds is available on CockroachDB Dedicated, on CockroachDB Serverless, and with an Enterprise license on CockroachDB Self-Hosted clusters. Core changefeeds are available in all products.
For a summary of Core and Enterprise changefeed features, refer to the Change Data Capture Overview page.
Enterprise changefeeds can connect to the following sinks:
- Kafka
- Google Cloud Pub/Sub
- Cloud Storage (Amazon S3, Google Cloud Storage, Azure Storage)
- New in v24.1: Azure Event Hubs
- Webhook
Refer to the Changefeed Sinks page for more detail on forming sink URIs, available sink query parameters, and specifics on configuration.
Cockroach Labs recommends monitoring your changefeeds to track retryable errors and protected timestamp usage. Refer to the Monitor and Debug Changefeeds page for more information.
Use the following filters to show usage examples for either Enterprise or Core changefeeds:
You can create an external connection to represent a changefeed sink URI. This allows you to specify the external connection's name in statements rather than the provider-specific URI. For detail on using external connections, see the CREATE EXTERNAL CONNECTION page.
Create a changefeed connected to Kafka
CREATE CHANGEFEED is an Enterprise-only feature. For the Core version, see the CHANGEFEED FOR example.
In this example, you'll set up a changefeed for a single-node cluster that is connected to a Kafka sink. The changefeed will watch two tables.
If you do not already have one, request a trial Enterprise license.
Use the
cockroach start-single-nodecommand to start a single-node cluster:cockroach start-single-node --insecure --listen-addr=localhostDownload and extract the Confluent Open Source platform (which includes Kafka).
In a new terminal window, go to the extracted
confluent-<version>directory and start Confluent:./bin/confluent local services startOnly
zookeeperandkafkaare needed. To troubleshoot Confluent, see their docs and the Quick Start Guide.Create two Kafka topics:
./bin/kafka-topics \ --create \ --zookeeper localhost:2181 \ --replication-factor 1 \ --partitions 1 \ --topic office_dogs./bin/kafka-topics \ --create \ --zookeeper localhost:2181 \ --replication-factor 1 \ --partitions 1 \ --topic employeesNote:You are expected to create any Kafka topics with the necessary number of replications and partitions. Topics can be created manually or Kafka brokers can be configured to automatically create topics with a default partition count and replication factor.
As the
rootuser, open the built-in SQL client:$ cockroach sql --insecureSet your organization name and Enterprise license key that you received via email:
> SET CLUSTER SETTING cluster.organization = '<organization name>';> SET CLUSTER SETTING enterprise.license = '<secret>';Enable the
kv.rangefeed.enabledcluster setting:> SET CLUSTER SETTING kv.rangefeed.enabled = true;Note:If you are working on a CockroachDB Serverless cluster, the
kv.rangefeed.enabledcluster setting is enabled by default.Create a database called
cdc_demo:> CREATE DATABASE cdc_demo;Set the database as the default:
> SET DATABASE = cdc_demo;Create a table and add data:
> CREATE TABLE office_dogs ( id INT PRIMARY KEY, name STRING);> INSERT INTO office_dogs VALUES (1, 'Petee'), (2, 'Carl');> UPDATE office_dogs SET name = 'Petee H' WHERE id = 1;Create another table and add data:
> CREATE TABLE employees ( dog_id INT REFERENCES office_dogs (id), employee_name STRING);> INSERT INTO employees VALUES (1, 'Lauren'), (2, 'Spencer');Start the changefeed:
CREATE CHANGEFEED FOR TABLE office_dogs, employees INTO 'kafka://localhost:9092';job_id +--------------------+ 360645287206223873 (1 row) NOTICE: changefeed will emit to topic office_dogs NOTICE: changefeed will emit to topic employeesThis will start up the changefeed in the background and return the
job_id. The changefeed writes to Kafka.In a new terminal, move into the extracted
confluent-<version>directory and start watching the Kafka topics:./bin/kafka-console-consumer \ --bootstrap-server=localhost:9092 \ --from-beginning \ --include 'office_dogs|employees'{"after": {"id": 1, "name": "Petee H"}} {"after": {"id": 2, "name": "Carl"}} {"after": {"id": 1, "name": "Lauren", "rowid": 528514320239329281}} {"after": {"id": 2, "name": "Spencer", "rowid": 528514320239362049}}The initial scan displays the state of the tables as of when the changefeed started (therefore, the initial value of
"Petee"is omitted).Note:This example only prints the value. To print both the key and value of each message in the changefeed (e.g., to observe what happens with
DELETEs), use the--property print.key=trueflag.Back in the SQL client, insert more data:
INSERT INTO office_dogs VALUES (3, 'Ernie');Back in the terminal where you're watching the Kafka topics, the following output has appeared:
{"after": {"id": 3, "name": "Ernie"}}When you are done, exit the SQL shell (
\q).To stop
cockroach:Get the process ID of the node:
ps -ef | grep cockroach | grep -v grep501 21766 1 0 6:21PM ttys001 0:00.89 cockroach start-single-node --insecure --listen-addr=localhostGracefully shut down the node, specifying its process ID:
kill -TERM 21766initiating graceful shutdown of server server drained and shutdown completedTo stop Kafka, move into the extracted
confluent-<version>directory and stop Confluent:./bin/confluent local services stop
Create a changefeed connected to Kafka using Avro
CREATE CHANGEFEED is an Enterprise-only feature. For the Core version, see the CHANGEFEED FOR example.
In this example, you'll set up a changefeed for a single-node cluster that is connected to a Kafka sink and emits Avro records. The changefeed will watch two tables.
If you do not already have one, request a trial Enterprise license.
Use the
cockroach start-single-nodecommand to start a single-node cluster:cockroach start-single-node --insecure --listen-addr=localhostDownload and extract the Confluent Open Source platform (which includes Kafka).
Move into the extracted
confluent-<version>directory and start Confluent:./bin/confluent local services startOnly
zookeeper,kafka, andschema-registryare needed. To troubleshoot Confluent, see their docs and the Quick Start Guide.Create two Kafka topics:
./bin/kafka-topics \ --create \ --zookeeper localhost:2181 \ --replication-factor 1 \ --partitions 1 \ --topic office_dogs./bin/kafka-topics \ --create \ --zookeeper localhost:2181 \ --replication-factor 1 \ --partitions 1 \ --topic employeesNote:You are expected to create any Kafka topics with the necessary number of replications and partitions. Topics can be created manually or Kafka brokers can be configured to automatically create topics with a default partition count and replication factor.
As the
rootuser, open the built-in SQL client:$ cockroach sql --insecureSet your organization name and Enterprise license key that you received via email:
> SET CLUSTER SETTING cluster.organization = '<organization name>';> SET CLUSTER SETTING enterprise.license = '<secret>';Enable the
kv.rangefeed.enabledcluster setting:> SET CLUSTER SETTING kv.rangefeed.enabled = true;Note:If you are working on a CockroachDB Serverless cluster, the
kv.rangefeed.enabledcluster setting is enabled by default.Create a database called
cdc_demo:> CREATE DATABASE cdc_demo;Set the database as the default:
> SET DATABASE = cdc_demo;Create a table and add data:
> CREATE TABLE office_dogs ( id INT PRIMARY KEY, name STRING);> INSERT INTO office_dogs VALUES (1, 'Petee'), (2, 'Carl');> UPDATE office_dogs SET name = 'Petee H' WHERE id = 1;Create another table and add data:
> CREATE TABLE employees ( dog_id INT REFERENCES office_dogs (id), employee_name STRING);> INSERT INTO employees VALUES (1, 'Lauren'), (2, 'Spencer');Start the changefeed:
CREATE CHANGEFEED FOR TABLE office_dogs, employees INTO 'kafka://localhost:9092' WITH format = avro, confluent_schema_registry = 'http://localhost:8081';To connect to Confluent Cloud, use the following URL structure:
'https://{API_KEY_ID}:{API_SECRET_URL_ENCODED}@{CONFLUENT_REGISTRY_URL}:443'. See the Stream a Changefeed to a Confluent Cloud Kafka Cluster tutorial for further detail.job_id +--------------------+ 360645287206223873 (1 row) NOTICE: changefeed will emit to topic office_dogs NOTICE: changefeed will emit to topic employeesThis will start up the changefeed in the background and return the
job_id. The changefeed writes to Kafka.In a new terminal, move into the extracted
confluent-<version>directory and start watching the Kafka topics:./bin/kafka-avro-console-consumer \ --bootstrap-server=localhost:9092 \ --from-beginning \ --include 'office_dogs|employees'{"after":{"office_dogs":{"id":{"long":1},"name":{"string":"Petee H"}}}} {"after":{"office_dogs":{"id":{"long":2},"name":{"string":"Carl"}}}} {"after":{"employees":{"dog_id":{"long":1},"employee_name":{"string":"Lauren"},"rowid":{"long":528537452042682369}}}} {"after":{"employees":{"dog_id":{"long":2},"employee_name":{"string":"Spencer"},"rowid":{"long":528537452042747905}}}}The initial scan displays the state of the table as of when the changefeed started (therefore, the initial value of
"Petee"is omitted).Note:This example only prints the value. To print both the key and value of each message in the changefeed (e.g., to observe what happens with
DELETEs), use the--property print.key=trueflag.Back in the SQL client, insert more data:
INSERT INTO office_dogs VALUES (3, 'Ernie');Back in the terminal where you're watching the Kafka topics, the following output has appeared:
{"after":{"office_dogs":{"id":{"long":3},"name":{"string":"Ernie"}}}}When you are done, exit the SQL shell (
\q).To stop
cockroach:Get the process ID of the node:
ps -ef | grep cockroach | grep -v grep501 21766 1 0 6:21PM ttys001 0:00.89 cockroach start-single-node --insecure --listen-addr=localhostGracefully shut down the node, specifying its process ID:
kill -TERM 21766initiating graceful shutdown of server server drained and shutdown completedTo stop Kafka, move into the extracted
confluent-<version>directory and stop Confluent:./bin/confluent local services stop
Create a changefeed connected to a Confluent Cloud sink
In this example, you'll set up a changefeed for a single-node cluster that is connected to a Confluent Cloud managed Kafka cluster. The changefeed will watch a table and send messages to the sink.
If you do not already have one, request a trial Enterprise license.
Use the
cockroach start-single-nodecommand to start a single-node cluster:cockroach start-single-node --insecure --listen-addr=localhostIn this example, you'll run CockroachDB's Movr application workload to set up some data for your changefeed.
In a new terminal, first create the schema for the workload:
cockroach workload init movr "postgresql://root@127.0.0.1:26257?sslmode=disable"Then run the workload:
cockroach workload run movr --duration=1m "postgresql://root@127.0.0.1:26257?sslmode=disable"As the
rootuser, open the built-in SQL client:$ cockroach sql --insecureSet your organization name and Enterprise license key that you received via email:
> SET CLUSTER SETTING cluster.organization = '<organization name>';> SET CLUSTER SETTING enterprise.license = '<secret>';Enable the
kv.rangefeed.enabledcluster setting:> SET CLUSTER SETTING kv.rangefeed.enabled = true;Note:If you are working on a CockroachDB Serverless cluster, the
kv.rangefeed.enabledcluster setting is enabled by default.To prepare the Confluent Cloud Kafka sink, sign up on the Confluent Cloud trial page.
On the Create cluster page, select the necessary cluster type. The Basic cluster type is sufficient to run this example. Select the configuration and regions. After you have confirmed payment and set a cluster name, Launch the cluster.
From the Overview page, click on API Keys in the navigation menu. Click Create key and select the scope for this API key. Global access is sufficient for this example. Granular access is more suitable for production. Copy or download the key and secret.
Create a topic in Confluent Cloud. Under Topics select Add topic. Add a topic name and define the number of partitions and then Create. CockroachDB defaults to using the table name as the topic name. If you would like to send messages to an alternate topic, you can specify the
topic_nameparameter.Note:You can enable auto topic creation for Confluent Cloud Dedicated clusters under Cluster Settings in the console.
Construct the URI to connect your changefeed to the Confluent Cloud cluster. You will need:
- The prefix scheme
confluent-cloud://. - The address and port of the bootstrap server. Click on Cluster settings in your Confluent Cloud console. Under Endpoints, you will find the Bootstrap server. It will be something like:
pkc-lzvrd.us-west4.gcp.confluent.cloud:9092. - Ensure that you follow the cluster address with
?before the remaining parameters, and also connect the following parameters with&. - Your API key and secret from the previous step passed with the
api_keyandapi_secretparameters. You must URL encode the secret before adding to the connection string. (Optional) Any further parameters. Refer to Query parameters.
'confluent-cloud://pkc-lzvrd.us-west4.gcp.confluent.cloud:9092?api_key={API key}&api_secret={url-encoded API secret}'
- The prefix scheme
Back in the SQL shell, create a changefeed:
CREATE CHANGEFEED FOR TABLE movr.users, movr.vehicles INTO 'confluent-cloud://pkc-lzvrd.us-west4.gcp.confluent.cloud:9092?api_key={API key}&api_secret={url-encoded API secret}&topic_name=users_and_vehicles' WITH resolved;job_id ---------------------- 913248812656525313 (1 row) NOTICE: changefeed will emit to topic users_and_vehicles
Create a changefeed connected to a Google Cloud Pub/Sub sink
In this example, you'll set up a changefeed for a single-node cluster that is connected to a Google Cloud Pub/Sub sink. The changefeed will watch a table and send messages to the sink.
You'll need access to a Google Cloud Project to set up a Pub/Sub sink. In this example, the Google Cloud CLI (gcloud) is used, but you can also complete each of these steps within your Google Cloud Console.
If you do not already have one, request a trial Enterprise license.
Use the
cockroach start-single-nodecommand to start a single-node cluster:cockroach start-single-node --insecure --listen-addr=localhostIn this example, you'll run CockroachDB's Movr application workload to set up some data for your changefeed.
In a new terminal, first create the schema for the workload:
cockroach workload init movr "postgresql://root@127.0.0.1:26257?sslmode=disable"Then run the workload:
cockroach workload run movr --duration=1m "postgresql://root@127.0.0.1:26257?sslmode=disable"As the
rootuser, open the built-in SQL client:$ cockroach sql --insecureSet your organization name and Enterprise license key that you received via email:
> SET CLUSTER SETTING cluster.organization = '<organization name>';> SET CLUSTER SETTING enterprise.license = '<secret>';Enable the
kv.rangefeed.enabledcluster setting:> SET CLUSTER SETTING kv.rangefeed.enabled = true;Note:If you are working on a CockroachDB Serverless cluster, the
kv.rangefeed.enabledcluster setting is enabled by default.Next, you'll prepare your Pub/Sub sink.
In a new terminal window, create a Service Account attached to your Google Project:
gcloud iam service-accounts create cdc-demo --project cockroach-projectIn this example,
cdc-demowill represent the name of the service account, andcockroach-projectis the name of the Google Project.To ensure that your Service Account has the correct permissions to publish to the sink, use the following command to give the Service Account the predefined Pub/Sub Editor role:
gcloud projects add-iam-policy-binding cockroach-project --member='serviceAccount:cdc-demo@cockroach-project.iam.gserviceaccount.com' --role='roles/pubsub.editor'Create the Pub/Sub topic to which your changefeed will emit messages:
gcloud pubsub topics create movr-users --project cockroach-projectRun the following command to create a subscription within the
movr-userstopic:gcloud pubsub subscriptions create movr-users-sub --topic=movr-users --topic-project=cockroach-projectWith the topic and subscription set up, you can now download your Service Account's key. Use the following command to specify where to download the json key file (
key.json):gcloud iam service-accounts keys create key.json --iam-account=cdc-demo@cockroach-project.iam.gserviceaccount.comNext, base64 encode your credentials key using the command specific to your platform.
If you're working on macOS:
cat key.json | base64If you're working on Linux, run the following to ensure that lines are not wrapped in the output:
cat key.json | base64 -w 0Copy the output so that you can add it to your
CREATE CHANGEFEEDstatement in the next step. When you create your changefeed, it is necessary that the key is base64 encoded before passing it in the URI.Back in the SQL shell, create a changefeed that will emit messages to your Pub/Sub topic. Ensure that you pass the base64-encoded credentials for your Service Account:
CREATE CHANGEFEED FOR TABLE users INTO 'gcpubsub://cockroach-project?REGION=us-east1&topic_name=movr-users&AUTH=specified&CREDENTIALS={base64-encoded key}';You can include the
regionparameter for your topic, or use the WITHunorderedoption for multi-region Pub/Sub. See the Changefeed Sinks page for more detail.The output will confirm the topic where the changefeed will emit messages to.
       job_id
----------------------
756641304964792321
(1 row)

NOTICE: changefeed will emit to topic movr-users
To view all the messages delivered to your topic, you can use the Cloud Console. You'll see the messages emitted to the
movr-users-subsubscription.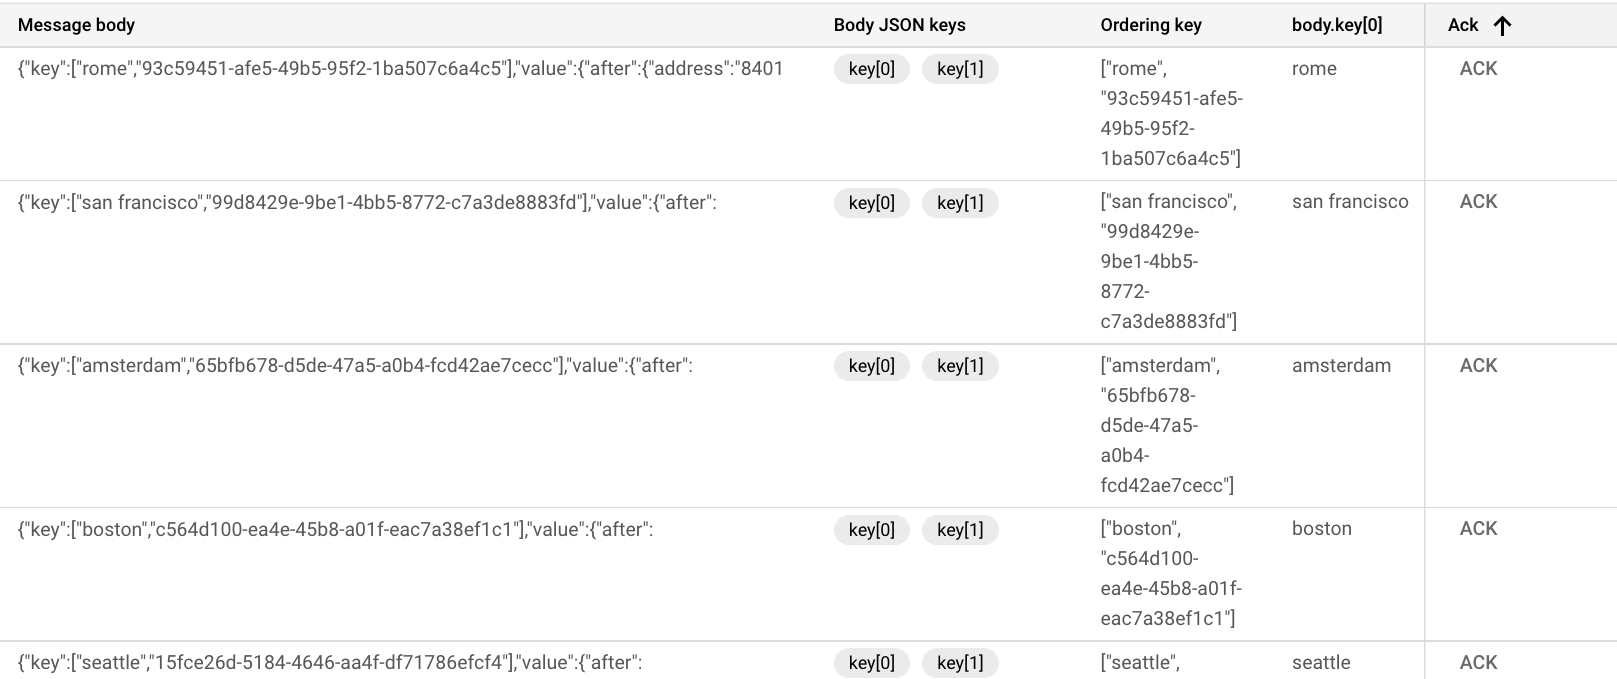
To view published messages from your terminal, run the following command:
gcloud pubsub subscriptions pull movr-users-sub --auto-ack --limit=10This command will only pull these messages once per subscription. For example, if you ran this command again you would receive 10 different messages in your output. To receive more than one message at a time, pass the
--limitflag. For more details, see the gcloud pubsub subscriptions pull documentation.┌──────────────────────────────────────────────────────────────────────────────────────────────────────────────────────────────────────────────────────────────────────────────────────────────────────────────────────────────────────────────────────────────────────┬──────────────────┬─────────────────────────────────────────────────────────┬────────────┬──────────────────┐ │ DATA │ MESSAGE_ID │ ORDERING_KEY │ ATTRIBUTES │ DELIVERY_ATTEMPT │ ├──────────────────────────────────────────────────────────────────────────────────────────────────────────────────────────────────────────────────────────────────────────────────────────────────────────────────────────────────────────────────────────────────────┼──────────────────┼─────────────────────────────────────────────────────────┼────────────┼──────────────────┤ │ {"key":["boston","40ef7cfa-5e16-4bd3-9e14-2f23407a66df"],"value":{"after":{"address":"14980 Gentry Plains Apt. 64","city":"boston","credit_card":"2466765790","id":"40ef7cfa-5e16-4bd3-9e14-2f23407a66df","name":"Vickie Fitzpatrick"}},"topic":"movr-users"} │ 4466153049158588 │ ["boston", "40ef7cfa-5e16-4bd3-9e14-2f23407a66df"] │ │ │ │ {"key":["los angeles","947ae147-ae14-4800-8000-00000000001d"],"value":{"after":{"address":"35627 Chelsey Tunnel Suite 94","city":"los angeles","credit_card":"2099932769","id":"947ae147-ae14-4800-8000-00000000001d","name":"Kenneth Barnes"}},"topic":"movr-users"} │ 4466144577818136 │ ["los angeles", "947ae147-ae14-4800-8000-00000000001d"] │ │ │ │ {"key":["amsterdam","c28f5c28-f5c2-4000-8000-000000000026"],"value":{"after":{"address":"14729 Karen Radial","city":"amsterdam","credit_card":"5844236997","id":"c28f5c28-f5c2-4000-8000-000000000026","name":"Maria Weber"}},"topic":"movr-users"} │ 4466151194002912 │ ["amsterdam", "c28f5c28-f5c2-4000-8000-000000000026"] │ │ │ │ {"key":["new york","6c8ab772-584a-439d-b7b4-fda37767c74c"],"value":{"after":{"address":"34196 Roger Row Suite 6","city":"new york","credit_card":"3117945420","id":"6c8ab772-584a-439d-b7b4-fda37767c74c","name":"James Lang"}},"topic":"movr-users"} │ 4466147099992681 │ ["new york", "6c8ab772-584a-439d-b7b4-fda37767c74c"] │ │ │ │ {"key":["boston","c56dab0a-63e7-4fbb-a9af-54362c481c41"],"value":{"after":{"address":"83781 Ross Overpass","city":"boston","credit_card":"7044597874","id":"c56dab0a-63e7-4fbb-a9af-54362c481c41","name":"Mark Butler"}},"topic":"movr-users"} │ 4466150752442731 │ ["boston", "c56dab0a-63e7-4fbb-a9af-54362c481c41"] │ │ │ │ {"key":["amsterdam","f27e09d5-d7cd-4f88-8b65-abb910036f45"],"value":{"after":{"address":"77153 Donald Road Apt. 62","city":"amsterdam","credit_card":"7531160744","id":"f27e09d5-d7cd-4f88-8b65-abb910036f45","name":"Lisa Sandoval"}},"topic":"movr-users"} │ 4466147182359256 │ ["amsterdam", "f27e09d5-d7cd-4f88-8b65-abb910036f45"] │ │ │ │ {"key":["new york","46d200c0-6924-4cc7-b3c9-3398997acb84"],"value":{"after":{"address":"92843 Carlos Grove","city":"new york","credit_card":"8822366402","id":"46d200c0-6924-4cc7-b3c9-3398997acb84","name":"Mackenzie Malone"}},"topic":"movr-users"} │ 4466142864542016 │ ["new york", "46d200c0-6924-4cc7-b3c9-3398997acb84"] │ │ │ │ {"key":["boston","52ecbb26-0eab-4e0b-a160-90caa6a7d350"],"value":{"after":{"address":"95044 Eric Corner Suite 33","city":"boston","credit_card":"3982363300","id":"52ecbb26-0eab-4e0b-a160-90caa6a7d350","name":"Brett Porter"}},"topic":"movr-users"} │ 4466152539161631 │ ["boston", "52ecbb26-0eab-4e0b-a160-90caa6a7d350"] │ │ │ │ {"key":["amsterdam","ae147ae1-47ae-4800-8000-000000000022"],"value":{"after":{"address":"88194 Angela Gardens Suite 94","city":"amsterdam","credit_card":"4443538758","id":"ae147ae1-47ae-4800-8000-000000000022","name":"Tyler Dalton"}},"topic":"movr-users"} │ 4466151398997150 │ ["amsterdam", "ae147ae1-47ae-4800-8000-000000000022"] │ │ │ │ {"key":["paris","dc28f5c2-8f5c-4800-8000-00000000002b"],"value":{"after":{"address":"2058 Rodriguez Stream","city":"paris","credit_card":"9584502537","id":"dc28f5c2-8f5c-4800-8000-00000000002b","name":"Tony Ortiz"}},"topic":"movr-users"} │ 4466146372222914 │ ["paris", "dc28f5c2-8f5c-4800-8000-00000000002b"] │ │ │ └──────────────────────────────────────────────────────────────────────────────────────────────────────────────────────────────────────────────────────────────────────────────────────────────────────────────────────────────────────────────────────────────────────┴──────────────────┴─────────────────────────────────────────────────────────┴────────────┴──────────────────┘
Create a changefeed connected to a cloud storage sink
CREATE CHANGEFEED is an Enterprise-only feature. For the Core version, see the CHANGEFEED FOR example.
In this example, you'll set up a changefeed for a single-node cluster that is connected to an AWS S3 sink. The changefeed watches two tables. Note that you can set up changefeeds for any of these cloud storage providers.
If you do not already have one, request a trial Enterprise license.
Use the
cockroach start-single-nodecommand to start a single-node cluster:$ cockroach start-single-node --insecure --listen-addr=localhostAs the
rootuser, open the built-in SQL client:$ cockroach sql --insecureSet your organization name and Enterprise license key that you received via email:
> SET CLUSTER SETTING cluster.organization = '<organization name>';> SET CLUSTER SETTING enterprise.license = '<secret>';Enable the
kv.rangefeed.enabledcluster setting:> SET CLUSTER SETTING kv.rangefeed.enabled = true;Note:If you are working on a CockroachDB Serverless cluster, the
kv.rangefeed.enabledcluster setting is enabled by default.Create a database called
cdc_demo:> CREATE DATABASE cdc_demo;Set the database as the default:
> SET DATABASE = cdc_demo;Create a table and add data:
> CREATE TABLE office_dogs ( id INT PRIMARY KEY, name STRING);> INSERT INTO office_dogs VALUES (1, 'Petee'), (2, 'Carl');> UPDATE office_dogs SET name = 'Petee H' WHERE id = 1;Create another table and add data:
> CREATE TABLE employees ( dog_id INT REFERENCES office_dogs (id), employee_name STRING);> INSERT INTO employees VALUES (1, 'Lauren'), (2, 'Spencer');Start the changefeed:
> CREATE CHANGEFEED FOR TABLE office_dogs, employees INTO 's3://example-bucket-name/test?AWS_ACCESS_KEY_ID=enter_key-here&AWS_SECRET_ACCESS_KEY=enter_key_here' with updated, resolved='10s';job_id +--------------------+ 360645287206223873 (1 row)This will start up the changefeed in the background and return the
job_id. The changefeed writes to AWS.Monitor your changefeed on the DB Console. For more information, see Changefeeds Dashboard.
When you are done, exit the SQL shell (
\q).To stop
cockroach:Get the process ID of the node:
ps -ef | grep cockroach | grep -v grep501 21766 1 0 6:21PM ttys001 0:00.89 cockroach start-single-node --insecure --listen-addr=localhostGracefully shut down the node, specifying its process ID:
kill -TERM 21766initiating graceful shutdown of server server drained and shutdown completed
Create a changefeed connected to an Azure Event Hubs sink
New in v24.1: In this example, you'll set up a changefeed for a single-node cluster that is connected to Azure Event Hubs. The changefeed watches two tables. You'll need access to the Azure Developer Portal, you can sign up for an Azure free account.
If you do not already have one, request a trial Enterprise license.
Use the
cockroach start-single-nodecommand to start a single-node cluster:cockroach start-single-node --insecure --listen-addr=localhostIn this example, you'll run CockroachDB's Movr application workload to set up some data for your changefeed.
In a new terminal, first create the schema for the workload:
cockroach workload init movr "postgresql://root@127.0.0.1:26257?sslmode=disable"Then run the workload:
cockroach workload run movr --duration=1m "postgresql://root@127.0.0.1:26257?sslmode=disable"As the
rootuser, open the built-in SQL client:$ cockroach sql --insecureSet your organization name and Enterprise license key that you received via email:
> SET CLUSTER SETTING cluster.organization = '<organization name>';> SET CLUSTER SETTING enterprise.license = '<secret>';Enable the
kv.rangefeed.enabledcluster setting:> SET CLUSTER SETTING kv.rangefeed.enabled = true;Note:If you are working on a CockroachDB Serverless cluster, the
kv.rangefeed.enabledcluster setting is enabled by default.To prepare the Azure Event Hubs sink, in the Portal, create a resource group.
Once you have a resource group, select Event Hubs in the portal navigation menu and then + Create from the Event Hubs page tool bar to create a namespace. Complete the naming details for the namespace and select the resource group you created in the previous step. For Pricing Tier, ensure that you select Standard or Premium (the Basic tier does not support Apache Kafka workloads). Complete your configuration options, and then create the namespace.
Select Go to resource after the deployment is complete. On the namespace overview page, select + Event Hub in the tool bar to create an event hub within this namespace. An Event Hub is equivalent to a Kafka topic. On the creation page, add a name and the configuration for partitions and message retention.
Note:You can manually create an Event Hub, or Event Hubs will create automatically when you start the changefeed.
To send changefeed messages to your Event Hub, you will need a
shared_access_key. Find Shared access policies in the left-hand navigation. Click + Add and provide a name for the policy as well as confirming the permissions. Once created, click on the policy name and then copy the Primary key — you will need this to create your changefeed.Build the connection string to your Event Hub. You will need the following:
- The
azure-event-hub://URI scheme. - The Host name from your Event Hubs namespace overview page. It will be something like:
{your-event-hubs-namespace}.servicebus.windows.net. - The port
:9093for the Kafka protocol. - The
shared_access_key_nameparameter with the name of your policy. - The
shared_access_keyparameter with your URL-encoded primary key.
'azure-event-hub://{event-hubs-namespace}.servicebus.windows.net:9093?shared_access_key_name={policy-name}&shared_access_key={url-encoded key}'You can include the
topic_nameortopic_prefixparameters to create and name an Event Hub for emitted messages.- The
Create an external connection to store your connection string:
CREATE EXTERNAL CONNECTION eventhub AS 'azure-event-hub://{your-event-hubs-namespace}.servicebus.windows.net:9093?shared_access_key_name={policy-name}&shared_access_key={url-encoded key}';Create the changefeed to your Event Hub:
CREATE CHANGEFEED FOR TABLE movr.rides, movr.users INTO 'external://eventhub';job_id ---------------------- 953466342378274817 (1 row) NOTICE: changefeed will emit to topic rides NOTICE: changefeed will emit to topic usersTo confirm the messages emitted to your Event Hub, navigate to the Event Hub's overview page that contains Requests, Messages, and Throughput counters. View the messages by clicking Process Data in the left-hand navigation menu. Then select the Enable real time insights from events feature box. On the Query page, your messages will load under Input Preview.
Create a changefeed connected to a webhook sink
CREATE CHANGEFEED is an Enterprise-only feature. For the Core version, see the CHANGEFEED FOR example.
In this example, you'll set up a changefeed for a single-node cluster that is connected to a local HTTP server via a webhook. For this example, you'll use an example HTTP server to test out the webhook sink.
If you do not already have one, request a trial Enterprise license.
Use the
cockroach start-single-nodecommand to start a single-node cluster:$ cockroach start-single-node --insecure --listen-addr=localhostIn this example, you'll run CockroachDB's Movr application workload to set up some data for your changefeed.
First create the schema for the workload:
cockroach workload init movr "postgresql://root@127.0.0.1:26257?sslmode=disable"Then run the workload:
cockroach workload run movr --duration=1m "postgresql://root@127.0.0.1:26257?sslmode=disable"As the
rootuser, open the built-in SQL client:$ cockroach sql --insecureSet your organization name and Enterprise license key that you received via email:
> SET CLUSTER SETTING cluster.organization = '<organization name>';> SET CLUSTER SETTING enterprise.license = '<secret>';Enable the
kv.rangefeed.enabledcluster setting:> SET CLUSTER SETTING kv.rangefeed.enabled = true;Note:If you are working on a CockroachDB Serverless cluster, the
kv.rangefeed.enabledcluster setting is enabled by default.In a separate terminal window, set up your HTTP server. Clone the test repository:
git clone https://github.com/cockroachlabs/cdc-webhook-sink-test-server.gitcd cdc-webhook-sink-test-server/go-https-serverNext make the script executable and then run the server (passing a specific port if preferred, otherwise it will default to
:3000):chmod +x ./server.sh./server.sh <port>Back in your SQL shell, run the following statement to create a changefeed that emits to your webhook sink:
CREATE CHANGEFEED FOR TABLE movr.vehicles INTO 'webhook-https://localhost:3000?insecure_tls_skip_verify=true' WITH updated;You set up a changefeed on the
vehiclestable, which emits changefeed messages to the local HTTP server.See the options table for more information on the options available for creating your changefeed to a webhook sink.
      job_id
----------------------
687842491801632769
(1 row)
In the terminal where your HTTP server is running, you'll receive output similar to:
2021/08/24 14:00:21 {"payload":[{"after":{"city":"rome","creation_time":"2019-01-02T03:04:05","current_location":"39141 Travis Curve Suite 87","ext":{"brand":"Schwinn","color":"red"},"id":"d7b18299-c0c4-4304-9ef7-05ae46fd5ee1","dog_owner_id":"5d0c85b5-8866-47cf-a6bc-d032f198e48f","status":"in_use","type":"bike"},"key":["rome","d7b18299-c0c4-4304-9ef7-05ae46fd5ee1"],"topic":"vehicles","updated":"1629813621680097993.0000000000"}],"length":1}
2021/08/24 14:00:22 {"payload":[{"after":{"city":"san francisco","creation_time":"2019-01-02T03:04:05","current_location":"84888 Wallace Wall","ext":{"color":"black"},"id":"020cf7f4-6324-48a0-9f74-6c9010fb1ab4","dog_owner_id":"b74ea421-fcaf-4d80-9dcc-d222d49bdc17","status":"available","type":"scooter"},"key":["san francisco","020cf7f4-6324-48a0-9f74-6c9010fb1ab4"],"topic":"vehicles","updated":"1629813621680097993.0000000000"}],"length":1}
2021/08/24 14:00:22 {"payload":[{"after":{"city":"san francisco","creation_time":"2019-01-02T03:04:05","current_location":"3893 Dunn Fall Apt. 11","ext":{"color":"black"},"id":"21b2ec54-81ad-4af7-a76d-6087b9c7f0f8","dog_owner_id":"8924c3af-ea6e-4e7e-b2c8-2e318f973393","status":"lost","type":"scooter"},"key":["san francisco","21b2ec54-81ad-4af7-a76d-6087b9c7f0f8"],"topic":"vehicles","updated":"1629813621680097993.0000000000"}],"length":1}
For more detail on emitted changefeed messages, see responses.
Core changefeeds stream row-level changes to a client until the underlying SQL connection is closed.
Create a Core changefeed
In this example, you'll set up a core changefeed for a single-node cluster.
In a terminal window, start
cockroach:$ cockroach start-single-node \ --insecure \ --listen-addr=localhost \ --backgroundAs the
rootuser, open the built-in SQL client:$ cockroach sql \ --url="postgresql://root@127.0.0.1:26257?sslmode=disable" \ --format=csvNote:Because core changefeeds return results differently than other SQL statements, they require a dedicated database connection with specific settings around result buffering. In normal operation, CockroachDB improves performance by buffering results server-side before returning them to a client; however, result buffering is automatically turned off for core changefeeds. Core changefeeds also have different cancellation behavior than other queries: they can only be canceled by closing the underlying connection or issuing a
CANCEL QUERYstatement on a separate connection. Combined, these attributes of changefeeds mean that applications should explicitly create dedicated connections to consume changefeed data, instead of using a connection pool as most client drivers do by default.Note:To determine how wide the columns need to be, the default
tabledisplay format incockroach sqlbuffers the results it receives from the server before printing them to the console. When consuming core changefeed data usingcockroach sql, it's important to use a display format likecsvthat does not buffer its results. To set the display format, use the--format=csvflag when starting the built-in SQL client, or set the\set display_format=csvoption once the SQL client is open.Enable the
kv.rangefeed.enabledcluster setting:> SET CLUSTER SETTING kv.rangefeed.enabled = true;Create table
foo:> CREATE TABLE foo (a INT PRIMARY KEY);Insert a row into the table:
> INSERT INTO foo VALUES (0);Start the core changefeed:
> EXPERIMENTAL CHANGEFEED FOR foo;table,key,value foo,[0],"{""after"": {""a"": 0}}"In a new terminal, add another row:
$ cockroach sql --insecure -e "INSERT INTO foo VALUES (1)"Back in the terminal where the core changefeed is streaming, the following output has appeared:
foo,[1],"{""after"": {""a"": 1}}"Note that records may take a couple of seconds to display in the core changefeed.
To stop streaming the changefeed, enter CTRL+C into the terminal where the changefeed is running.
To stop
cockroach:Get the process ID of the node:
ps -ef | grep cockroach | grep -v grep501 21766 1 0 6:21PM ttys001 0:00.89 cockroach start-single-node --insecure --listen-addr=localhostGracefully shut down the node, specifying its process ID:
kill -TERM 21766initiating graceful shutdown of server server drained and shutdown completed
Create a Core changefeed using Avro
In this example, you'll set up a core changefeed for a single-node cluster that emits Avro records. CockroachDB's Avro binary encoding convention uses the Confluent Schema Registry to store Avro schemas.
Use the
cockroach start-single-nodecommand to start a single-node cluster:$ cockroach start-single-node \ --insecure \ --listen-addr=localhost \ --backgroundDownload and extract the Confluent Open Source platform.
Move into the extracted
confluent-<version>directory and start Confluent:$ ./bin/confluent local services startOnly
zookeeper,kafka, andschema-registryare needed. To troubleshoot Confluent, see their docs and the Quick Start Guide.As the
rootuser, open the built-in SQL client:$ cockroach sql --url="postgresql://root@127.0.0.1:26257?sslmode=disable" --format=csvNote:Because core changefeeds return results differently than other SQL statements, they require a dedicated database connection with specific settings around result buffering. In normal operation, CockroachDB improves performance by buffering results server-side before returning them to a client; however, result buffering is automatically turned off for core changefeeds. Core changefeeds also have different cancellation behavior than other queries: they can only be canceled by closing the underlying connection or issuing a
CANCEL QUERYstatement on a separate connection. Combined, these attributes of changefeeds mean that applications should explicitly create dedicated connections to consume changefeed data, instead of using a connection pool as most client drivers do by default.Note:To determine how wide the columns need to be, the default
tabledisplay format incockroach sqlbuffers the results it receives from the server before printing them to the console. When consuming core changefeed data usingcockroach sql, it's important to use a display format likecsvthat does not buffer its results. To set the display format, use the--format=csvflag when starting the built-in SQL client, or set the\set display_format=csvoption once the SQL client is open.Enable the
kv.rangefeed.enabledcluster setting:> SET CLUSTER SETTING kv.rangefeed.enabled = true;Create table
bar:> CREATE TABLE bar (a INT PRIMARY KEY);Insert a row into the table:
> INSERT INTO bar VALUES (0);Start the core changefeed:
> EXPERIMENTAL CHANGEFEED FOR bar WITH format = avro, confluent_schema_registry = 'http://localhost:8081';table,key,value bar,\000\000\000\000\001\002\000,\000\000\000\000\002\002\002\000In a new terminal, add another row:
$ cockroach sql --insecure -e "INSERT INTO bar VALUES (1)"Back in the terminal where the core changefeed is streaming, the output will appear:
bar,\000\000\000\000\001\002\002,\000\000\000\000\002\002\002\002Note that records may take a couple of seconds to display in the core changefeed.
To stop streaming the changefeed, enter CTRL+C into the terminal where the changefeed is running.
To stop
cockroach:Get the process ID of the node:
ps -ef | grep cockroach | grep -v grep501 21766 1 0 6:21PM ttys001 0:00.89 cockroach start-single-node --insecure --listen-addr=localhostGracefully shut down the node, specifying its process ID:
kill -TERM 21766initiating graceful shutdown of server server drained and shutdown completedTo stop Confluent, move into the extracted
confluent-<version>directory and stop Confluent:$ ./bin/confluent local services stopTo terminate all Confluent processes, use:
$ ./bin/confluent local destroy
For further information on Core changefeeds, see EXPERIMENTAL CHANGEFEED FOR.
See also
Was this helpful?